ı
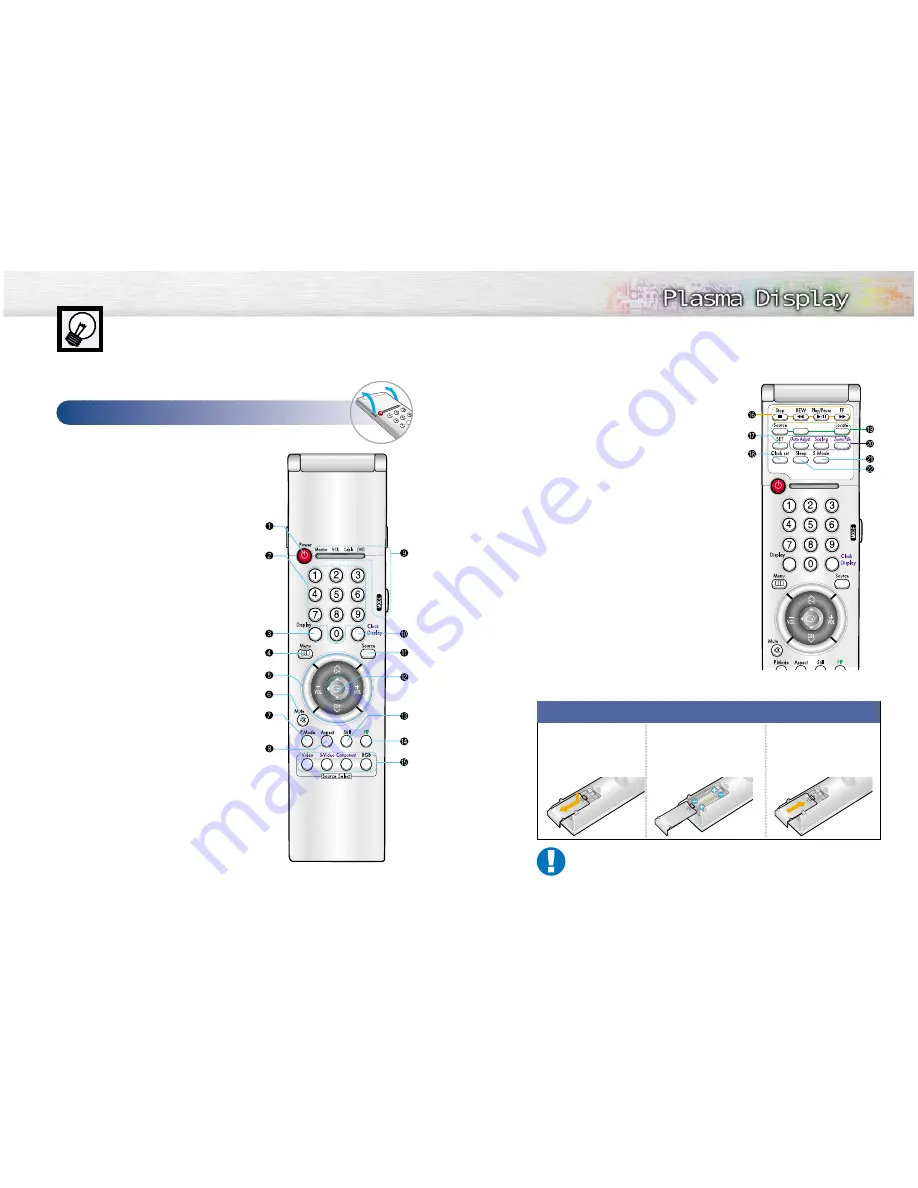
VCR control buttons
Controls VCR tape functions: Stop, Rewind,
Play/Pause, Fast Forward.
˜
SET button
Used during setup of this remote control, so that it will
work compatibly with other devices (VCR, cable box,
DVD, etc.)
¯
Clock set button
Press to set clock.
˘
PIP control buttons
Source : Press to select one of the available signal
sources for the PIP window.
S.Sel :
Press to select the Audio (PIP or Main).
Locate : Press to move the PIP window on the screen.
¿
PC control buttons
Auto Adjust
Scaling
Zoom/Pan
¸
S.Mode button
Adjust the PDP sound by selecting one of the preset
factory settings (or select your personal, customized
sound settings.)
˛
Sleep button
Press to select a preset time interval for automatic
shutoff.
S.Sel
13
Remote Control Buttons
Œ
Power button
Turns the PDP on and off.
´
Number buttons
ˇ
Display button
Press to display information on the PDP screen.
¨
Menu button
Displays the main on-screen menu.
ˆ
CH (Channel) and VOL (Volume) buttons
Channel and Volume buttons are used for selecting
menu items in the menu mode.
Ø
Mute button
Press to mute the PDP sound.
∏
P.Mode button
Adjust the PDP picture by selecting one of the preset
factory settings (or select your personal, customized
picture settings.)
”
Aspect button
Press to change the screen size.
’
Mode button
Selects a target device to be controlled by the AKAI
remote control (ie., VCR, Cable, or DVD players).
˝
Clock Display button
Press to display clock on the PDP screen.
Ô
Source button
Press to display all of the available video sources
(ie., Video, S-Video, Component1, Component2,
PC(RGB)).
Joystick button
Use to highlight on-screen menu items and change
menu values.
Ò
Still button
Press to pause the current screen.
Ú
PIP button
Activates picture in picture.
Æ
Source selection buttons
Press to directly select Video, S-Video, Component1,
Component2 or PC(RGB).
12
Remote Control
Flip the cover open
in the arrow direction.
Installing the Batteries in Your Remote Control
1
Slide the back cover
to open the battery
compartment of the
remote control
3
Slide the cover back into
place.
2
Install two AAA size batter-
ies. Make sure to match the
“+” and “-” ends of the bat-
teries with the diagram
inside the compartment.
Remote Control Operation Range.
You can use your remote control within a distance of 23 feet and an angle of 30 degrees
from the left and right sides of the remote control receiver of the monitor.


