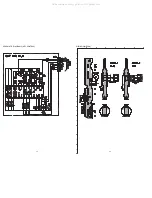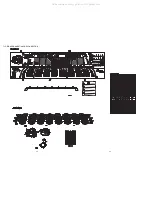
FRONT C.B
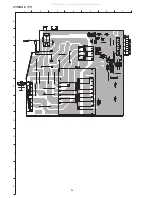
IC101
L101
MAIN C.B
SFR352
TP8 (LCH)
TP9 (RCH)
14
SFR351
IC601
13
SFR1
DECK–1 P, DECK-2 R/P/E HEAD
11
10
DECK C.B
15
SFR304
SFR303
SFR
305
SFR
306
SFR
301
SFR
302
IC301
TP
(GND)
TP1
TP
(GND)
16
38
37
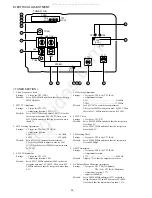
< DECK SECTION >
10. Tape Speed Adjustment (DECK1, DECK2)
Settings:
• Test tape: TTA-100
• Test point: TP8 (Lch), TP9 (Rch)
• Adjustment location: SFR1
Method:
Play back the test tape and adjust SFR1 so that the
frequency counter reads 3000Hz±5Hz and ±45Hz
(REV) with respect to forward speed.
11. Head Azimuth Adjustment (DECK1, DECK2)
Settings:
• Test tape: TTA-300
• Test point: TP8 (Lch), TP9 (Rch)
• Adjustment location: Head azimuth
adjustment screw
Method:
Play back (FWD) the 10kHz signal of the test tape
and adjust screw so that the output becomes
maximum. Next, perform on REV PLAY mode.
12. PB Frequency Response Check (DECK1, DECK2)
Settings:
• Test tape: TTA-300
• Test point: TP8 (Lch), TP9 (Rch)
Method:
Play back the 315Hz and 10kHz signals of the test
tape and check that the output ratio of the 10kHz
signal with respect to that of the 315Hz signal is
within 2.0dB.
13. PB Sensitivity Adjustment (DECK1, DECK2)
Settings:
• Test tape: TTA-200
• Test point: TP8 (Lch), TP9 (Rch)
• Adjustment location: SFR301 (Lch DECK1)
SFR302 (Rch DECK1)
SFR303 (Lch DECK2)
SFR304 (Rch DECK2)
Method:
Play back the test tape and adjust SFR’s so that the
output level of the test point is 250-260mV
(DECK1), 245±10mV (DECK2).
14. REC/PB Frequency Response Adjustment
Settings:
• Test tape: TTA-602
• Test point: TP8 (Lch), TP9 (Rch)
• Input signal: 1kHz/10kHz (LINE IN)
• Adjustment location: SFR351 (Lch)
SFR352 (Rch)
Method:
Apply a 1kHz signal and REC mode. Then adjust
OSC attenuator so that the output level at the TP8,
TP9 becomes 0dB (17mV). Record and play back
the 1kHz and 10kHz signals and adjust SFRs so
that the output of the 10kHz signals becomes
0dB±0.5dB with respect to that of the 1kHz signal.
15. REC/PB Sensitivity Adjustment
Settings:
• Test tape: TTA-602
• Test point: TP8 (Lch), TP9 (Rch)
• Adjustment location: SFR305 (Lch)
SFR306 (Rch)
• Input signal: 1kHz (LINE IN)
Method:
Apply a 1kHz signal and REC mode. Then adjust
OSC attenuator so that the output level at TP8, TP9
becomes 0dB (17mV). Record and play back the
1kHz signals and check that the output is
0dB±0.5dB.
< FRONT SECTION >
16. Clock Adjustment
Settings:
• Test point: TP1
• Adjustment location: L101
Method:
Insert AC plug with pressing TUNER function key.
Adjust L101 so that the frequency across the test
point is 208.82Hz±0.2Hz or 4.7888ms±0.005ms.
PRACTICAL SERVICE FIGURE
< TUNER SECTION >
< FM SECTION >
IHF Sensitivity:
Less than 10/9/9dBµV
(THD 3%)
[at 87.5/98.0/108.0MHz]
S/N 50dB Quieting sensitivity:
Less than 35dBµV
[at 98.0MHz]
Signal to noise ratio:
Mono: More than 68dB
Stereo: More than 62dB
[at 98.0MHz]
Distortion:
Mono: Less than 1.2%
Stereo: Less than 2.0%
[at 98.0MHz]
Auto stop level:
25dBµV±10dB
[at 98.0MHz]
Stereo separation:
More than 22dB
[at 98.0MHz]
Intermediate frequency:
10.7MHz
< MW SECTION >
Sensitivity:
Less than 60/58/58dBµV
[at 603/999/1404kHz]
Signal to noise ratio:
More than 36dB
[at 999kHz]
Distortion:
Less than 1.5%
[at 999kHz]
Auto stop level:
52dBµV +10/-15dB
[at 999kHz]
Intermediate frequency:
450kHz
< SW SECTION >
Sensitivity:
Less than 51/45/44dBµV
[at 5.9/12.0/17.9MHz]
Overload signal distortion:
Less than 10%
< DECK SECTION >
Tape speed:
3000Hz±45Hz
Wow & flutter:
Less than 0.15%
(W.R.M.S)
Take-up torque:
30~55g-cm
(FWD, REV)
F.F & REW torque:
75~160g-cm
Back tension:
2~7g-cm
(FWD, REV)
PB output level:
225mV±1dB
REC/PB output level:
0dB±1.0dB
(0VU, NORM, CrO2)
Distortion (REC/PB):
Less than 2.0%
(0VU, NORM, CrO2)
Noise level (PB):
Less than 2.0mV
(NORM, FILTER DIN AUDIO)
Noise level (REC/PB):
Less than 3.0mV
(NORM, FILTER DIN AUDIO)
Erasing ratio:
More than 60dB
(at 125Hz, +10VU, CrO2)
Test tape:
TTA-602 (NORMAL)
TTA-615 (CrO2)
All manuals and user guides at all-guides.com
Summary of Contents for NSX-L980
Page 12: ...14 13 BLOCK DIAGRAM 1 MAIN All manuals and user guides at all guides com ...
Page 13: ...15 BLOCK DIAGRAM 2 TUNER All manuals and user guides at all guides com ...
Page 15: ...17 SCHEMATIC DIAGRAM 1 TUNER 18 All manuals and user guides at all guides com ...
Page 17: ...21 SCHEMATIC DIAGRAM 2 DECK 22 All manuals and user guides at all guides com ...
Page 19: ...25 SCHEMATIC DIAGRAM 4 MAIN 26 All manuals and user guides at all guides com ...
Page 20: ...27 SCHEMATIC DIAGRAM 5 FRONT 28 S19 All manuals and user guides at all guides com ...
Page 22: ...31 SCHEMATIC DIAGRAM 6 AMP 32 All manuals and user guides at all guides com ...
Page 25: ...35 SCHEMATIC DIAGRAM 7 PT All manuals and user guides at all guides com ...
Page 28: ...40 39 FL GRID ASSIGNMENT ANODE CONNECTION All manuals and user guides at all guides com ...
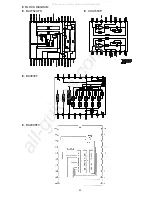
Page 32: ...44 IC M62449FP IC M65847AFP All manuals and user guides at all guides com ...
Page 33: ...45 IC LA1837NL IC LC72131D All manuals and user guides at all guides com ...


