background image

4. Operation


4

-

4.3.2  Check Coolant Level 


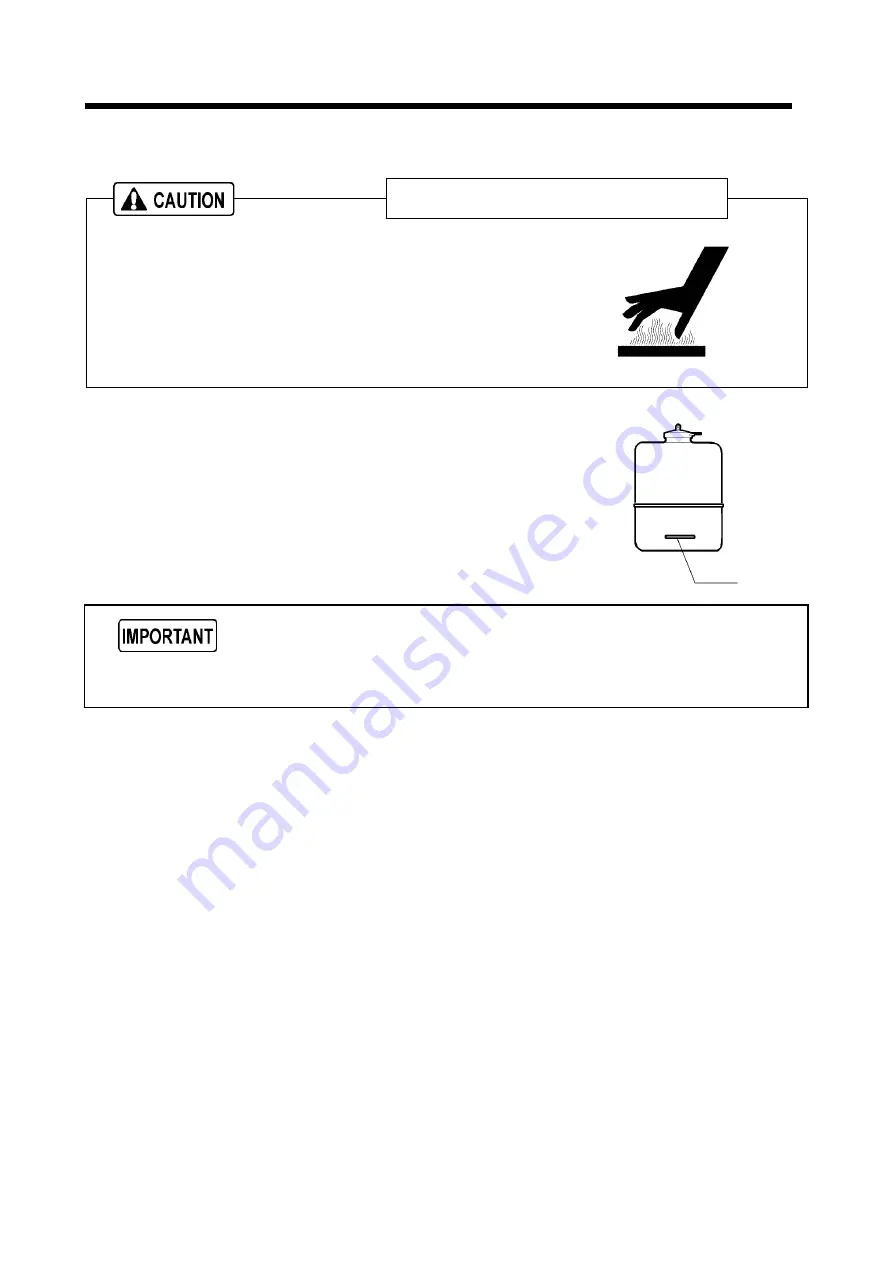
Taking off the Header tank radiator cap 


Be sure to stop the machine and allow time to cool. Then loosen 
the radiator cap one notch. After the coolant water is sufficiently 
cooled and the inner pressure is released, take the cap off. 
If this procedure is neglected, the inner pressure can blow off 
the cap. Steam jetting out of the radiator could result in causing 
scalding. Follow this procedure under all circumstances. 


W005     


Check the coolant level in the reserve tank. If it is lower than 
the limit, open the cap and replenish the coolant. (Level must 
be kept above LOW mark.)


If little coolant is left in the reserve tank, replenish the 
radiator with cooling water. (See 5.6.12)


Do not continue operation at low coolant level. Air bubble is mixed into radiator, and it causes 

damage to the radiator. 


A030173


LOW 

Discount-Equipment.com

Summary of Contents for PDS400S-6B1

Page 1: ...INSTRUCTIONAL MANUAL AIR COMPRESSOR PDS400S 6B1 www discount equipment com D i s c o u n t E q u i p m e n t c o m...

Page 2: ...ie Terex JLG MultiQuip Mayco Toro Stone Diamond Products Magnum Airman Mustang Power Blanket Nifty Lift Atlas Copco Chicago Pneumatic Allmand Brothers Essick Miller Spreader Skyjack Lull Skytrak Tsuru...

Page 3: ...rious injury or death For details of handling maintenance and safety of the engine see the Engine Operation Manual Keep the manual available at all times for the operator or safety supervisor If the m...

Page 4: ...it 4 2 4 4 Unit Operation 4 7 4 5 Stopping Procedures 4 11 5 Periodic Inspection Maintenance 5 1 5 1 Important items as Periodic and Maintenance or after Maintenance 5 1 5 2 Daily Inspection and keepi...

Page 5: ...n which if not avoided will result in death or serious injury This signal word is to be limited to the most extreme situations WARNING indicates a potentially hazardous situation which if not avoided...

Page 6: ...from the engine is poisonous and could cause death when inhaled Avoid using the machine in an insufficiently ventilated building or tunnel PC002 Air pressurized construction method prohibited Never us...

Page 7: ...ured In order to use it safely please read the handling of the work tools often used Safety outfit When handling machine do not wear loose clothes clothes with unbuttoned sleeves hanging tie or scarf...

Page 8: ...ety TR0085 Safety fittings Have first aid boxes and fire extinguishers near the unit ready for emergency situations such as injuries and a fire It is advisable to have a list of phone numbers of docto...

Page 9: ...nd plug Engine oil drain valve Oil cooler drain valve Never blow compressed air directly at people Scattered impurities dust or foreign objects in the compressed air may cause skin and eyes to be seri...

Page 10: ...receiver tank and discharging pipe are especially hot so never touch those parts because it could cause serious burns Compressor oil coolant water and engine oil are also very hot and dangerous to tou...

Page 11: ...art such a job as repair and maintenance Residual air under pressure will blow off and severely injure operator W010 Refilling of compressor oil When you refill the separator receiver tank with compre...

Page 12: ...ng fan If the cooling fan is rotating it may catch the operator or part of his body into the fan and it could cause a serious injury W009 Cleaning by air blow When cleaning dust accumulated in such de...

Page 13: ...r just after the operation Hot oil could blow out of the tank and can cause scalding Fear of fire Be sure to perform the periodical check of compressor oil and oil separator Neglecting checks could ca...

Page 14: ...D i s c o u n t E q u i p m e n t c o m...

Page 15: ...11 The pasting position of safe warning label is as follows 2 4 9 7 5 3 1 8 6 A040036 10 6 Engine part attachment position Separator receiver tank Part attachment position D i s c o u n t E q u i p m...

Page 16: ...art Names 2 1 2 1 Unit Appearance and Part Names 1 Lifting bail 2 Exhaust outlet 3 Drawbar 4 Door 5 Handle 6 Service valve 7 Instrument panel 4 7 3 2 1 5 6 A040037 D i s c o u n t E q u i p m e n t c...

Page 17: ...rve tank 15 Fuel air bleeding electromagnetic pump 16 Radiator 17 Oil cooler 18 Exhaust muffler 19 Oil cooler drain valve 20 Engine oil drain valve 21 Coolant drain plug radiator 22 Engine oil filter...

Page 18: ...use correct tow hitch Check operation of lights and brakes before towing Check wheel lug nuts for proper torque Lifting up Before lifting the unit up make sure to check the lifting bail for any crack...

Page 19: ...warning and cautions Unsafe operation could cause serious injury or death to the personnel After making sure that there is not any behind the tractor move the unit back So that it can be connected by...

Page 20: ...n 15 degrees Be sure to put one set of chocks 1 to the wheels The machine should be operated in following conditions Ambient temperature F to 104 F 15 C to 40 C Humidity Less than 90 Altitude Lower th...

Page 21: ...when coolant temperature reaches 221 F 105 See Troubleshooting 16 Discharge air temperature Lamp goes on when the air temperature at the outlet of the air end reaches the set temperature of 248 F 120...

Page 22: ...ck and without noticing its abnormality such operation could cause seizure of components or may even cause fire 4 3 1 Check Engine Oil Level Unit should be on level before checking oil level When you...

Page 23: ...cap Steam jetting out of the radiator could result in causing scalding Follow this procedure under all circumstances W005 Check the coolant level in the reserve tank If it is lower than the limit open...

Page 24: ...han the middle level replenish oil See 5 6 5 4 3 4 Drain Separator Receiver Tank Draining of Separator receiver tank After stopping the engine confirm that the pressure gauge indicates 0MPa and there...

Page 25: ...l Refuel only after stopping the engine and never leave an open fuel can near the machine Do not spill It could cause a fire When it is spilt wipe it up completely Refilling fuel tank should be done i...

Page 26: ...rnator until the play of the belt reaches 0 3 to 0 5in 22 lbf 98N when pushed by fingers and adjust it Be careful not to leave any grease or LLC on a belt while changing it If any such material is lef...

Page 27: ...re to mount a silencer to reduce noise and wear protective materials such as earplugs to prevent damage to hearing D003 Turn the starter switch to the RUN position and the preheating will be completed...

Page 28: ...D i s c o u n t E q u i p m e n t c o m...

Page 29: ...ystem automatically Air bleeding will be completed about 20 to 30 seconds Start the machine following the starting procedures mentioned in 4 4 1 If starting fails one time repeat the abovementioned pr...

Page 30: ...k water leak or fuel leak etc During normal operation each indication of instruments is shown in the table below Refer to the table for daily checks The above table gives standard values They may vary...

Page 31: ...engine Remove the key from the compressor every time when you stop the engine Keep the key and be careful not to lose it Unless all the service valves are fully closed upon stopping operation the com...

Page 32: ...keshift or improper tools could cause unexpectedly injury by their slippage SY001 For protecting oil separator from fire accident Be sure to perform oil change basically according to the specified int...

Page 33: ...nual ask your nearest dealer for information a Controls and instruments function properly b Quantity and any leak of water fuel and oil or any contamination should be checked c Appearance abnormal noi...

Page 34: ...12 000 Page Check compressor oil level 4 4 Drain separator receiver tank 4 4 Check looseness in pipe connecting part and wear and tear of pipe 4 6 Check oil water fuel and air leak 4 10 Check perform...

Page 35: ...engine feed pump 5 12 Change coolant 5 10 Clean outside of radiator 5 9 Check rubber hose 5 12 Clean inside of radiator Clean inside of fuel tank Change radiator hoses Engine Change wiring harness 5 5...

Page 36: ...l consumption of the engine as well as wear of the moving parts Choose appropriate oil based upon the table below according to the outside air temperature Relation between viscosity SAE and temperatur...

Page 37: ...D i s c o u n t E q u i p m e n t c o m...

Page 38: ...nce and shorten the life of the compressor oil But fresh compressor oil could accept a mixture of small amount of different brands Running the unit with old and deteriorated compressor oil will cause...

Page 39: ...time turn using filter wrench After installing oil filter be sure to check for oil leak during the operation 5 6 7 Clean Strainer in the Scavenging Orifice Wash the strainer 1 with diesel fuel and blo...

Page 40: ...D i s c o u n t E q u i p m e n t c o m...

Page 41: ...e inside and seal it up then keep it in a place away from children Beware of flames Follow the designated regulations to dispose of LLC Antifreeze Quality of coolant and antifreeze Use soft water of g...

Page 42: ...ler spring pin Supply grease through grease nipples positioned at the bottom Grease Chassis grease 5 6 15 Change Oil Separator If even before scheduled interval of 2 000 hours operation consumption of...

Page 43: ...D i s c o u n t E q u i p m e n t c o m...

Page 44: ...wer level will cause deterioration of such parts as pole plates etc and also it may cause explosion as well as reduction of battery life Add distilled water so that the liquid level may reach the midd...

Page 45: ...D i s c o u n t E q u i p m e n t c o m...

Page 46: ...r orifice clogging 3 Faulty speed regulator 4 Engine trouble 5 Fuel filter clogging Re adjust Disassemble Clean Disassemble Check Call your nearest dealer Disassemble Change Revolution drops before di...

Page 47: ...ooler clogging 2 Oil filter clogging 3 Faulty discharged air temp switch 4 Loose wiring connectors and disconnection 5 Slippage of fan belt 6 Shortage of compressor oil 7 Malfunction of by pass valve...

Page 48: ...e engine oil pan Pour new lubricant in the engine to clean its inside After running it for a while drain it again Spread lubricant on moving parts like speed regulator and rod end beforehand Completel...

Page 49: ...by compressed pressure Fuel tank capacity gal L 43 6 165 Driving system Direct driving with rubber coupling Receiver tank capacity cu in m3 5 980 0 098 Compressor Lubrication oil capacity gal L 13 5 5...

Page 50: ...D i s c o u n t E q u i p m e n t c o m...

Page 51: ...10 Piping Diagram 10 1 A040051 D i s c o u n t E q u i p m e n t c o m...

Page 52: ...www discount equipment com D i s c o u n t E q u i p m e n t c o m...

Reviews: