Airlink101 AP431W User Manual Download Page 36

36 

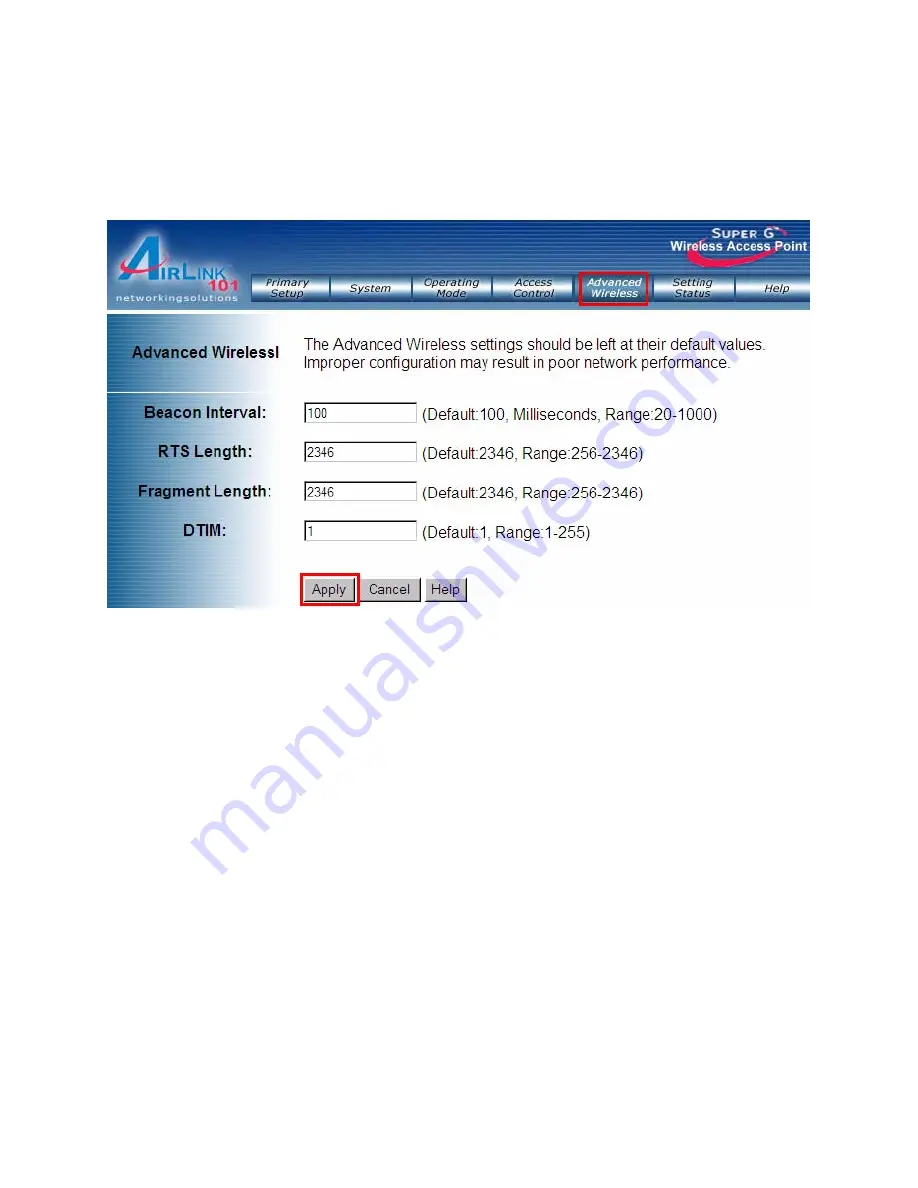
7.5 Advanced Wireless 

 
The Advanced Wireless page allows you to customize data transmission settings. In 
most cases, the advanced settings on this page should remain at their default values. 


Beacon Interval:

 The default value is 

100

. Enter a value between 20 and 1000 

milliseconds. The Beacon Interval value indicates the frequency interval of the beacon. 
A beacon is a packet broadcast by the Access Point to synchronize the wireless 
network. 

RTS Threshold:

 This value should remain at its default setting of 

2346

. The range is 

256-2346 bytes. 


Should you encounter inconsistent data flow, only minor modifications are 
recommended. If a network packet is smaller than the preset RTS threshold size, the 
RTS/CTS mechanism will not be enabled. The Access Point sends Request to Send 
(RTS) frames to a particular receiving station and negotiates the sending of a data 
frame. After receiving an RTS, the wireless station responds with a Clear to Send (CTS) 
frame to acknowledge the right to begin transmission.


Fragmentation Length:

 This value should remain at its default setting of 

2346

. The 

range is 256-2346 bytes. It specifies the maximum size for a packet before data is 
fragmented into multiple packets. A smaller setting means smaller packets, which will 
create more packets for each transmission. Setting the Fragmentation Threshold too 
small may result in poor network performance. Only minor modifications of this value 
are recommended.


Summary of Contents for AP431W

Page 1: ...Super G Multi Functional Wireless Access Point Model AP431W User s Manual Ver 2A...

Page 2: ...k Address 7 5 Using Web Configuration Utility 14 6 Connecting to the Access Point 19 7 Web Configuration Utility 20 7 1 Primary Setup 20 7 2 System 27 7 3 Operating Mode 29 7 4 Access Control 34 7 5 A...

Page 3: ...nto a virtual LAN while allowing wireless clients to connect with the device The Access Point is compatible with existing 802 11b and 802 11g network devices so it will work with most existing wireles...

Page 4: ...cess Point with minimal configuration just connect it to your existing router or switch with a Cat 5 network cable and then power it on The Access Point is ready to use with its default settings SSID...

Page 5: ...the router See the diagram below Step 2 Power on the Access Point by connecting one end of the supplied power adapter to the power jack of the Access Point and connecting the other end to an electrica...

Page 6: ...s router or AP 1 SSID Network Name 2 Channel Number 3 Wireless Security Settings The AP431W needs to use the same wireless settings in order for it to work properly You may gather this information fro...

Page 7: ...computer s IP Address to access the Access Point s Web Configuration Utility and then to change the Access Point s IP Address to match your existing Network Address Step 1 Go to Start Settings Control...

Page 8: ...8 Step 3 Right click on Local Area Connection and select Properties Step 4 Select Internet Protocol TCP IP and click on Properties...

Page 9: ...9 Step 5 Select Use the following IP address and enter the following IP Address 192 168 1 101 Subnet Mask 255 255 255 0 Click OK when done Step 6 Click Close...

Page 10: ...10 Step 7 Open your web browser Internet Explorer or Netscape and enter 192 168 1 250 in the Address Bar and press Enter Step 8 Enter admin for both the User name and Password and click OK...

Page 11: ...ss to match your local network address For example If your computer s IP Address is 192 168 2 100 change the first three numbers to 192 168 2 as well but leave the last number 250 alone Step 10 Enter...

Page 12: ...12 Step 12 Return to Internet Protocol TCP IP Properties and select Obtain an IP address automatically and Obtain DNS server address automatically and click OK Step 13 Click Close...

Page 13: ...nd press Enter You should see all 0 s as shown below Step 15 Type ipconfig renew and press Enter You should receive a valid IP address as shown below Step 16 Type ping 192 168 2 250 and press Enter Yo...

Page 14: ...Point s wireless and security settings Step 1 Open your Web Browser Internet Explorer or Netscape enter the IP Address of the Access Point default 192 168 1 250 in the address bar and press Enter Not...

Page 15: ...mber Step 4 You may enable encryption authentication for your wireless network for security purpose or to match the encryption settings of your existing Access Point Select an encryption mode from the...

Page 16: ...reless network Open System and disabling encryption implies no encryption Open System and enabling encryption implies WEP open system mode Shared Key and enabling encryption implies WEP shared key mod...

Page 17: ...lect the same Key Type and Key Size 64 Bits 128 Bits 152 Bits from the drop down menus as the WEP settings in your wireless network Step 4c Enter the same key password of your wireless network in the...

Page 18: ...18 WPA EAP Step 4d If your network uses a Radius Server select WPA EAP from the drop down menu and enter all the applicable fields Click Apply and proceed to...

Page 19: ...Connecting to the Access Point Once you have properly configured the Access Point your wireless computers should be able to detect its signal Use your wireless network adapter s utility to detect and...

Page 20: ...ary Setup Step 1 Open your Web Browser Internet Explorer or Netscape enter the default IP Address of the Access Point 192 168 1 250 in the Address Bar and press Enter Note If you have changed the IP A...

Page 21: ...21 You can configure its IP Address and Wireless settings from this page...

Page 22: ...P server then select Dynamic DHCP If you will assign the Access Point a static IP address then select Static Manual and enter an IP Address Subnet Mask and Default Gateway address in the corresponding...

Page 23: ...s in your wireless network must use the same channel in order to function correctly Enable Auto Channel Scan allows the Access Point to automatically scan for a clear channel Note If you enable Auto C...

Page 24: ...etween 64 bit 128 bit and 152 bit encryption Valid Key Select a key to be the active key Key 1 4 Manually assign a passphrase for each key If you selected HEX and 64 bits encryption enter 10 HEX chara...

Page 25: ...Select the WPA Algorithm AUTO AES or TKIP that your network uses Group Key Update Interval Enter the key renewal time in seconds Default is 1800 seconds RADIUS Server Enter the IP Address of your RAD...

Page 26: ...oose between WPA PSK Cipher Type Select the WPA Algorithm AUTO AES or TKIP that your network uses Group Key Update Interval Enter the desired key renewal time in seconds Default is 1800 seconds PassPh...

Page 27: ...s is the password used for logging into the Access Point s Web Configuration Utility Restore Factory Defaults Select Yes and click Apply to reset all of the settings to factory default Backup Restore...

Page 28: ...updated firmware from our web site at www airlink101 com Step 1 Unzip the new firmware Step 2 Click on Browse to locate the new firmware and click on Firmware Upgrade to change the AP firmware Warning...

Page 29: ...de AP Client The AP Client mode converts the Access Point to a wireless network adapter allowing the network device such as your computer or game console to become a wireless client Step 1 Select AP C...

Page 30: ...reboot the Access Point AP Repeater The AP Repeater mode converts the Access Point to a wireless repeater By extending the wireless signal of the source AP wireless router the wireless coverage is exp...

Page 31: ...en the wireless router and your wireless computers Note The repeater mode may not be compatible with all routers due to the lack of a standard protocol for repeater mode WDS Bridge The WDS mode conver...

Page 32: ...work This mode will not work if you try to use them with any other brand of access point Step 1 Select WDS and enter the MAC address of the remote APs Click Apply to save the changes Step 2 Configure...

Page 33: ...wireless clients to connect to the network via the Access Point You will need to use ap431w access points throughout your network This mode will not work if you try to use them with any other brand of...

Page 34: ...ess Control The Access Control page allows you to control which PCs may or may not communicate with the Access Point depending on their MAC address Select Accept from the drop down menu to enable Acce...

Page 35: ...MAC address Click Apply to save the changes If you want to block specific PCs from communicating with the Access Point set Access Control to Reject Enter a MAC Address then click the Save button to c...

Page 36: ...recommended If a network packet is smaller than the preset RTS threshold size the RTS CTS mechanism will not be enabled The Access Point sends Request to Send RTS frames to a particular receiving sta...

Page 37: ...countdown field informing clients of the next window for listening to broadcast and multicast messages When the Access Point has buffered broadcast or multicast messages for associated clients it send...

Page 38: ...38 7 6 Setting Status The Setting Status page displays the Access Point s current status and configuration All information is read only...

Page 39: ...39 7 7 Help The Help page provides links to online help files regarding each page of the Web Configuration Utility...

Page 40: ...te the receiving antenna Increase the separation between the equipment and receiver Connect the equipment into an outlet on a circuit different from thatto which the receiver is connected Consult the...

Page 41: ...ximum gain of 2dBi Antenna having a higher gain is strictly prohibited per regulations of Industry Canada The required antenna impedance is 50 ohms To reduce potential radio interference to other user...

Page 42: ...uction mix of wireless products used radio frequency interference e g cordless telephones and microwaves as well as network overhead lower actual data throughput rate Copyright 2007 AirLink101 All rig...

Reviews: