AIR TENT.
1
IMPORTANT! CHECK SETUP AND PREPARATION FOR USE OF YOUR AIR TENT
BEFORE GOING AWAY. ENSURE YOU ARE FAMILIAR WITH ALL ASPECTS OF THE
PRODUCT AND HAVE READ THE INSTRUCTIONS FULLY.
PARTS LIST FOR AIR TENT
1.
AIR Tent Canvas x 1 (fitted to your OPUS
®
Camper)
2.
Inner Tents x 2
3.
Peg and ladder bands x 16
4.
Repair kit x 1
5.
Roof Cover
ASSEMBLY
Try to choose a site that is relatively flat. Avoid sites where the land may flood or where water will
run down. DO NOT pitch directly under trees. Pitching near a hedge or wall may provide shelter
against wind. AVOID areas with heavy pollution and where crop spraying may be in progress.
1.
Refer to Owner’s Handbook for all prior steps to tent inflation. Page 9.
2.
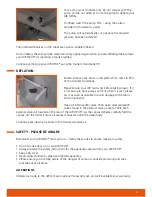
Open the AIR OPUS
®
trailer door and locate the pump switch within the electrics panel.
3.
Remove inflation valve screw cap and fit the hose into the inflation valve.
4.
Ensure the 12v system is turned on.
5.
Ensure all the external AIR valves are closed to allow for inflation and ensure all internal valves are open.
6.
Press the pump switch to begin inflation.
7.
Secure the tent canvas over the bed ends as the AIR tent inflates.
8.
Once fully inflated to the correct pressure the pump will automatically cut out.
9.
Disconnect pump hose from inflation valve and fit inflation valve screw cap to prevent any loss of
tent pressure.
10.
Close all internal valves (keep valves closed whilst product is in use).
11.
Attach roof lining to internal fixings if required. The roof lining is clipped into place along the
roof of the tent, it attaches in a similar way to the inner bed tents. It provides a lining that is
designed to keep the warmth in during the winter, and the heat out in the summer. It is an optional
installation and blocks out the ceiling windows.
12.
Attach inner bed tents to internal fixings at both bed ends.
13.
(If applicable) Install LED lighting into zipped PVC pockets on AIR tent roof beam, route cabling
through AIR pole sleeving down to socket and connect. Once installed the LED lighting can stay
fitted permanently, but it must be disconnected from the socket before pack down.
14.
Continue from Page 13 of the Owner’s Handbook for all remaining setup steps.
PACK DOWN
Please ensure canvas is dry before packing down.
1.
Refer to Owner’s Handbook for all prior pack down steps. Page 24.
2.
Ensure the inflation hose has been disconnected from the inflation valve, this will prevent the
valve from getting damaged during pack down.
3.
Ensure all inner bed tents are fully unzipped, this will prevent damage during pack down.
4.
Open all internal valves.
Summary of Contents for OFC195B-102
Page 2: ......


