background image

MN-745

6

GETTING STARTED

1.  Raise the vehicle up with a hoist or jack up the rear with a jack. Place Jack stands under 

the axle and lower the vehicle down if using a frame contact hoist (so vehicle is at curb 

height). 

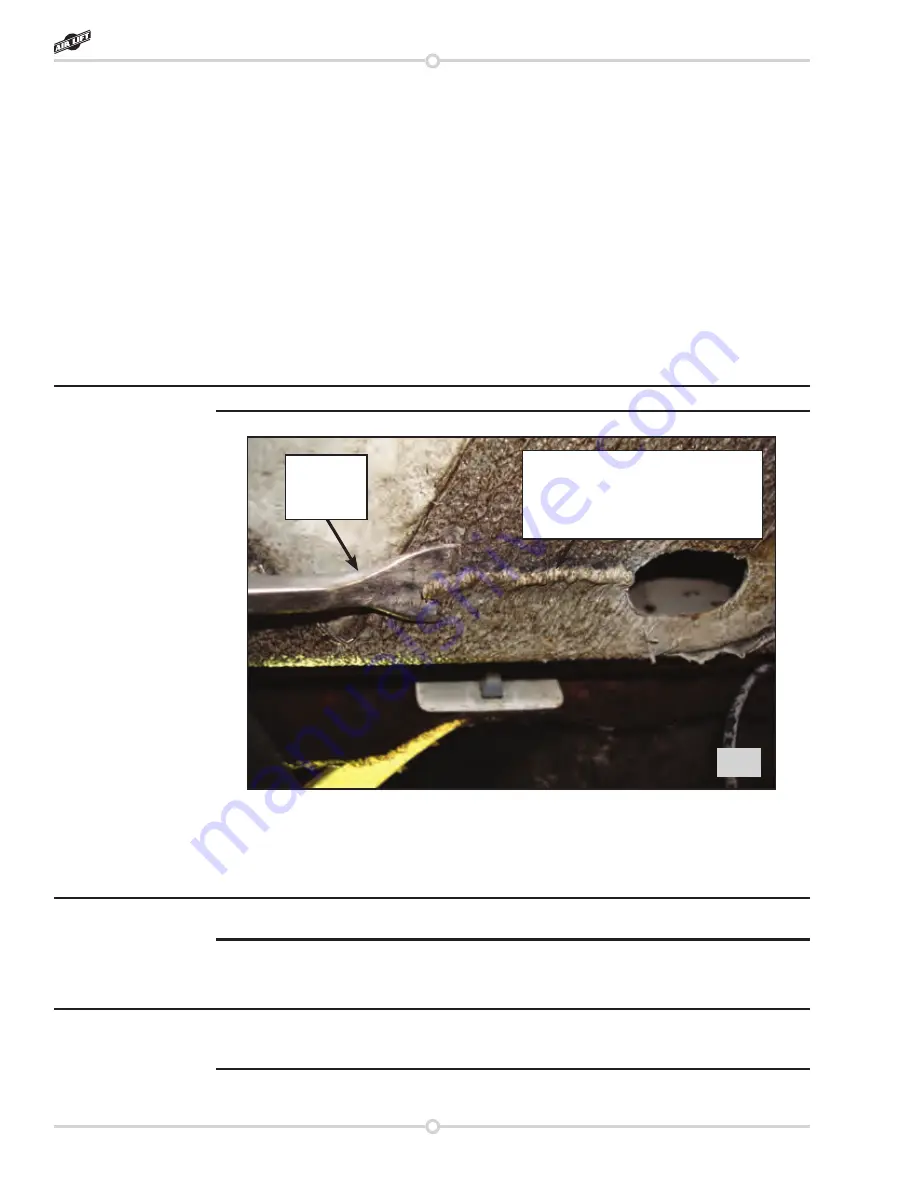
2.  The air spring assembly fits forward of the axle. On some models there is a thick coat 

of a body filler type substance that will need to be removed where the upper bracket 

contacts the frame (fig. 6). Set the left and right hand assembly in place on the axle, 

make sure the “finger” of the lower bracket is over the leaf spring U-bolt. Align the spring 

so it is perpendicular to both upper and lower brackets. Mark the frame in the area that 
the upper bracket makes contact with the frame and remove both assemblies. This is 

the area that you will need to remove the “body filler” material so that the bracket fits flat 

to the frame. Use a gasket scraper or a chisel to remove the material. 

I use an air chisel with light pressure to remove the material. 

3.  Set the assemblies back in place forward of the axle with the holes in the upper bracket 

pointing inboard.

4.  With the finger of the lower bracket over the stock U-bolt, attach it to the leaf spring with 

the U-bolt (H), clamp bar (G), flat washers (K) and nyloc nuts (J) (fig. 7). 

Offset the lower bracket to the inside of the vehicle on the leaf spring before tightening 

hardware. Torque to 16ftlbs and repeat for the opposite side.

5.  With the lower bracket attached to the leaf spring, align the upper bracket on the frame 

so that the air spring is perpendicular to both the upper and lower bracket (fig. 8). Keep 

the bracket centered on the frame, between the outside and inside while positioning.

It may be helpful to have slight pressure in the air spring for aligning and attaching the upper 

bracket to the frame. Cut the air line (L) in two equal lengths (see hose attaching instructions) 

and insert the air line into the air spring fittings. Inflate the springs to 5psi (or less).

6.  Using the upper bracket as a template, drill two ¼” holes through the bottom of the frame 

(fig. 8). 

Installing the RideControl System

fig. 6

Bead of “body filler” type substance 

that will need to be removed so 

that the upper bracket will fit flush 

to the frame

Scrapper 
removing 
bead

NOTE

NOTE

NOTE

RideControl

Summary of Contents for RideControl 59569

Page 1: ...ad these instructions completely before proceeding with installation Failure to read these instructions can result in an incorrect installation MN 745 011102 ERN 6925 INSTALLATION GUIDE Kit 59569 Ford...

Page 2: ......

Page 3: ...hecking for Leaks 10 Fixing Leaks 10 Before Operating 11 Installation Checklist 11 Post installation checklist 11 Product Use Maintenance and Servicing 11 Minimum Air Pressure and Maximum Air Pressure...

Page 4: ...the vehicle Check your vehicle s owner s manual and do not exceed the maximum load listed for your vehicle Gross Vehicle Weight Rating The maximum allowable weight of the fully loaded vehicle includi...

Page 5: ...Dish Soap Water Solution 1 Item Part Description Qty A 07869 Upper Bracket 2 B 03437 Lower Bracket 2 C 58484 Air Spring 2 D 17178 1 2 13 x 3 4 Flat Head Screw 2 E 18454 3 4 16 Jam Nut 2 F 21848 1 8 S...

Page 6: ...nut by holding the nut with a wrench or medium size crescent wrench and spinning the air spring by hand nut only needs to be torqued to 4ft lbs fig 2 4 Install the lower bracket B onto the air spring...

Page 7: ...er of the vehicle with the finger on the lower bracket facing the rear fig 4 Once you orient the brackets correctly align the upper and lower brackets so they are parallel and tighten the flat head sc...

Page 8: ...axle with the holes in the upper bracket pointing inboard 4 With the finger of the lower bracket over the stock U bolt attach it to the leaf spring with the U bolt H clamp bar G flat washers K and nyl...

Page 9: ...all to them and you will have to drill through both to attach the upper bracket with the self tapping screw I provided NOTE Driver left side shown Attach the lower bracket with the U bolt H clamp bar...

Page 10: ...s 3 Cut the air line assembly in two equal lengths NOTE Unless you have an angle drill you will be drilling the holes on an angle because of the leaf spring interference This will be ok and should not...

Page 11: ...16 nut to secure it in place Tighten the nuts to secure the assembly 6 Route the air line along the frame to the air fitting on the air spring fig 12 Keep AT LEAST 6 of clearance between the air line...

Page 12: ...of the air line Be sure the cut is clean and square see fig 10 Reinsert the air line into the push to connect fitting b Check the threaded connection by tightening the swivel fitting another turn If...

Page 13: ...te the air springs to 30 PSI check all connections for leaks with a soapy water solution See page 10 for tips on how to spot leaks All leaks must be eliminated before the vehicle is road tested Heat t...

Page 14: ...e height for optimal ride and handling Remember that loads carried behind the axle including tongue loads require more leveling force pressure than those carried directly over the axle 6 Always add ai...

Page 15: ...gs TUNING THE AIR PRESURE Pressure determination comes down to three things level vehicle ride comfort and stability 1 Level vehicle If the vehicle s headlights are shining into the trees or the vehic...

Page 16: ...s responsible for installation reinstallation labor charges of the product Air Lift Company reserves the right to change the design of any product without assuming any obligation to modify any product...

Page 17: ...call Air Lift directly and we can ship you the part you need the same day in the U S or Canada Please do not cannibalize kits for parts Step 1 Step 2 Replacement Information If you need replacement p...

Page 18: ...tions concerns or even a suggestion please feel free to contact us Four air springs require TWO compressor systems It s easy to put your air springs to work with an Air Lift on board air compressor sy...

Page 19: ......

Page 20: ...com Thank you for purchasing Air Lift products the professional installer s choice Printed in the USA Need Help Contact our customer service department by calling 800 248 0892 Monday through Friday 8...

Reviews: