background image

SECTION 5

Wiring

CAUTION:

 MAKE SURE POWER IS SWITCHED OFF AT SERVICE 

PANEL BEFORE STARTING INSTALLATION.

CAUTION:

ALL ELECTRICAL CONNECTIONS MUST BE MADE 

IN ACCORDANCE WITH LOCAL CODES, ORDINANCES, OR NATIONAL 

ELECTRICAL CODE. IF YOU ARE UNFAMILIAR WITH METHODS OF 

INSTALLING ELECTRICAL WIRING, SECURE THE SERVICES OF A 

QUALIFIED ELECTRICIAN.

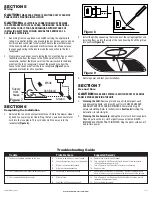
1.  Run wiring from an approved wall switch carrying the appropriate 

rating. One neutral (white), one ground (green or bare copper), and one 

hot (black lead connected to the switch). Secure the electrical wires 

to the housing with an approved electrical connector. Make sure you 

leave enough wiring in the box to make the connection to the fan’s 

receptacle.

2.  From where you have access to inside the fan’s junction box, connect 

the White wire from the house to the White wire from the fan’s 

receptacle. Connect the Black wire from the wall switch to the Black 

wire from the fan’s receptacle. Connect the ground wire from the 

house to the Green wire from the fan’s receptacle 

(Figure 7)

. Use 

approved methods for all connections.

SECTION 6

Completing the Installation

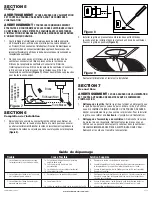
1.  Reinstall the fan’s wire compartment cover. Rotate the blower wheel 

by hand to ensure it spins freely. Plug the fan’s quick connect motor 

cord into the receptacle. This cord will only fit one way into the 

receptacle 

(Figure 8).

www.airkinglimited.com

2A0572021 Rev. E 8-12

3 of 8

2.  Install the grill by squeezing the two ends of the springs together and 

installing them up into the slots of the fan’s housing. Push the grill up 

into position 

(Figure 9).

3.  Restore power and test your installation.

SECTION 7

Use and Care

CAUTION:

 MAKE SURE POWER IS SWITCHED OFF AT SERVICE 

PANEL BEFORE SERVICING THE UNIT.

1. 

Cleaning the Grill:

 Remove grill and use a mild detergent, such 

as dishwashing liquid, and dry with a soft cloth. NEVER USE ANY 

ABRASIVE PADS OR SCOURING POWDERS. Completely dry grill 

before reinstalling. Refer to instructions in 

Section 6


Finishing the 

Installation

, to reinstall grill.

2. 

Cleaning the Fan Assembly: 

Unplug the motor cord from receptacle. 

Wipe all parts with a dry cloth or gently vacuum the fan. NEVER 

IMMERSE ELECTRICAL PARTS IN WATER. Plug the motor cord back in 

and restore power.

Figure 8

Supply 

from 

house

Ground

White

Figure 7

Hot (Black)

Figure 9

Troubleshooting Guide

    Trouble 


Probable Cause 


Suggested Remedy

  1.  Fan does not operate when the switch is on. 

1a.  A fuse may be blown or a circuit tripped. 

1a.  Replace fuse or reset circuit breaker.


1b.  Connector plug from motor is not plugged in.  1b.  Turn off power to unit. Remove Grill and plug motor into receptacle


in housing. Restore power to unit.


1c.  Wiring is not connected properly. 

1c.  Turn off power to unit. Check that all wires are connected.


1d 

Motor has stopped operating. 

1d.  Replace motor.

  2.  Fan is operating, but air moves slower than normal. 

2. 

Obstruction in the exhaust ducting. 

2. 

Check for any obstructions in the ducting. The most common are bird


nests in the roof cap or wall cap where the fan exhausts to the outside.

  3.  Fan is operating louder than normal 

3a.  Motor is loose. 

3a.  Turn off power to unit. Remove grill and check that all screws are fully


tightened. Restore power to unit.


3b.  Fan blade is hitting housing of unit. 

3b.  Call your dealer for service.

Summary of Contents for BFQ50

Page 1: ...must be done by qualified person s in accordance with all applicable codes and standards including fire related construction b Sufficient air is needed for proper combustion and exhausting of gases through the flue chimney of fuel burning equipment to prevent back drafting Follow the heating equipment manufacturer s guideline and safety standards such as those published by the National Fire Protec...

Page 2: ...an will be flush with the finished ceiling Nail or screw the bracket in place securely Figure 3 2 Snap the fan body into the bracket Figure 4 The fan can be snapped into position with the duct collar facing to the left or the right depending which is most convenient www airkinglimited com 2A0572021 Rev E 8 12 2 of 8 SECTION 3 Existing Construction 1 Position housing against the joist or stud and t...

Page 3: ...he grill up into position Figure 9 3 Restore power and test your installation SECTION 7 Use and Care CAUTION MAKE SURE POWER IS SWITCHED OFF AT SERVICE PANEL BEFORE SERVICING THE UNIT 1 Cleaning the Grill Remove grill and use a mild detergent such as dishwashing liquid and dry with a soft cloth NEVER USE ANY ABRASIVE PADS OR SCOURING POWDERS Completely dry grill before reinstalling Refer to instru...

Page 4: ...RY IN NO EVENT SHALL AIR KING S LIABILITY UNDER ANY EXPRESS OR IMPLIED WARRANTY EXCEED THE PURCHASE PRICE OF THE PRODUCT AND ANY SUCH LIABILITY SHALL TERMINATE UPON THE EXPIRATION OF THE WARRANTY PERIOD Some states and provinces do not allow limitations on how long an implied warranty lasts or the exclusion or limitation of incidental or consequential damages so these exclusions or limitations may...

Page 5: ...rmité avec tous les codes et normes applicables incluant la construction relative aux incendies b De l air en quantité suffisante est requis pour la bonne combustion et l évacuation de gaz par le conduit cheminée provenant d équipement de brûlage au combustible pour prévenir un refoulement Suivre les directives du fabricant de l équipement de chauffage et les normes de sécurité telles que celles p...

Page 6: ...le plafond fini Clouer ou visser solidement le support en place Figure 3 www airkinglimited com 2A0572021 Rev E 8 12 6 of 8 2 Fixer par pression le bâti du ventilateur dans le support Figure 4 Le ventilateur peut être fixé par pression en position avec le collet de conduit faisant face à gauche ou à droite en fonction de quelle direction est la plus pratique SECTION 3 Construction Existante 1 Posi...

Page 7: ...TATION EST COUPÉE AU PANNEAU DE SERVICE AVANT DE COMMENCER L INSTALLATION 1 Nettoyage de la grille Retirer la grille et utiliser un détergent doux tel que du liquide pour la vaisselle puis sécher à l aide d un chiffon doux NE JAMAIS UTILISER D ABRASIF OU DE POUDRE À RÉCURER Sécher complètement la grille avant de la réinstaller Pour réinstaller la grille vous référer à la Section 6 Complétion de l ...

Page 8: ... EXPRESSE OU TACITE NE DÉPASSERA LE PRIX D ACHAT DU PRODUIT ET UNE TELLE RESPONSABILITÉ SE TERMINERA AVEC L EXPIRATION DE LA PÉRIODE DE GARANTIE Certains états et provinces ne permettent pas les limitations de la période de garantie ou l exclusion ou la restriction des dommages accidentels ou indirects et par con séquent les présentes restrictions ne peuvent pas s appliquer La présente garantie vo...

Reviews: