Air King BFQ50 Important Instructions & Operating Manual Download Page 2

INSTALLATION INSTRUCTIONS
CAUTION:


MAKE SURE POWER IS SWITCHED OFF AT SERVICE 

PANEL BEFORE STARTING INSTALLATION.

SECTION 1

Preparing the Exhaust Fan

1.  Unpack fan from the carton and confirm that all pieces are present. In 

addition to the exhaust fan you should have:


1 - Grill


1 - Damper Assembly (attached)


1 - Mounting Bracket


1 - Hardware Bag


1 - Electrical Connector


3 - Wire Nuts


1 - Instruction/Safety Sheet   

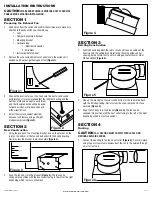
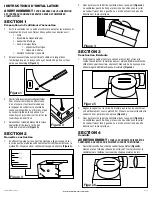
2.  Remove the wire compartment cover and store in the carton until 

needed so it does not get damaged or lost 

(Figure 1).

3.  Choose the location for your fan. To ensure the best air and sound 

performance, it is recommended that the length of ducting and the 

number of elbows be kept to a minimum, 

and that insulated hard ducting be used. 

Larger duct sizes will reduce noise and 

airflow restrictions.

4.  Select the most convenient electrical 

knockout and remove using a straight- 

blade screw driver 

(Figure 2).

SECTION 2

New Construction

1.  Using the gauge on the mounting bracket, line up the bracket on the 

joist so the bottom of the fan will be flush with the finished ceiling. 

Nail or screw the bracket in place securely 

(Figure 3).

2.  Snap the fan body into the bracket 

(Figure 4).

 The fan can be 

snapped into position with the duct collar facing to the left or the right 

depending which is most convenient. 

www.airkinglimited.com

2A0572021 Rev. E 8-12

2 of 8

SECTION 3

Existing Construction

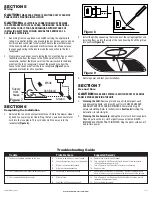
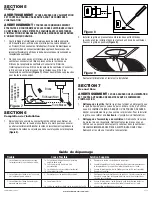
1.  Position housing against the joist or stud and trace an outline of the 

housing onto the ceiling/wall material. Set housing aside and cut 

opening, being careful not to cut or damage any electrical or other 

hidden utilities 

(Figure 5).

2.  Line up the bracket on the joist so the bottom of the fan will be flush 

with the finished ceiling. Nail or screw the snap-in bracket in place 

securely 

(Figure 3).

3.  Snap the fan body into the bracket 

(Figure 4).

 The fan can be 

snapped into position with the duct collar facing to the left or the right 

depending which is most convenient.

SECTION 4

Ducting

CAUTION:

 ALL DUCTING MUST COMPLY WITH LOCAL AND 

NATIONAL BUILDING CODES.

1.  Connect the ducting to the fan’s duct collar 

(Figure 6).

 Secure in place 

using tape or screw clamp. Always duct the fan to the outside through 

a wall or roof cap.

Figure 2

Figure 3

Figure 4

Figure 5

Figure 6

Figure 1

Summary of Contents for BFQ50

Page 1: ...must be done by qualified person s in accordance with all applicable codes and standards including fire related construction b Sufficient air is needed for proper combustion and exhausting of gases through the flue chimney of fuel burning equipment to prevent back drafting Follow the heating equipment manufacturer s guideline and safety standards such as those published by the National Fire Protec...

Page 2: ...an will be flush with the finished ceiling Nail or screw the bracket in place securely Figure 3 2 Snap the fan body into the bracket Figure 4 The fan can be snapped into position with the duct collar facing to the left or the right depending which is most convenient www airkinglimited com 2A0572021 Rev E 8 12 2 of 8 SECTION 3 Existing Construction 1 Position housing against the joist or stud and t...

Page 3: ...he grill up into position Figure 9 3 Restore power and test your installation SECTION 7 Use and Care CAUTION MAKE SURE POWER IS SWITCHED OFF AT SERVICE PANEL BEFORE SERVICING THE UNIT 1 Cleaning the Grill Remove grill and use a mild detergent such as dishwashing liquid and dry with a soft cloth NEVER USE ANY ABRASIVE PADS OR SCOURING POWDERS Completely dry grill before reinstalling Refer to instru...

Page 4: ...RY IN NO EVENT SHALL AIR KING S LIABILITY UNDER ANY EXPRESS OR IMPLIED WARRANTY EXCEED THE PURCHASE PRICE OF THE PRODUCT AND ANY SUCH LIABILITY SHALL TERMINATE UPON THE EXPIRATION OF THE WARRANTY PERIOD Some states and provinces do not allow limitations on how long an implied warranty lasts or the exclusion or limitation of incidental or consequential damages so these exclusions or limitations may...

Page 5: ...rmité avec tous les codes et normes applicables incluant la construction relative aux incendies b De l air en quantité suffisante est requis pour la bonne combustion et l évacuation de gaz par le conduit cheminée provenant d équipement de brûlage au combustible pour prévenir un refoulement Suivre les directives du fabricant de l équipement de chauffage et les normes de sécurité telles que celles p...

Page 6: ...le plafond fini Clouer ou visser solidement le support en place Figure 3 www airkinglimited com 2A0572021 Rev E 8 12 6 of 8 2 Fixer par pression le bâti du ventilateur dans le support Figure 4 Le ventilateur peut être fixé par pression en position avec le collet de conduit faisant face à gauche ou à droite en fonction de quelle direction est la plus pratique SECTION 3 Construction Existante 1 Posi...

Page 7: ...TATION EST COUPÉE AU PANNEAU DE SERVICE AVANT DE COMMENCER L INSTALLATION 1 Nettoyage de la grille Retirer la grille et utiliser un détergent doux tel que du liquide pour la vaisselle puis sécher à l aide d un chiffon doux NE JAMAIS UTILISER D ABRASIF OU DE POUDRE À RÉCURER Sécher complètement la grille avant de la réinstaller Pour réinstaller la grille vous référer à la Section 6 Complétion de l ...

Page 8: ... EXPRESSE OU TACITE NE DÉPASSERA LE PRIX D ACHAT DU PRODUIT ET UNE TELLE RESPONSABILITÉ SE TERMINERA AVEC L EXPIRATION DE LA PÉRIODE DE GARANTIE Certains états et provinces ne permettent pas les limitations de la période de garantie ou l exclusion ou la restriction des dommages accidentels ou indirects et par con séquent les présentes restrictions ne peuvent pas s appliquer La présente garantie vo...

Reviews: