background image

4

RU

RU

RU

RU

Съемка/Просмотр снимка

Чтобы сделать снимок:

  Включите видеокамеру и перейдите в режим фотоснимков (

).

2

  Для увеличения/уменьшения изображения используйте 

навигационные кнопки "вверх"/"вниз" (   ).

3

  Чтобы сделать снимок нажмите кнопку OK (Затвор) ( ).

Примечание 

Нажмите навигационную кнопку вправо, чтобы включить 

светодиодную подсветку для съемки в условиях недостаточной 

освещенности.

Чтобы просмотреть снимок:

  В режиме просмотра фотокамеры нажмите кнопку 

воспроизведения ( ).

2

  Для выбора изображений для просмотра используйте навигационные кнопки 

"влево"/"вправо" ( ).

3

  В режиме воспроизведения можно увеличить/уменьшить изображение, нажав 

кнопку "вверх"/"вниз" (   ). Затем можно нажать кнопку воспроизведения ( ) 

для фиксации соотношения сторон и перемещения изображения с помощью 

навигационных кнопок ( ). Нажмите кнопку воспроизведения ( ) снова для 

отмены фиксации соотношения сторон.

4

  Для возврата в режим просмотра нажмите кнопку OK ( ).

Запись/Просмотр видео

Для записи видео:

  Включите видеокамеру и перейдите в режим видеокамеры 

(

).

2

  Чтобы начать запись, нажмите кнопку OK (Запись) ( ). 

Для увеличения/уменьшения изображения используйте 

навигационные кнопки "вверх"/"вниз" (   ).

3

  Чтобы остановить запись, снова нажмите кнопку OK 

(Запись) ( ).

Примечание 

Нажмите навигационную кнопку "вправо", чтобы включить 

светодиодную подсветку при съемке в условиях недостаточной 

освещенности.

Для просмотра видео:

  В режиме просмотра видеокамеры нажмите кнопку воспроизведения ( ). 

Автоматически начнется воспроизведение последней видеозаписи.

2

  Если устройство подключено к телевизору или наушникам, для регулировки 

уровня громкости используйте навигационные кнопки "вверх"/"вниз" (   ). 

При воспроизведении кнопку воспроизведения ( ) можно использовать для 

паузы и возобновления воспроизведения видео.

3

  Для ускоренной обратной и прямой перемотки видео во время воспроизведения 

нажмите и удерживайте навигационные кнопки "влево"/"вправо" ( ). Щелчками 

"влево"/"вправо" ( ) выполняется переход между видеофайлами.

4

  Для возврата в режим просмотра нажмите кнопку OK ( ).

Примечание 

После копирования видеофайлов на ПК можно воспроизвести их с помощью 

проигрывателя “Quicktime”.

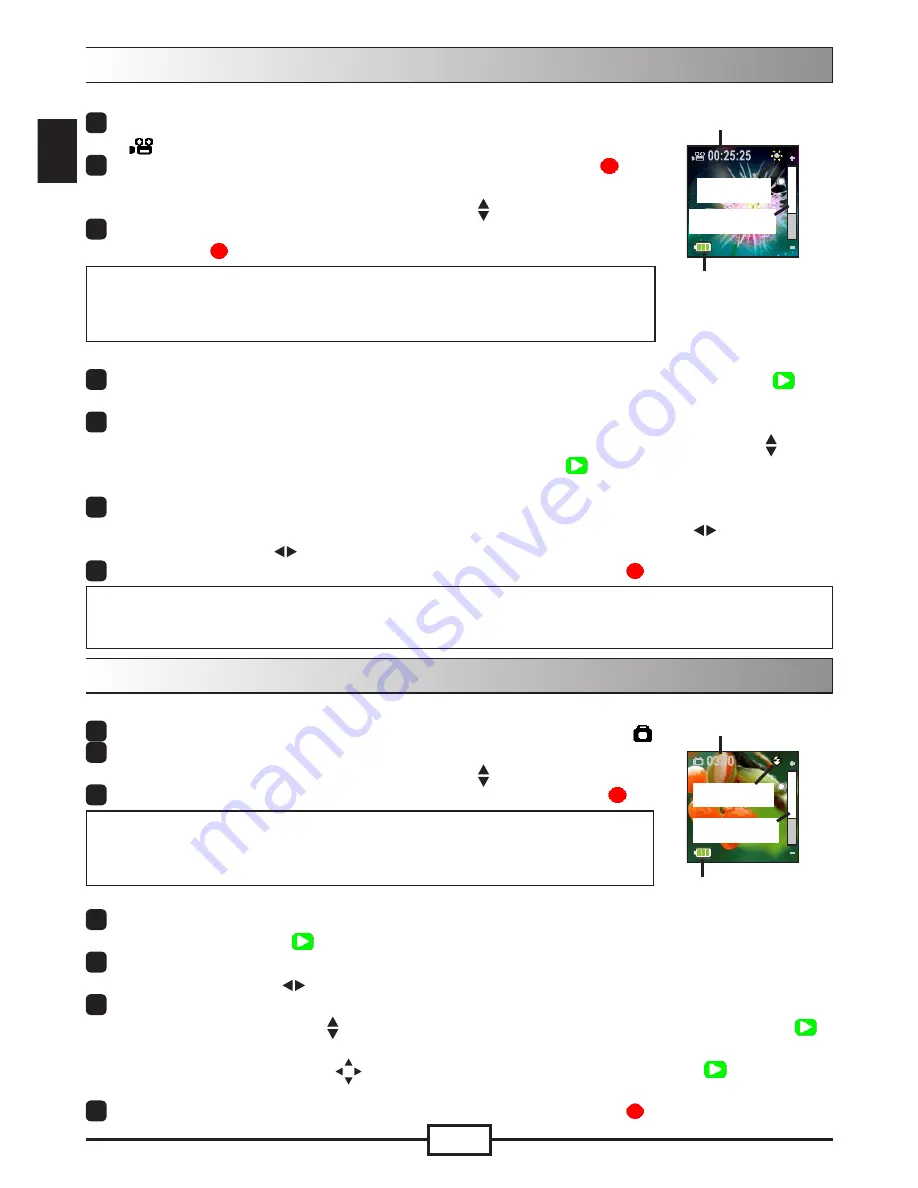
Заряд 

аккумулятора

Время записи

Светодиодная 

подсветка 

Панель 

масштабирования

Заряд 

аккумулятора

Оставшееся 

число кадров

Светодиодная 

подсветка 

Панель 

масштабирования

Summary of Contents for PENCAM_HD

Page 1: ......

Page 2: ...in direct sunlight 4 Avoid applying unnecessary pressure to the camera body 5 For your own safety avoid using the camera during a lightning storm 6 Only use accessories supplied by the manufacturer 7...

Page 3: ...structions may cause harmful interference to radio communications However there is no guarantee that interference will not occur in a particular installation If this equipment does cause interference...

Page 4: ...holder 7 Mode switch Camcorder Voice recorder Camera 8 Power button 9 OLED display 10 Directional button 11 LED indicator 12 Playback button 13 OK Record Shutter button 14 Delete button 15 HDMI output...

Page 5: ...for storage Supports MOV JPEG and WAVE file format Supports USB PC connection Supports TV out HDMI out earphone Charging battery When using for the first time please charge the built in Li polymer ba...

Page 6: ...ratio Due to the nature of OLED screens the display ratio of still picture video on the camcorder and TV PC will vary Please see the following table for details Mode 1 1 OLED display TV PC display Vi...

Page 7: ...camcorder and switch to camcorder mode 2 Press the OK Record button to start recording Use the directional button up down to zoom in out 3 To stop recording press the OK Record button again Note Press...

Page 8: ...rd button again to stop recording To review a voice clip 1 In voice recorder mode use the directional button up down to select a file and press the Playback button to play 2 While playing you can use...

Page 9: ...TV 1 Turn on your TV and switch to AV mode 2 Connect the audio and video ends of the AV cable to the TV 3 Turn on the camcorder 4 Connect the other end of the AV cable to your camcorder 5 Select the...

Page 10: ...n to force a manual shut down to reset the camcorder Addendum Troubleshooting Icon Description Full battery life Moderate battery life Low battery life The LED light strobe will be disabled Empty batt...

Page 11: ...solution set to 5M 2592x1944 resolution set to HD 30f 1280x720 Note This table is for reference purposes only and is approximate Actual battery life may vary slightly due to numerous factors including...

Page 12: ...mory 4GB for storage LCD Display 2 8cm OLED 1 1 Lens Fixed lens F 3 0 f 7 15mm Flash Light LED Back Lighting Support Digital Zoom 3X Night Shot Mode Auto White Balance Auto Voice Recorder Yes Micropho...

Page 13: ...4 Meiden Sie berm igen Druck auf das Kamerageh use 5 Nutzen Sie die Kamera zu Ihrer eigenen Sicherheit nicht w hrend eines Gewitters 6 Verwenden Sie ausschlie lich vom Hersteller angebotenes Zubeh r...

Page 14: ...gen installiert und verwendet St rungen der Funkkommunikation verursachen Allerdings ist nicht gew hrleistet dass es in bestimmten Installationen nicht zu St rungen kommt Falls dieses Ger t St rungen...

Page 15: ...fenhalterung 7 Modusschalter Camcorder Diktierger t Kamera 8 Ein Austaste 9 OLED Bildschirm 10 Richtungstasten 11 LED Anzeige 12 Wiedergabetaste 13 OK Taste Aufnahme Ausl ser 14 L schen Taste 15 HDMI...

Page 16: ...Unterst tzt TV Ausgang HDMI Ausgang Kopfh rer Akku aufladen Wenn Sie das Ger t das erste Mal benutzen laden Sie den integrierten Lithium Polymer Akku bitte mindestens 8 Stunden lang auf 1 Achten Sie d...

Page 17: ...ED Bildschirmen unterscheidet sich das Anzeigeformat von Fotos Videos auf dem Camcorder von dem auf einem Fernseher Computer Einzelheiten entnehmen Sie bitte der nachstehenden Tabelle Modus 1 1 Zoll O...

Page 18: ...Dr cken Sie zum Start derAufnahme die OK Taste Aufnahme Mit den Aufw rts Abw rtstasten vergr ern bzw verkleinern Sie das Bild 3 Dr cken Sie zum Beenden derAufnahme erneut die OK Taste Aufnahme Hinwei...

Page 19: ...e Aufnahme So geben Sie eine Sprachdatei wieder 1 Im Sprachaufnahmemodus W hlen Sie mit den Aufw rts Abw rtstasten eine Datei dr cken Sie dann zum Start der Wiedergabe die Wiedergabetaste 2 W hrend de...

Page 20: ...auf der linken Seite V deo udio Modo AV Televis o SA DA DE TV TV TV Ausgang Modo AV TV Herk mmlicher CRT TV 1 Schalten Sie Ihren Fernseher an wechseln Sie in den AV Modus 2 Verbinden Sie die Audio und...

Page 21: ...adurch erzwingen Sie eine manuelle Abschaltung Starten Sie den Camcorder neu Anhang Probleml sung Symbol Beschreibung Akku voll geladen Akku halb voll Akku fast leer Das LED Licht Stroboskop wird deak...

Page 22: ...280 x 720 eingestellt Hinweis Diese Tabelle dient lediglich der Veranschaulichung es handelt sich hierbei um Ann herungswerte Die tats chliche Akkulebensdauer kann aufgrund zahlreicher Faktoren u a de...

Page 23: ...CD Bildschirm 1 1 Zoll OLED 2 8 cm Objektiv Festes Objektiv F 3 0 f 7 15 mm Blitzlicht Unterst tzt LED Hintergrundbeleuchtung Digitaler Zoom 3 fach Nachtaufnahmemodus Auto Wei abgleich Auto Diktierger...

Page 24: ...d appliquer une pression inutile sur le corps du cam scope 5 Pour votre propre s curit n utilisez pas le cam scope pendant un orage 6 N utilisez que les accessoires fournis par le fabricant 7 Conserv...

Page 25: ...diofr quence et s il n est pas install et utilis conform ment aux instructions fournies peut produire des interf rences affectant les communications radio Cependant aucune garantie n est donn e qu il...

Page 26: ...onne 7 S lecteur de mode Cam scope Dictaphone Cam ra 8 Bouton d alimentation 9 Ecran OLED 10 Touche de navigation 11 Voyant LED 12 Bouton Lecture 13 Bouton Enregistrement D clencheur 14 Bouton Supprim...

Page 27: ...des formats de fichier MOV JPEG et WAVE Prise en charge de la connexion USB PC Prise en charge de la sortie TV sortie HDMI couteurs Charger la batterie Avant d utiliser l appareil pour la premi re foi...

Page 28: ...e m me des crans OLED fait varier le ratio d affichage d une image fixe d une vid o sur un cam scope et sur un t l viseur ou un cran d ordinateur Veuillez consulter le tableau suivant pour plus de d t...

Page 29: ...uton OK enregistrer pour commencer l enregistrement Utilisez le bouton directionnel haut bas pour effectuer un zoom avant arri re 3 Pour arr ter d enregistrer appuyez nouveau sur le bouton OK enregist...

Page 30: ...OK enregistrer pour interrompre l enregistrement Lire un clip audio 1 En mode dictaphone utilisez le bouton directionnel haut bas pour s lectionner un fichier puis appuyez sur le bouton Lecture pour...

Page 31: ...sous tension et basculez le en mode AV 2 Branchez les extr mit s audio et vid o du c ble AV au t l viseur 3 Mettez le cam scope sous tension 4 Branchez l autre extr mit du c ble AV sur votre cam scope...

Page 32: ...ors tension forc e et r initialiser le cam scope Addenda Guide de d pannage Ic ne Description Batterie pleine charge Batterie charge moyenne Batterie faible Le t moin voyant LED est d sactiv Batterie...

Page 33: ...720 Remarque Ce tableau n est indiqu qu titre de r f rence et pr sente des approximations La dur e de vie r elle de la batterie peut varier l g rement en raison de nombreux facteurs dont le niveau de...

Page 34: ...stockage Affichage LCD 2 8cm OLED 1 1 Objectif Objectif fixe F 3 0 f 7 15mm Flash Eclairage en contre jour LED Zoom num rique 3X Mode Photos nuit Auto Balance des blancs Auto Dictaphone Oui Microphon...

Page 35: ...4 Evitare di applicare pressioni inutili al corpo della videocamera 5 Per la propria sicurezza evitare di usare la videocamera durante i temporali 6 Usare solo gli accessori forniti dal produttore 7...

Page 36: ...truzioni pu causare interferenze dannose alle comunicazioni radio Non c tuttavia garanzia che non si verifichino interferenze in installazioni particolari Qualora questa apparecchiatura causasse inter...

Page 37: ...ttore modalit Videocamera Registratore voce Fotocamera 8 Tasto d alimentazione 9 Schermo OLED 10 Tasti direzionali 11 Indicatore LED 12 Tasto Riproduzione 13 Tasto OK registrazione otturatore 14 Tasto...

Page 38: ...archiviazione Supporta i file di formato MOV JPEG e WAVE Supporto del collegamento USB al PC Supporta uscita TV uscita HDMI cuffie Caricamento batterie Al primo utilizzo caricare la batteria integrat...

Page 39: ...li schermi OLED le proporzioni schermo per le fotografie video della videocamera e del TV PC varieranno Fare riferimento alla tabella che segue per i dettagli Modalit Schermo OLED 1 1 Schermo TV PC Vi...

Page 40: ...eocamera 2 Premere il tasto OK Registrazione per avviare la registrazione Usare il tasto direzionale su gi per ingrandire ridurre 3 Premere di nuovo il tasto OK Registrazione per terminare la registra...

Page 41: ...tasto OK Registrazione per terminare la registrazione Per ascoltare una sequenza audio 1 In modalit registratore voce usare tasti direzionali su gi per selezionare un file e premere il tasto Riproduz...

Page 42: ...tradizionale 1 Accendere il televisore impostare la modalit AV 2 Collegare le estremit audio e video del cavo AV al televisore 3 Accendere la videocamera 4 Collegare l altra estremit del cavo AV alla...

Page 43: ...e ripristinare la videocamera Addendum Risoluzione dei problemi Icona Descrizione Batteria completamente carica Batteria mediamente carica Batteria scarica La luce flash LED sar disabilitata Batteria...

Page 44: ...postata su HD 30f 1280x720 Nota Questa tabella solo per riferimento ed approssimativa La durata effettiva della batteria pu variare a causa di molti fattori includendo il livello di carica Durata dell...

Page 45: ...chermo LCD 2 8 cm OLED 1 1 Obiettivo Obiettivo fisso F 3 0 f 7 15mm Luce flash Supporto illuminazione LED Zoom digitale 3X Modalit scatto notturno Automatico Bil bianco Automatico Registratore voce S...

Page 46: ...aplique presiones innecesarias sobre el cuerpo de la c mara 5 Por su propia seguridad no utilice la c mara durante una tormenta 6 Utilice nicamente accesorios especificados por el fabricante 7 Manteng...

Page 47: ...g a de radiofrecuencia y si no se instala y usa siguiendo las instrucciones puede causar interferencias perjudiciales para las comunicaciones de radio Sin embargo no hay garant a de que no vayan a ocu...

Page 48: ...do Cideoc mara Cideoc mara rabadora de vo rabadora de vo C mara C mara 8 Bot n de alimentaci n 9 Pantalla OLED 0 Bot n de direcciones Indicador LED 2 Bot n Reproducir 3 Bot n Aceptar rabar Disparador...

Page 49: ...miento Admite los formatos de archivo MOV JPEG y WAVE Admite conexiones de PC USB Admite salida de TV salida HDMI y auriculares Cargar la bater a Cuando la utilice por primera vez cargue la bater a de...

Page 50: ...a naturaleza de las pantallas OLED la relaci n de visualizaci n de las im genes est ticas y el v deo en la videoc mara y el televisor o PC variar Consulte la tabla siguiente para obtener detalles Modo...

Page 51: ...volver al modo de vista previa presione el bot n Aceptar Tomar y revisar una fotograf a Para tomar una fotograf a Encienda la videoc mara y cambie al modo de c mara 2 Utilice el bot n de direcci n Ar...

Page 52: ...la grabaci n Para revisar un clip de voz En el modo de grabadora de voz utilice el bot n de direcci n Arriba o Abajo para seleccionar un archivo y a continuaci n presione el bot n Reproducir para rep...

Page 53: ...a el televisor y seleccione el modo AV 2 Conecte los terminales de audio y v deo del cable AV al televisor 3 Encienda la videoc mara 4 Conecte el otro extremo del cable AV a la videoc mara 5 Seleccion...

Page 54: ...pagado manual para restablecerla Ap ndice Resoluci n de problemas Icono Descripci n Bater a totalmente cargada Bater a con bastante carga Bater a con poca carga La luz de LED se deshabilitar Bater a a...

Page 55: ...en HD 30f 1280x720 Nota esta tabla es simplemente de referencia y sus valores son aproximados El per odo de vida til real de la bater a puede variar ligeramente en funci n de numerosos factores como p...

Page 56: ...alla LCD OLED de 2 8 cm 1 1 Objetivo Objetivo fijo F 3 0 f 7 15 mm Luz del flash Compatibilidad con retroiluminaci n de LED Zoom digital 3X Modo de escena nocturna Autom tico Balance de blanco Autom t...

Page 57: ...nen van onnodige druk op de camerabehuizing 5 Voor uw persoonlijke veiligheid is het af te raden de camera te gebruiken tijdens een onweer 6 Gebruik uitsluitend accessoires die door de fabrikant worde...

Page 58: ...t wordt conform de instructies kan het schadelijke ruis veroorzaken aan radiocommunicatie Er bestaat echter geen garantie dat er geen ruis optreedt in een bepaalde installatie Als het apparaat ruis ve...

Page 59: ...elaar Camcorder Camcorder Spraakrecorder Spraakrecorder Camera Camera 8 Voedingsknop 9 OLED display 0 Richtingsknop Led indicator 2 Knop Afspelen 3 Knop OK Opname ontspanknop 4 Knop Verwijderen 5 HDMI...

Page 60: ...g Ondersteuning van USB PC verbinding Ondersteunt tv uitgang HDMI uitgang oortelefoon De batterij opladen Wanneer u het apparaat voor de eerste keer gebruikt moet u de ingebouwde li polymeerbatterij g...

Page 61: ...mverhouding Vanwege de aard van OLED schermen zal de beeldschermverhouding van stilstaande beelden video s op de camcorder en de tv pc verschillen Raadpleeg de volgende tabel voor details Modus 1 1 OL...

Page 62: ...akel de camcorder in en schakel naar de camcorderstand 2 Druk op de knop OK Opname om de opname te starten Gebruik de richtingsknop omhoog omlaag om in uit te zoomen 3 Druk opnieuw op de knop OK Opnam...

Page 63: ...n Een spraakopname weergeven Gebruik de richtingsknop omhoog omlaag in de spraakopnamemodus om een bestand te selecteren en druk op de knop Afspelen om het af te spelen 2 Tijdens het afspelen kunt u d...

Page 64: ...1 Zet uw tv aan en schakel de tv naar de AV modus 2 Sluit de audio en video uiteinden van de AV kabel aan op de tv 3 Schakel de camcorder in 4 Sluit het andere uiteinde van de AV kabel aan op uw camco...

Page 65: ...sluiten te forceren om de camcorder te resetten Addendum Probleemoplossing Pictogram Beschrijving Volledig batterijvermogen Gemiddeld batterijvermogen Laag batterijvermogen De LED lamp flits wordt uit...

Page 66: ...op HD 30f 1280x720 Opmerking Deze tabel is uitsluitend informatief en bij benadering De werkelijke levensduur van de batterij kan een weinig verschillen afhankelijk van talrijke factoren zoals het ni...

Page 67: ...cm OLED 1 1 Lens Vaste lens F 3 0 f 7 15mm Flitslamp Ondersteuning LED achtergrondverlichting Digitale zoom 3X Nachtopnamestand Auto Witbalans Auto Spraakrecorder Ja Microfoon Ja Luidspreker Geen Tele...

Page 68: ...Evite aplicar press o desnecess ria no corpo da c mara 5 Para sua seguran a evite utilizar a c mara durante a ocorr ncia de trovoada 6 Utilize apenas os acess rios fornecidos pelo fabricante 7 Manten...

Page 69: ...de acordo com as instru es pode provocar interfer ncia perigosa nas comunica es de r dio No entanto n o existe garantia de que n o ocorra uma interfer ncia perigosa numa instala o particular Se este e...

Page 70: ...o de modo C mara de v deo Gravador de voz C mara 8 Bot o de Energia 9 Ecr OLED 10 Bot o Direccional 11 Indicador LED 12 Bot o de Reprodu o 13 Bot o OK Gravar Obturador 14 Bot o Eliminar 15 Sa da HDMI...

Page 71: ...Suporta os formatos de ficheiro MOV JPEG e WAVE Suporta liga o ao PC atrav s de USB Suporta sa da de TV sa da HDMI auscultadores Carregar a bateria Ao utilizar a unidade pela primeira vez carregue a b...

Page 72: ...eccionar uma op o de liga o 2 Propor o da imagem Devido natureza dos ecr s OLED a propor o de fotografia v deo na c mara de v deo e TV PC ir variar Consulte a tabela seguinte para obter mais detalhes...

Page 73: ...deo 2 Prima o bot o OK Gravar para iniciar a grava o Utilize o bot o direccional para cima baixo para aplicar mais menos zoom 3 Para parar a grava o prima novamente o bot o OK Gravar Nota Prima o bot...

Page 74: ...ra parar a grava o Para rever um clip de voz 1 No modo de gravador de voz utilize o bot o direccional para a cima baixo para seleccionar um ficheiro e prima o bot o de Reprodu o para reproduzir 2 Dura...

Page 75: ...igue o sua TV e mude para o modo AV 2 Ligue as extremidades de udio e de v deo do cabo AV TV 3 Ligue a c mara 4 Ligue a outra extremidade do cabo AV c mara 5 Seleccione o cone de TV e prima o bot o OK...

Page 76: ...cerramento manual para reiniciar a c mara de v deo Adenda Resolu o de problemas cone Descri o Bateria com carga completa Bateria com carga moderada Bateria fraca O LED de luz flash ser desactivado Bat...

Page 77: ...ra 5M 2592x1944 resolu o definida para HD 30f 1280x720 Nota Esta tabela serve apenas como refer ncia e apresenta valores aproximados A dura o real da bateria poder variar devido a v rios factores incl...

Page 78: ...ara armazenamento Ecr LCD 2 8cm OLED 1 1 Lente Lente fixa F 3 0 f 7 15mm Luz de flash Suporte de ilumina o LED Zoom digital 3X Modo de captura nocturna Auto Balan o de brancos Auto Gravador de voz Sim...

Page 79: ...1 2 3 4 5 6 7...

Page 80: ...15 1 2 B 15...

Page 81: ...RU 1 2 3 4 5 6 7 8 9 OLED 10 11 12 13 OK 14 15 HDMI 16 17 USB 18 1 7 8 2 3 4 5 6 9 10 12 13 14 15 16 17 18 11...

Page 82: ...RU RU 1280 x 720 720P 30 OLED 2 84 1 1 5 4 MOV JPEG WAVE USB HDMI 8 1 USB USB 2 3...

Page 83: ...RU RU AV 1 2 OLED OLED 2 8 1 1 1 1 16 9 1 1 16 9 1 1 4 3 1 1 4 3 4 3 16 9...

Page 84: ...RU RU 1 2 3 OK 1 2 3 4 OK 1 2 OK 3 OK 1 2 3 4 OK Quicktime...

Page 85: ...RU RU 1 2 3 4 1 2 OK 3 OK 1 2 3 OK 1 2 3...

Page 86: ...RU RU USB USB HDTV AV 1 AV 2 AV 3 4 5 OK HDTV HDMI 1 2 HDMI HDMI HDTV 3 4 HDMI 5 HDMI TV HDMI HDMI V deo udio Modo AV Televis o SA DA DE TV...

Page 87: ...RU RU B O P...

Page 88: ...RU RU HD30f 1280x720 5M WAV 4 100 2357 83 7 30 310 125 30 CIPA 5 2592 x 1944 HD 30 1280x720 HD 1280x720 30 Windows XP SP2 Vista Pentium 4 3 2 1 2 256...

Page 89: ...RU RU 5 2592x1944 HD 720P 1280x720 5 MOV JPEG WAV HD 720P 30 4 2 8 OLED 1 1 F 3 0 f 7 15 3X HDMI AV out NTSC PAL 3 950...

Page 90: ...82 496 90010v1 0...

Reviews: