background image

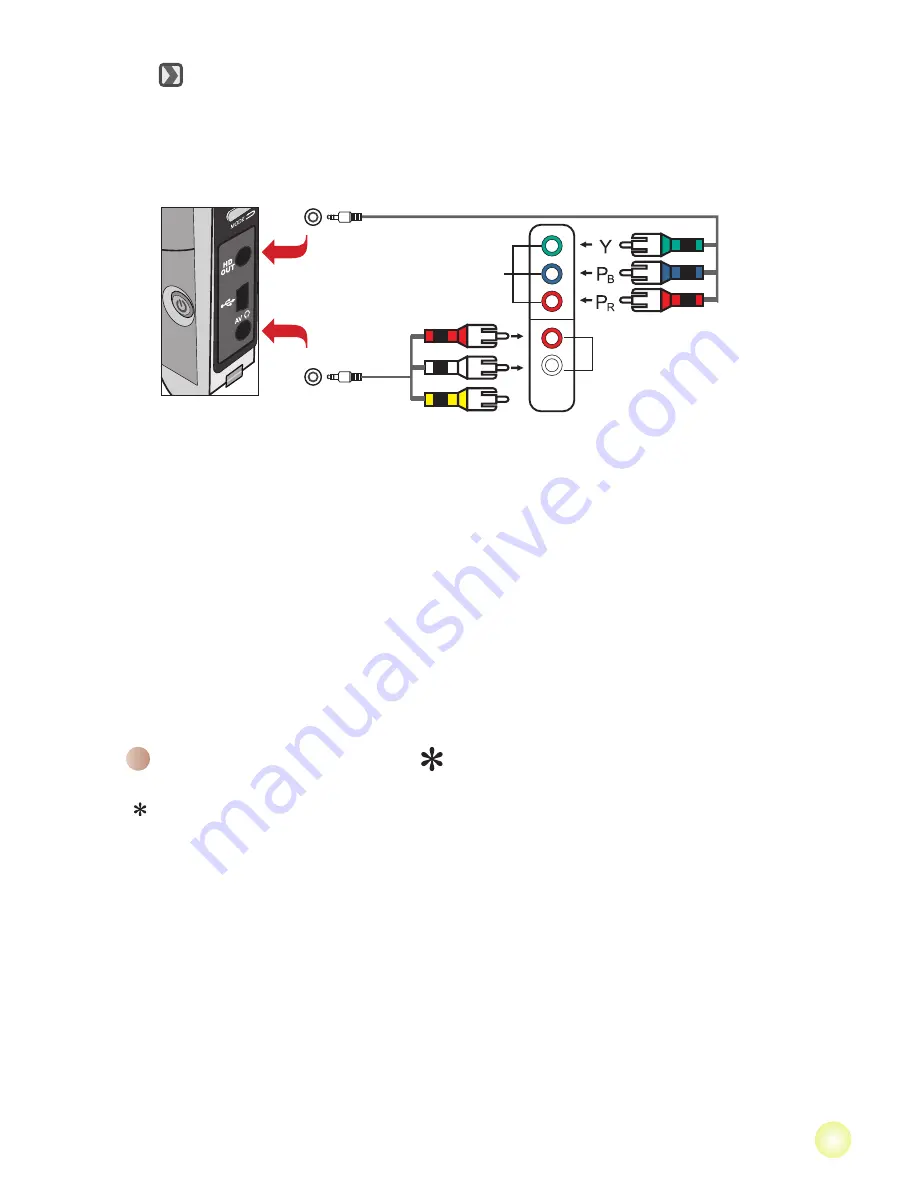
 Connecting the camcorder to HDTV

1. Turn on your HD TV.  

2. Turn on the Camcorder.

3. Plug one end of the component video cable into the (Component Video IN) port on 

the HDTV and the other end into the (HD OUT) port on the Camcorder. 

4. Plug one end of the other AV cable into the (Component Audio IN) port on the HDTV 

and the other end into the (AV OUT) port on the Camcorder.  (Please do not plug in 

the yellow connector to HDTV’s AV-IN.) 

5. Press the input switch mode on HD TV and select “Component Input”.   

HD TV hereby means the HDTV built-in component input ports, thus being able to 

perform HD high resolution quality while connected.

AV OUT

HD OUT

HD TV

Component Audio in

Component Video in

<Component Video cable>

<AV cable>

(red)

(yellow)

(white)

(green)

(red)

(blue)

(Do not plug in Yellow Cable)


For select model only. Please refer to the package printing for detailed 

specifications.

1. Turn on the camera, and connect the camera to a PC using the USB cable.

2. Copy files to the camera:


After the camera is connected to the PC, double-click on “My Computer” and you will 

find a removable disk. Copy MP3 files into the “Music” folder for playing.

3. Press the Mode button and use the Direction buttons to select the Music Player 

mode. Then press the OK button to enter.

Play MP3 music  

Summary of Contents for Hi-Speed HD

Page 1: ......

Page 2: ...hat any change or modifications to the equipment not expressly approved by the party responsible for compliance could void Your authority to operate such equipment If the time arises to throw away you...

Page 3: ...Earphone USB connector HD OUT Mode Return button Menu OK button Zoom button T Zoom in Volume up W Zoom out Volume down Record button External Microphone Jack Indicator light LCD display Power button...

Page 4: ...ed and the charge starts 3 When the charging is interrupted or the battery pack is fully charged the charging LED will turn green When using a PC to charge the battery do not power on the camcorder or...

Page 5: ...utton up down to select a language 6 When done press OK to confirm the setting Reading LCD indicators 1 Mode icon White Balance mode Video resolution Remaining recordable time Picture resolution Exter...

Page 6: ...phone options When you insert an external microphone the icon will appear in the lower left corner The zoom function is also available during recording except in macro mode It s normal that the camcor...

Page 7: ...Resume playing During playing While paused press the OK button Adjust the volume level During playing move the Zoom button up or down to adjust the volume accordingly Stop playing During playing press...

Page 8: ...pen folder to view files and click OK 4 If the dialogue window does not appear automatically you may double click on My computer and open the Removable Drive 5 Double click on the DCIM file folder 6 D...

Page 9: ...t in component input ports thus being able to perform HD high resolution quality while connected AV OUT HD OUT HD TV Component Audio in Component Video in Component Video cable AV cable red yellow whi...

Page 10: ...g this setting allows you to take a photograph with a dark background Since the shutter speed will slow down when taking photographs at a dark place we recommend using a tripod to eliminate blurring f...

Page 11: ...ocked unlocked files If there are no files in the camera no items will be seen Menu items in Camera mode continued Item Option Description Effect Normal Make recordings in natural color B W Make recor...

Page 12: ...on is suitable for Germany England Italy Netherlands China Japan and Hong Kong Flicker 50Hz Set flicker frequency to 50Hz 60Hz Set flicker frequency to 60Hz Auto Off Off Disable Auto off function 1 mi...

Page 13: ...reference only The actual battery life depends on your battery type and recharge level Battery Life Icon Description Full battery life Moderate battery life Low battery life The flash strobe and the...

Page 14: ...rent in different video resolution settings Video Resolution PC system requirements HD 60f 1280x720 60fps OS Windows XP SP2 Vista or above CPU Pentium 4 3 2GHz or above System RAM 1GB 2GB recommended...

Page 15: ...82 481 90010v1 0...

Reviews: