Aiphone JK-1MED Installation And Operation Manual Download Page 10

- 10 -

English

Fr

ançais

Neder

lands

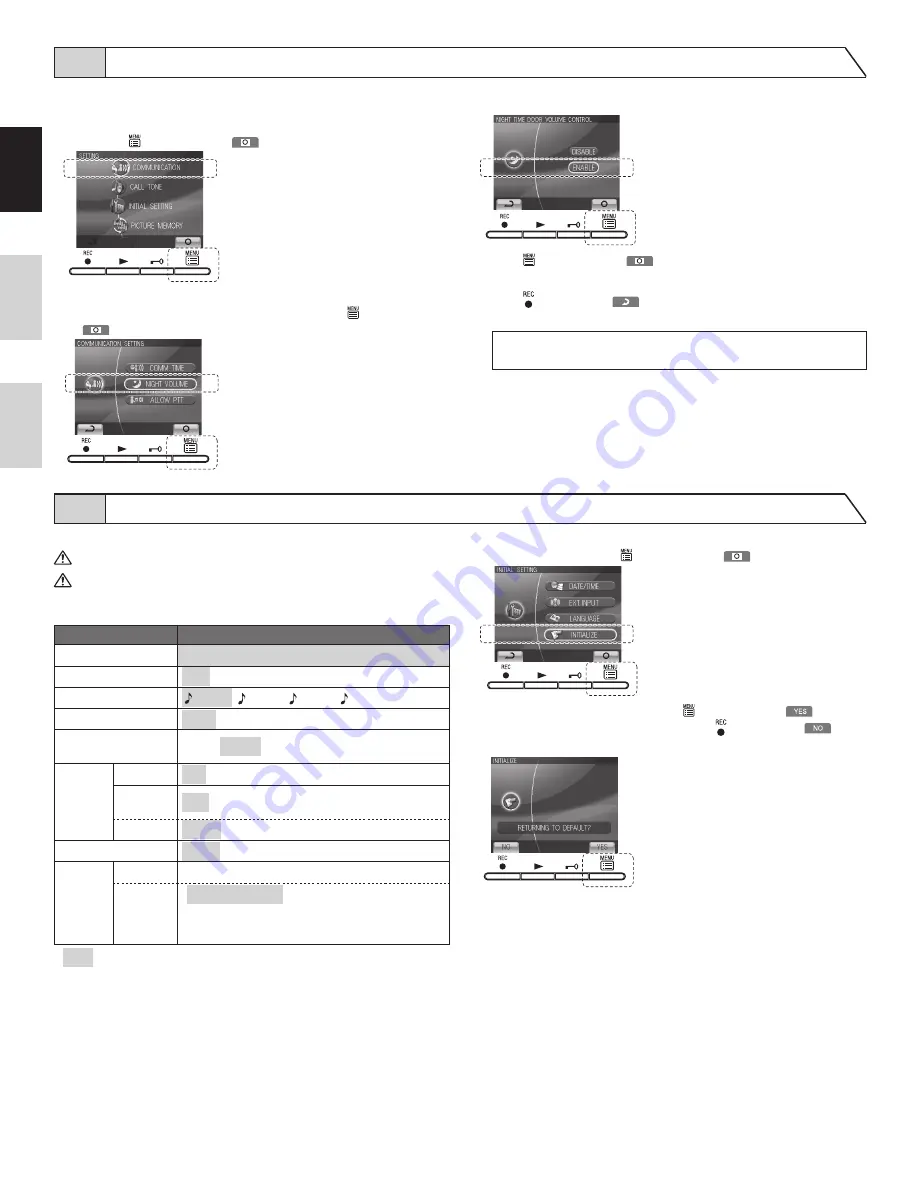
7-7 Automatic night volume adjustment

This automatically lowers the communication volume at the door station 
only at night.Initial setting: "Disabled"

1

  After performing step 1 in section 7-1, select "COMMUNICATION" 

and press  MENU button (

).

2

  In the "COMMUNICATION SETTING" screen, press 

 button or 

 button to select "NIGHT VOLUME" and press  MENU button 

(

).

3

  In the "NIGHT TIME DOOR VOLUME CONTROL" screen, press 

 button or 

 button to select "ENABLE".

4

  Press  MENU button (

) to complete the settings and return to 

the previous screen.


Press  REC button (

) to cancel the setting and return to the 

previous screen.

NOTES:  Distinguishing between day and night is automatically done by the 

door station.

7-8 Restore default setting

All settings can be restored to their condition at the time of purchase.

 1. Recorded pictures are erased and settings are reset. 
 2. Pre-set functions (section 8-7) are not reset.

Settings reset with "RESTORE DEFAULT SETTING"

Setting name

Available setting

Time

JAN/01/2009 00 : 00

Language

 ENG  FRA ITA DUT SPA

Door station chime tone


1

 (Tone 1)


    2

 (Tone 2)

    3

 (Tone 3)

    4

 (Tone 4) 

Communication time

 1 min.  2 min.  3 min.  5 min

Automatic night volume 
adjustment

Enable   Disable 

External 
input

Detection

 N/O   N/C  Disable

Notification 
at door

 OFF   OFF  ON

Sound time  30 sec.   Continuous  Continuous

Press-to-talk setting

 Enable   Disable 

Recording

Pictures

All saved pictures are erased.

Screen

  Zoom x 3, Wide x 3 

 Wide x 3, Zoom x 3

 Zoom x 6

 Wide x 6

             are initial views

1

  After performing steps 1 and 2 in section 7-1, select "INITIALIZE" 

with 

 or 

 and press  MENU button (

).

2

  In the "INITIALIZE" screen, press  MENU button (

(approximately 1 sec.) to initialize. Press  REC button (

) to 

cancel initialization and return to the "MENU" screen.

3

  4 LEDs light up during initialization. The screen goes out when 

initialization is complete. (The menu LED flashes)

Summary of Contents for JK-1MED

Page 1: ...ION INTERPHONEVIDEO COULEUR MAINS LIBRES MONITEUR MA TRE HANDENVRIJE KLEURENVIDEOFONIE MONITOR HOOFDPOST JK 1MED Master monitor station Moniteur ma tre Monitor hoofdpost INSTALLATION OPERATION MANUAL...

Page 2: ...is for indoor use only Do not use outdoors 3 In areas where broadcasting station antennas are close by the intercom system may be affected by radio frequency interference 4 As to other manufacturer s...

Page 3: ...n 5 cm 2 5 cm 2 JK 1MED 2 3 15 cm 6 2 2 Wiring method wiring distance Wire the units from station to station daisy chained 0 65 mm 22 AWG 1 0 mm 18 AWG A 50 m 165 100 m 330 B 5 m 16 10 m 33 C 75 m 245...

Page 4: ...EL 12S AC 12 V 0 125 A DC 12 V 0 2 A or equivalent part and a separate AC transformer are required Run separate cables for audio video and door release Door release contact AC DC 24 V 0 5 A Minimum C...

Page 5: ...master monitor station Audio only sub master station Optional long distance adaptor JKW BA Use the long distance adaptor JKW BA within the distance ranges shown in the table when the wiring distance b...

Page 6: ...1 gang box Din rail 83 5 mm 3 5 16 To pass the cable through the back of the unit cut out the cable inlet Wood mounting screws x 2 Mounting bracket 83 5 mm 3 5 16 5 NAMES JK 1MED Play LED red PLAY but...

Page 7: ...ettings are incomplete start again from the beginning Symbol Function description To manually record To return to the screen of the previous operation To display the previous more recent date picture...

Page 8: ...The date time increases by one button press once The date time decreases by one button press once The cursor moves to the left button pressed once The cursor moves to the right button press and hold f...

Page 9: ...creen 7 5 1 Setting the optional units detection method Initial setting 1 After performing steps 1 and 2 in section 7 1 select EXT INPUT and press MENU button 2 In the EXTERNAL INPUT SETTING screen pr...

Page 10: ...pictures are erased and settings are reset 2 Pre set functions section 8 7 are not reset Settings reset with RESTORE DEFAULT SETTING Setting name Available setting Time JAN 01 2009 00 00 Language ENG...

Page 11: ...pictures at a pre set position and the next three pictures are wide pictures Pictures are automatically recorded First three pictures are wide pictures and the next three pictures are zoom pictures at...

Page 12: ...play changes ZOOM WIDE button section 8 5 can be used to change the display 3 When TALK button is pressed momentarily and communication starts the screen display will be held as is regardless of the p...

Page 13: ...ton to talk with the other person A call in is sent to the sub master station The reply of the other person is not heard 2 If the other person presses TALK button hands free communication is possible...

Page 14: ...ng again The previous setting will be overwritten 2 The zoom picture position set with the master monitor station will also be displayed at the sub monitor station 2 Press ZOOM WIDE button for at leas...

Page 15: ...utomatic recording function cannot be cancelled 2 The recorded pictures are recorded using the method section 7 10 that has been set However if switching between zoom and wide is performed during auto...

Page 16: ...age Refer to sections 8 13 and 8 14 1 When there are multiple unread images all images enter the read condition even if only one image is played and the play LED goes off 2 The recorded pictures are d...

Page 17: ...dysfonctionnement d un de ses produits La zone d application de est l UE Garantie Aiphone garandeert dat zijn producten onder normale gebruiksomstandigheden gedurende twee jaar na levering aan de eind...

Reviews: