Aigo atom A205 User Manual Download Page 7

aigo atom A205 Digital Audio Player                          USER MANUAL 


Page 7 

PC. 

Microphone (MIC) 

Built-in microphone (for use in 

Record

 mode). 

MODE 

To enter the Main Menu and select modes, options, etc. 

Record (REC) 

Press  to  record  voice  directly  onto  the  Player  when  in 

Record


mode. 

PLAY / Pause / Select 

Play  or  pause  the  track  that  is  currently  selected.    Used 

occasionally in various sub-menus to select an option. 

POWER ON/OFF 

Turn the Player ON and OFF. 

OLED Screen 

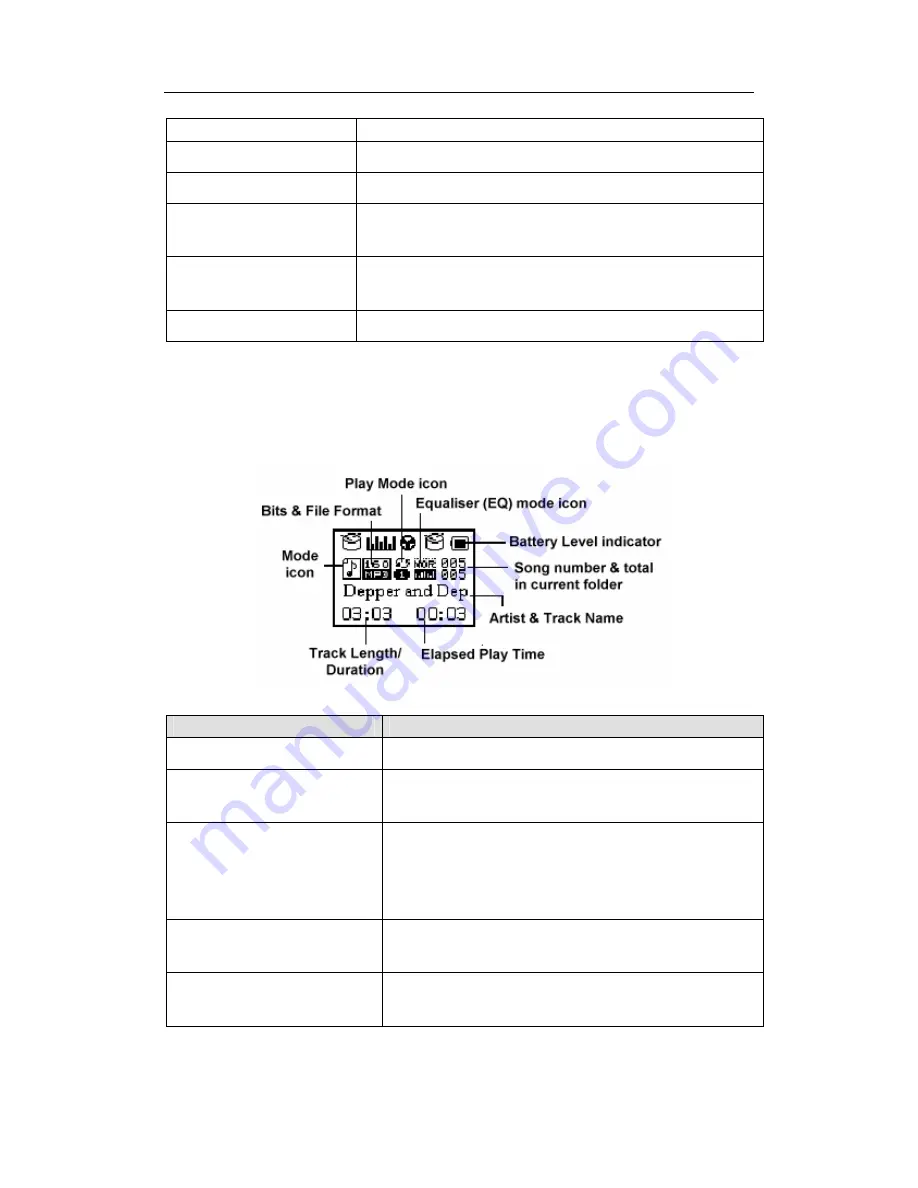
The  diagram  below  shows  an  example  of  the  OLED  display  in  Music  Mode.    The  table  below 

explains what each of the symbols or indicators means. 


Symbol or indicator 

Description 

Track Length/Duration 

Total duration of track in minutes and seconds. 

Mode icon 

Symbol  shown  indicates  the  currently  specified  Mode 

(Play Music, Radio, Voice, Record). 

Bits & File Format


This  indicator  consists  of  two  parts.    The  top  figure  (in 

numbers)  shows  the  size  of  the  file/track  in  bits.    The 

bottom  shows  the  format  (MP3,  WAV,  etc)  of  the 

track/file.


Play Mode icon


Symbol  shown  indicates  the  currently  specified  Play 

Mode (Normal, Repeat One, Repeat All, etc).


Equaliser (EQ) mode icon 

Symbol shown indicates the currently specified Equaliser 

(EQ) mode. 

Summary of Contents for atom A205

Page 1: ...YING TRACKS 10 PLAYING RECORDED VOICE FILES 10 PAUSING TRACKS 10 SELECTING A TRACK FILE 10 SCROLLING THROUGH MENUS 11 FAST FORWARDING AND FAST REVERSING 11 INCREASING DECREASING VOLUME 11 LOCKING THE...

Page 2: ...de 21 VOICE REPLAY MODE 22 ENTERING THE VOICE REPLAY MODE 22 Entering the Voice mode File Menu 23 Entering the Voice mode Play Menu 23 FM RADIO MODE 24 ENTERING THE FM RADIO MODE 24 FM MENU 24 Search...

Page 3: ...cting the Player from a PC 36 INSTALLATION OF DRIVER SOFTWARE FOR PCS RUNNING WINDOWS 98SE ONLY 36 TRANSFERRING TRACKS TO THE PLAYER FROM A CD VIAA PC 36 SENDING AND DELETING FILES BETWEEN PC AND PLAY...

Page 4: ...ed in the Warranty section of this Manual on page 45 When opening the Product Pack for the first time be careful when removing the contents as many of the items contained in the box are fairly small a...

Page 5: ...play or comparison replay 7 Equalizer Pre sets Choose from seven 7 Equaliser pre sets Normal Rock Pop Classic Soft Jazz and DBB to optimise the sound quality no matter what your musical tastes 7 Play...

Page 6: ...the various control keys buttons Button Function Volume VOL Hold VOL To cause the NEXT PREV buttons to become the Vol and Vol Hold Press and hold the Volume button to lock the buttons so they are not...

Page 7: ...f the OLED display in Music Mode The table below explains what each of the symbols or indicators means Symbol or indicator Description Track Length Duration Total duration of track in minutes and seco...

Page 8: ...oring system in the Player has 9 levels The level of charge in the battery is indicated by the level of fill in he Battery Level indicator shown on the OLED screen Symbol or indicator Description Indi...

Page 9: ...menu for the last mode used by the Player will appear For example if the last mode used was the FM radio then the FM radio menu will appear in the OLED screen NOTE Should the buttons be locked press a...

Page 10: ...voice file will begin to play and the file information will begin to scroll across the OLED screen Pausing tracks 1 While a track is playing in Music mode press the PLAY button briefly The Artist and...

Page 11: ...o increase or decrease the volume The Volume level indicator in the OLED screen will go up or down and the volume you hear will be either louder or softer depending on your selection 3 Press the Volum...

Page 12: ...se modes is explained in greater detail in the remainder of this Manual Music Mode Use the Music mode in order to play tracks files that are on the Player Entering the Music Mode In the Main Menu use...

Page 13: ...selected the folder you wish to access 5 Press the MODE button briefly once to confirm your selection and return to the Music or Voice mode screen The track information for the first track file in th...

Page 14: ...ow Repeat The Repeat function allows you choose from a number of different Play Repeat options Option Description Normal Plays all of the tracks files only once in order and then stops Repeat One Play...

Page 15: ...you want 2 Press the MODE button briefly once to confirm your selection and return to the Music mode screen Tempo Rate The Tempo Rate function enables you to change the tempo speed at which tracks fi...

Page 16: ...ined in the Replay Times and Replay Gap options which are outlined below The Player will quit the Replay mode as soon as it has played the specified section the specified number of times Follow Read M...

Page 17: ...ion is specified 5 Press the MODE key briefly once to exit the Follow Read mode and return to the Music mode screen NOTE While in the Comparison Replay mode pressing the PREV button will return you to...

Page 18: ...ou will need get the lyric files and put them onto the Player The lyrics of many songs can be downloaded from various Internet sites for example from http www mstclub com lyrics search aspx Using Lyri...

Page 19: ...ifying a particular Recording Type as well as change the folder of recorded files that is being accessed Entering the Record mode In the Main Menu use the NEXT and PREV buttons to scroll through the m...

Page 20: ...the voice file just recorded you must enter the Voice mode which is covered in the next section of this Manual NOTE The Player has automatic voice control which means that when the Player detects no...

Page 21: ...lined above and without recording press the MODE key briefly once in order to access the Record mode File Menu The first option in the File Menu Local Folder will appear in the OLED screen 2 Press the...

Page 22: ...played on the OLED screen the Player s memory is full Therefore it will be necessary to delete some files in order to make some space available to do further recording NOTE If Out of Folder is display...

Page 23: ...ode and these are outlined in File Menu on page 12 1 Press the MODE button briefly once and the first option in the File Menu Local Folder will appear in the OLED screen 2 Scroll through the menu opti...

Page 24: ...enter the FM mode If there are saved FM radio stations on the Player then the FM mode will open with the most recently accessed station playing 4 Press the MODE button briefly once again to enter the...

Page 25: ...the last station found will play on the Player Exit To exit the Search Mode sub menu and return to FM mode NOTE Remember the radio stations that you are able to access depends on your current location...

Page 26: ...bles you to delete one or all of the saved FM radio stations from the Player 1 While in the FM mode press the MODE button briefly once to open the FM Menu 2 Use the NEXT or PREV button to scroll throu...

Page 27: ...ted when you record from the radio directly onto the Player Choose from Fine REC WAM format Fine timbre Long REC ACT format Generic timbre Exit To exit the REC Type sub menu and return to the FM mode...

Page 28: ...he eBook functionality to work NOTE If no TXT files exist on the Player and you select the eBook mode the OLED screen will display the words No Files To enter the eBook mode 1 In the Main Menu use the...

Page 29: ...lect an eBook to read on the Player There will be a list of available eBooks in TXT format from which to choose 1 Use the NEXT or PREV button to scroll up down the list of files until the desired eBoo...

Page 30: ...Press the MODE button briefly once again in order to delete the file A prompt screen will appear asking if you would like to delete the currently selected file 4 Use the NEXT or PREV button to toggle...

Page 31: ...g the System Mode To enter the System mode 1 Enter the Main Menu 2 Use the NEXT or PREV buttons to scroll through the menu until the System mode is highlighted selected 3 Press the MODE button briefly...

Page 32: ...il all parts of the date and time are correct 8 Then press the MODE button to confirm the new date and time setting and return to the System Menu Backlight Use the Backlight option to specify a fixed...

Page 33: ...language selected and showing in the OLED display 5 Use the NEXT or PREV button to scroll through the menu list until the desired language is reached 6 Press the MODE button briefly once to confirm y...

Page 34: ...V button scroll through the System Menu until Replay Mode appears in the OLED screen 3 Press the MODE button briefly once to confirm your selection and enter the Replay Mode sub menu 4 Use the NEXT or...

Page 35: ...runs the Player Firmware is installed to enable the aigo UK Support Team to correct elements of the computer code quickly and easily if required should you experience problems with the Player that can...

Page 36: ...o Installation of Driver Software for PCs running Windows 98SE only NOTE Installation of the Driver Software is ONLY required if the PC to which you are connecting the Player is running the operating...

Page 37: ...transfer rip the tracks in MP3 format 4 Open Windows Media Player click on the Tools menu and select Options see example below 5 When the Options dialog box opens click on the Rip Music tab as indicat...

Page 38: ...h can be accessed by clicking on the Library tab at the top of the window see example below 9 Once the tracks files have been transferred ripped click on the Library tab at the top of the player windo...

Page 39: ...left you will see tracks you have just imported On the right you will see your MP3 Player directory If there are no tracks files on the Player the words There are no items on this device will appear...

Page 40: ...be used like an extra disk drive for your PC to upload download or delete file s 1 Turn the Player ON and connect it to your PC with the USB lead provided in the Product Pack 2 Open Windows Explorer...

Page 41: ...x type in the name that you wish to give the new folder NOTE Any new folders that you create and put on the Player must be at the top level on the player The Player does not recognise folders in a hie...

Page 42: ...ill appear tell you that it is safe to remove the connection between the Player and the PC Digital Rights Management DRM DRM Digital Rights Management is new technology for securing WMA files This sta...

Page 43: ...Number of Stations 20 in Normal Band 87 0 108 00Mhz and 20 in School Band 76 0 90 00Mhz Max headphone output LEFT 10mW and RIGHT 10mW 32Ohm FM radio Sound to Noise Ratio 45dB decibels Functional Temp...

Page 44: ...in with it Measured in decibels the sound to noise ratio measures the clarity of the signal in a circuit or a wired or wireless transmission channel The greater the ratio evidenced by a larger number...

Page 45: ...he earphone may be used as the antenna Download of music files to the Player fails 1 Check whether the USB cable is damaged 2 Check that the USB cable is connected properly 3 Check whether the driver...

Page 46: ...aigo atom A205 Digital Audio Player USER MANUAL Page 46 The Support Team aigo UK SBC House Restmor Way Wallington SM6 7AH www aigo co uk...

Reviews: