Aigo A208 User Manual Download Page 25

aigo A208 Digital Audio Player                                    USER MANUAL 


Page 25 

Exit 

Use the 

Exit

 option in the Main Menu to leave the Main Menu and return to the mode you were 

previously using. 

NOTE:


Pressing the STOP button while in any sub-menu will return you to the previous menu. 

Connecting the Player to a PC 

Make  sure  your  PC/computer  supports  USB  devices.  (Refer  to  your  PC  manual  for  the 

information about hardware). 

The  Player  can  be  used  as  a  spare  mass  storage  device  that  is  connected  to  your  PC  via  a  USB 

cable.    This functionality is supported under the following Operating Systems: 

Ø


Windows 98SE (with driver, provided on CD-ROM in Product Pack) 

Ø


Windows ME/2000/XP (no driver required 

 see NOTE below) 

NOTE:


For  Windows  2000  users  ONLY:

    Windows  Service  Pack  3  must  be  installed  before 

installing the MP3 Player driver files. 

For  Windows  ME/2000/XP  users:

    The  driver  software  will  be  required 

only

  if  a 

Firmware Upgrade is required for the Player. 

You should only ever use the Firmware functionality if instructed to do so by the Aigo 

UK Support Team. 

1.


Connect your PC to your player using the USB cable provided in the Product Pack.    The one 

end of the USB cable goes into the USB port of the Player, and the other end goes into a spare 

USB port on your PC. 
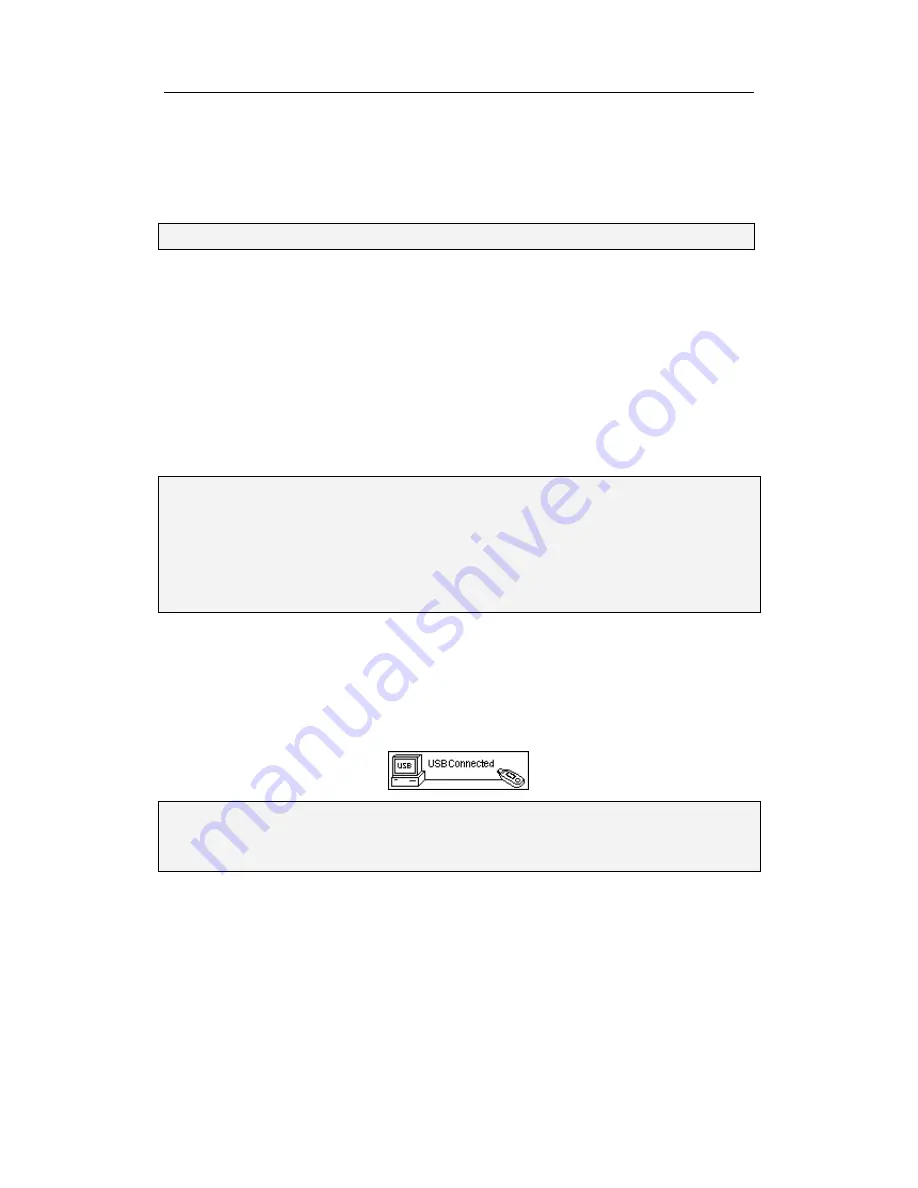
2.


After  connecting  the  USB  cable  to  both  the  Player  and  your  PC,  the  Player  will  turn  ON 

automatically and will enter the USB mode.    The LCD screen will appear as follows: 


NOTE:


If  your  PC  is  running  Windows  98,  then  you  will  need  to  install  the  driver  software 

(provided  on  the  CD-ROM  in  the  Product  Pack)  BEFORE  you  connect  the  Player  to 

your PC for the first time.    See 

Installation of the Driver Software

 on page 26. 

Disconnecting the Player from a PC 

To safely  disconnect the MP3 Player from the PC each time  you want to disconnect it, you  must 

double-click

 on the 

Safely Remove Hardware

 icon located in the System Tray at the right-hand 

end of the Windows Taskbar (which is the blue bar located at the bottom of the screen). 

Summary of Contents for A208

Page 1: ...ER OFF 8 PLAYING TRACKS 9 PLAYING RECORDED VOICE FILES 9 PAUSING TRACKS 9 SELECTING A TRACK FILE 9 SCROLLING THROUGH MENUS SUB MENUS 9 FAST FORWARDING AND FAST REVERSING 10 INCREASING DECREASING VOLUM...

Page 2: ...ows 98 98SE users 26 INSTALLATION OF DRIVER SOFTWARE FOR PCS RUNNING WINDOWS 98SE ONLY 26 DIGITAL RIGHTS MANAGEMENT DRM 26 TRANSFERRING TRACKS TO THE PLAYER FROM A CD 27 TRANSFERRING DRM9 WMA9 TRACKS...

Page 3: ...s Manual on page 35 Note When opening the Product Pack for the first time be careful when removing the contents as many of the items contained in the box are fairly small and could fall out without be...

Page 4: ...rmats This model of player can play MP3 and WMA file formats Simultaneous display of lyrics Lyrics to tracks can be displayed simultaneously as a track is being played Supports LRC format lyrics only...

Page 5: ...e entire User Manual however the information and diagrams below provide a useful overview of the main functions of the Player Exterior view explanation of controls The diagram below shows the front vi...

Page 6: ...ption Press and hold to turn the Player ON Hold Switch Move the Hold switch toward the lock symbol to lock the keys of the Player EQ Equalizer Button Press while playing tracks to change the equalizer...

Page 7: ...tor Description Track Length Duration Total duration of track in minutes and seconds Mode icon Symbol shown indicates the currently specified Mode Play Music Radio Voice Record Bits File Format This i...

Page 8: ...rt 1 fully charged AAA LR03 battery into the battery compartment The positive and negative symbols in the battery compartment indicate how the battery should be inserted 4 Replace the battery compartm...

Page 9: ...With the Player ON and in Voice mode press the PLAY button briefly The selected voice file will begin to play Pausing tracks 1 While a track is playing in Music mode press the PLAY button briefly The...

Page 10: ...he buttons keys In order to avoid accidental pushing of buttons keys they can be locked using the Hold switch located on the side of the Player 1 To activate the Hold function slide the Hold switch to...

Page 11: ...the Music mode Displaying Lyrics This Player supports the use of LRC lyric files so that lyrics can be displayed simultaneously while a track is being played The tracks that you choose to put on the P...

Page 12: ...e Skip Forward Skip Previous buttons to find the track that you wish to play that has a matching LRC lyric file 3 Press PLAY 4 The lyrics will appear in the LCD screen as the track is playing Note If...

Page 13: ...Vxxx WAV in the Voice folder on the Player 6 Press the PLAY button to listen to the voice file you just recorded 7 To exit the Record mode press MENU button on the side of the Player to access the Mai...

Page 14: ...you to navigate around the various files and folders on the Player Entering the Navigation sub menu To enter the Navigation sub menu 1 Press the MENU button to access the Main Menu 2 Use the Skip to...

Page 15: ...music files over this maximum of 500 will be ignored The Player supports a maximum of 50 directories Any directories over this maximum will be ignored as will the content music files contained in thos...

Page 16: ...e 5 pre set Equalizer options Normal XBass Rock Jazz Classical Pop To access the EQ function 1 Access the Settings menu as outlined above 2 Use the Skip to Next or Skip to Previous button to scroll th...

Page 17: ...ys the currently selected track file repeatedly Repeat All Plays all tracks files in order repeatedly until another operation is performed or specified Random Plays all the tracks files in the current...

Page 18: ...esired segment is reached in the track press the MENU button to specify the start point A An A will appear in the LCD screen indicating that the start of a segment has been selected 5 Allow the track...

Page 19: ...access the Backlight function 1 Access the Settings menu as outlined above 2 Use the Skip to Next or Skip to Previous button to scroll through the Settings menu and select the Backlight option 3 Press...

Page 20: ...the Power Savings menu and select the desired option Choose from 0 mins off 1 mins 2 mins 5 mins 10 mins and 15 mins 5 Press the MENU button to confirm your Power Savings selection and return to the S...

Page 21: ...ip to Previous button to scroll through the options and select the desired recording format 7 Press the MENU button to confirm your selection 8 Use the play button to scroll through the options and se...

Page 22: ...ext or Skip to Previous button to scroll through the Settings menu and select the Default option 3 Press the MENU button to confirm your selection The Default settings will be loaded onto the Player E...

Page 23: ...he type of file that you wish to delete or you can choose to leave the Delete mode Music to erase music files Voice to erase Voice files Exit to exit the Delete mode 5 Use the Skip to Next or Skip to...

Page 24: ...on 1 Press the MENU button to access the Main Menu 2 Use the Skip to Next or Skip to Previous button to scroll through the menu option until About is selected 3 Press the MENU button to confirm your s...

Page 25: ...Firmware Upgrade is required for the Player You should only ever use the Firmware functionality if instructed to do so by the Aigo UK Support Team 1 Connect your PC to your player using the USB cable...

Page 26: ...t Pack includes the driver software that is required in order to enable a PC running Windows 98SE to load or delete tracks files onto or from the Player 1 Place the installation CD into the CD ROM dri...

Page 27: ...eps involved in transferring tracks files from a CD to a PC and then to the Aigo A208 Player 1 Ensure that you have Windows Media Player preferably version 10 installed on the PC you will be using Win...

Page 28: ...on page 26 7 Open the CD drive carefully insert the CD containing the tracks that you wish to transfer to your MP3 Player and close the CD drive A pop up box will appear asking what you would like to...

Page 29: ...Sync List on the right hand side Drop it into the Sync List by releasing the left mouse key See example below 11 Once you have dragged all of the tracks that you want into the Sync List click on the S...

Page 30: ...DRM9 WMA9 copy protected WMA files onto the Player it is necessary that a The Player is connected to your PC b Your PC is be connected to the Internet c Windows Media Player 10 is installed on your P...

Page 31: ...files that you copied onto the Player can now be listened to or data transferred to the PC can transferred to another computer Deleting files from the Player via a PC To delete files from the Player...

Page 32: ...and inside a box which indicates that the name can be edited 5 Before clicking on anything else while the folder name is still highlighted and inside of an editing box type in the name that you wish t...

Page 33: ...ive E After a few seconds a text bubble will appear tell you that it is safe to remove the connection between the Player and the PC Technical Specification Dimensions 30mm x 95mm x 18mm H x W x D Weig...

Page 34: ...ate when recording Max Recording Time Indicates the maximum amount of direct recording time Frequency Response This indicates the tonal range of the sounds that can be played on the Player SNR Sound t...

Page 35: ...Transferring DRM9 WMA9 tracks to the Player on page 30 Download of music files to the Player fails 1 Check whether the USB cable is damaged 2 Check that the USB cable is connected properly 3 Check wh...

Page 36: ...ny assistance with your Aigo product please be sure to first contact the Aigo UK Support team Telephone 0871 288 0536 Monday Friday 9am 5pm Email support aigo co uk Response within 24 hours The Suppor...

Reviews: