background image


29 


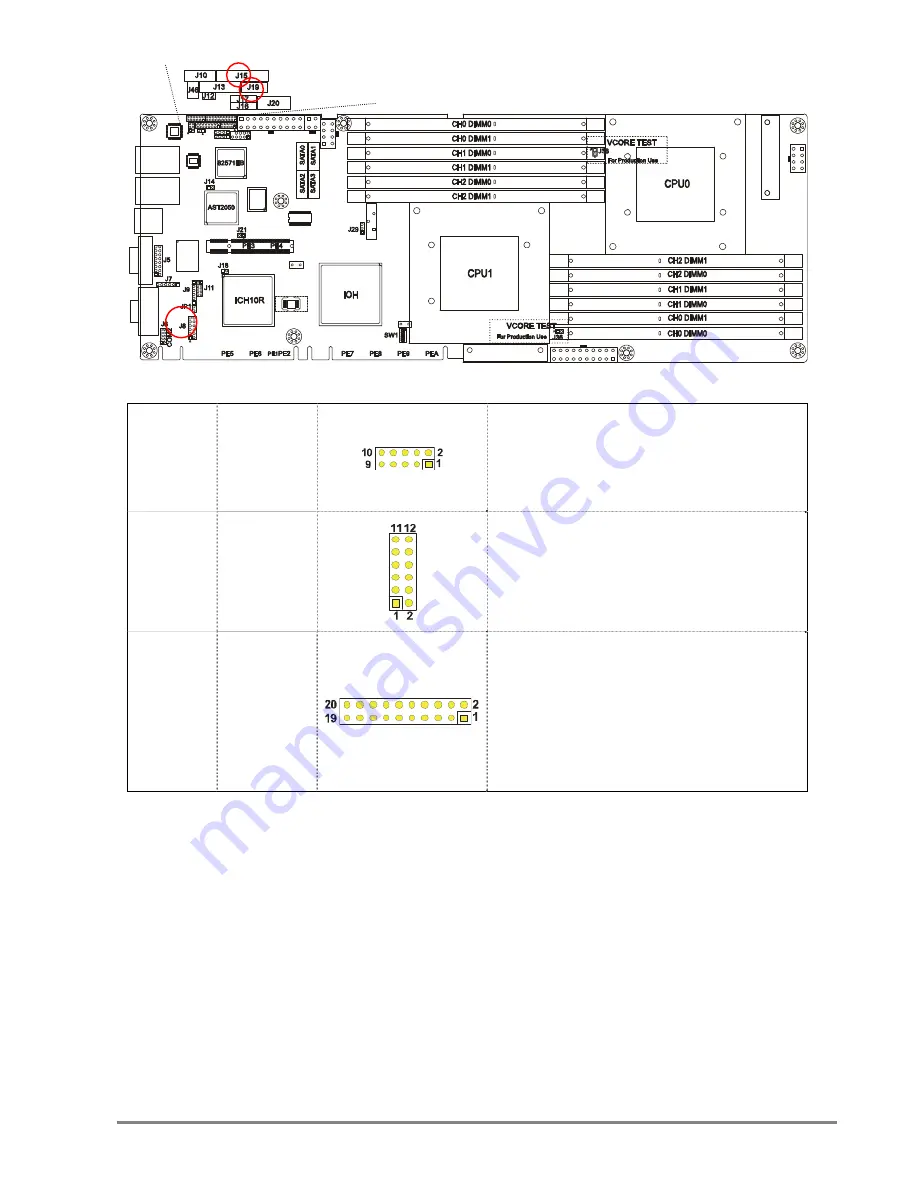
3.2.4 Internal LEDs  


J19 

LAN LED 


LED ON=LAN LINK 
LED BLINK=ACTIVE 
1.GbE1 LED#         2.GbE1 LED+ 
3.GbE2 LED#         4.GbE2 LED+ 
5.GbE3 LED#         6.GbE3 LED+ 
7.GbE4 LED#         8.GbE4 LED+ 
9.NC                      10.3.3V 

J8 

DEBUG PORT  


1.GND                        2.CLK_33M  
3.NC                           4.ICH_LPC_LFRAME# 
5.NC                           6.SIO_PLTRST# 
7.ICH_LPC_LAD1       8.ICH_LPC_LAD3 
9.ICH_LPC_LAD2     10.+3.3V 
11.GND                    12.ICH_LPC_LAD0 

J15 

FRONT 
PANEL 


1.PWR LED+               2.PWR BTN 
3.PWR LED#               4.GND 
5.HDD LED+               6.RST BTN 
7.HDD LED#               8.GND 
9.SYS ID LED+           10.FP ID BTN 
11.SYS ID LED#         12.GND 
13.SYS FLT LED+        14.FP NMI BTN 
15.SYS FLT LED#       16.GND 
17.SB SMB DATA      18.5VSB 
19.SB SMB CLK         20.GND 

Summary of Contents for SB110-CT

Page 1: ...SB110 CT Storage Server Barebone User s Manual Document Number MAN 00103 A...

Page 2: ...11 2 2 2 Installing the CPU Heatsink 13 2 3 System Memory 14 2 4 Drive Bays 16 2 4 1 Installing or Replacing 2 5 Hot swap SAS SATA HDD 16 2 4 2 Installing or Replacing 1 8 Internal SAS SATA HDD 17 2...

Page 3: ...4 2 Updating BIOS 32 Chapter 5 BMC Configuration and Settings 33 5 1 Method 1 Use the BIOS setup 33 5 2 Method 2 Use a Dos tool Syscheck 36 5 3 Connect to BMC 38 5 4 Updating BMC Firmware 41 5 5 Upda...

Page 4: ...ce such as a wet faucet Never push objects of any kind into this product through open slots as they may touch dangerous voltage points or short out parts that could result in fire or electric shock Ne...

Page 5: ...s Manual This document provides a detailed description of the SB110 CT including The General Features of the Product Hardware Setup Motherboard Settings BIOS Configuration and Settings BMC Configurat...

Page 6: ...nesses MAX I O technology maximizing the usage of off the shelf expansion cards up to 5 in the barebone System Package Contents Check your package for the following items Motherboard Castor Components...

Page 7: ...m ID 1 x USB LEDs Power System ID Alert Drive Bays Drive Bays Ten 10 x 2 5 hot swap SATA SAS SSD HDD bays Two 2 x 1 8 internal SATA SSD HDD bays Expansion Slots Expansion Slots 1 x PCIe X8 slot low pr...

Page 8: ...bond W83627DHG Rear I O LAN 4 x RJ 45 ports USB 2 x USB ports VGA 1 x VGA port Serial Port 1 x DB 9 serial port Power Supply Power Supply 650W 1 1 redundant power supply 90 264VAC 47 63 Hz System Cool...

Page 9: ...FF Push for Power On or Off System ID LED Blue System Identification Blink Activity System ID Push for turning ID LED On or Off Alert LED Red Light System Alert System Reset Push for System Reset USB...

Page 10: ...iew of SB110 CT The barebone server includes the basic components shown below Castor Motherboard Power Supply Expansion Slots System Fans SAS SATA Backplane Hot swap HDD Trays Rear I O 1 8 Internal Dr...

Page 11: ...rocedures in replacing a defective part once the SB110 CT appliance is installed and is operational 2 1 Chassis Cover 2 1 1 Removing the Chassis Cover 1 Release the two thumbscrews on the rear panel a...

Page 12: ...he load lever to release the load plate 2 Lift the load plate 3 Remove the processor protective cover from CPU socket Processor protective cover Load lever Load plate Caution When unpacking a processo...

Page 13: ...e load plate load lever Press to close Caution The pins of the processor socket are vulnerable and easily susceptible to damage if fingers or any foreign objects are pressed against them Please keep t...

Page 14: ...r fasteners match the holes on the motherboard 2 Tighten the four screws in a diagonal sequence a couple of turns at a time until all four screws are secure and the heatsink is securely fastened to th...

Page 15: ...following order DIMM Numbers DIMM arrangement CH2 CH1 CH0 2 DIMMs CPU0 DIMM 0 CPU1 DIMM 0 CH2 CH1 CH0 4 DIMMs CPU0 DIMM 0 CPU1 DIMM 0 CPU0 DIMM 0 CPU1 DIMM 0 CH2 CH1 CH0 6 DIMMs CPU0 DIMM 0 CPU1 DIMM...

Page 16: ...2 CH1 CH0 12 DIMMs CPU0 DIMM 0 DIMM 1 CPU1 DIMM 0 DIMM 1 CPU0 DIMM 0 DIMM 1 CPU1 DIMM 0 DIMM 1 CPU0 DIMM 0 DIMM 1 CPU1 DIMM 0 DIMM 1 2 Unlock a DIMM socket by pressing the retaining clips outward 3 In...

Page 17: ...tray 2 Firmly hold the tray lever and pull the drive out of the bay 3 Place the 2 5 HDD on the tray and then secure it with four screws on the bottom 4 Insert the drive carrier into its bay Push the...

Page 18: ...ing 1 8 Internal SATA SSD HDD 1 Release the four screws to remove the HDD cage 2 Release the eight screws and place two 1 8 HDD on the cage 3 Fix the cage with the eight screws and then put the cage i...

Page 19: ...or RISER CARD DIAGRAM PCIE1 PCIE2 PCIE3 PCIE4 Slot Bandwidth PCIE1 X8 PCIE3 X4 PCIE2 X8 PCIE4 X8 Default Switch On Motherboard SW1 3 1 2 O FF O N 5 6 4 2 RISER CARD PN PSG CODE DESCRIPTION PSG RC CTOB...

Page 20: ...to release the bracket and remove the card retainer in the chassis 2 Install the expansion card into the proper slot and connect the expansion card to the riser card 3 Secure the bracket back with th...

Page 21: ...rews on top of the bracket holder and twist out the metal plate to insert the expansion card I O ports 2 Connect the expansion card into the riser card slot which is located under the bracket holder S...

Page 22: ...install the internal expansion card to the riser card please remove the original bracket 2 Install an internal full height half length expansion card into the proper slot and connect the expansion car...

Page 23: ...gth expansion card into the top slot please remove the extended bracket on the chassis bottom 5 Secure the extended bracket with screw 6 Install the expansion card into the proper slot and secure with...

Page 24: ...the bottom slot please adjust the hex brass post to fix the expansion card 2 7 System Fans 2 7 1 Removing or Replacing the System Fans 1 Disconnect the fan cable 2 Remove the fan by lifting it from th...

Page 25: ...ks to the holes on the chassis Start with the bottom hooks and finish by securely connecting the top hooks 2 8 Power Supply 2 8 1 Removing or Replacing the Power Supply Module 1 Hold the PSU lever and...

Page 26: ...Jumpers Location Internal Connectors Location 1 VGA DISABLE J14 7 BMC GPIO J46 2 AST ARM J21 8 GPIO J11 3 AST ARM RESET J12 9 PSU I2C J17 4 CLEAR CMOS J29 10 IPMB I2C J16 5 PCIe Strapping Configuratio...

Page 27: ...rs J14 VGA DISABLE 1 2 1 2 DISABLE OFF ENABLE J21 AST ARM 1 2 1 2 DISABLE OFF ENABLE J12 AST ARM RESET 1 2 1 2 RESET OFF NORMAL J29 CLEAR CMOS 1 3 1 2 NORMAL 2 3 CLEAR OPEN INVALID SW1 PCIe Strapping...

Page 28: ...TS 6 TXD 3 RTS 4 RXD 1 DSR 2 DCD J5 VGA HEADER 15 GND 16 CLK 13 GND 14 GND 11 V_SYNC 12 DVO_5V 9 NC 10 H_SYNC 7 GND 8 BLUE 5 DATA 6 GND 3 GREEN 4 NC 1 GND 2 RED J7 KB MS 1 KB_DATA 2 5V 3 KB_CLK 4 MS_C...

Page 29: ...LK 3 I2C_DATA 4 GND J16 IPMB I2C 1 I2C_DATA 2 GND 3 I2C_CLK 4 NC J20 USB 1 USB5V 2 USB5V 3 USBD 4 USBD 5 USBD 6 USBD 7 GND 8 GND 9 GND 10 NC J13 FAN BOARD CONNECTOR 1 GND 2 3 3V 3 I2CSCL 4 I2CSDA 5 PW...

Page 30: ...DEBUG PORT 1 GND 2 CLK_33M 3 NC 4 ICH_LPC_LFRAME 5 NC 6 SIO_PLTRST 7 ICH_LPC_LAD1 8 ICH_LPC_LAD3 9 ICH_LPC_LAD2 10 3 3V 11 GND 12 ICH_LPC_LAD0 J15 FRONT PANEL 1 PWR LED 2 PWR BTN 3 PWR LED 4 GND 5 HDD...

Page 31: ...n the setup procedure 2 There will be a message Entering SETUP displayed on the diagnostics screen Caution For the official released version the last digit of the BIOS Version must end in a 0 Caution...

Page 32: ...31 3 Identify the BIOS Version 4 Load Optimal Default setting 5 Save the setting and exit the BIOS setup utility...

Page 33: ...in DOS environment 2 The latest BIOS version is available from the FAE or AIC website 3 Enter flash at the DOS command line 4 Reboot the system after the update Caution Do not shut down the system wh...

Page 34: ...onfiguration and Settings Insert BMC IP LAN into the BMC LAN port There are two methods to setup BMC IP 5 1 Method 1 Use the BIOS setup 1 BIOS SETUP Advance IPMI configuration Set LAN configuration BM...

Page 35: ...34 2 Input IP address Set IP static Note type 1 for selecting static IP mode or type 2 for selecting DHCP mode...

Page 36: ...35 3 Input subnet mask address...

Page 37: ...36 5 2 Method 2 Use a Dos tool Syscheck 1 Type sc lanset 2 Modify IP setting 3 Input IP address Note type 1 for selecting static IP mode or type 2 for selecting DHCP mode...

Page 38: ...address Below IP address is an example using a default IP setting User is allowed to change the IP address for realistic use 5 Finish BMC IP configuration Note Type sc exe langet command to obtain BMC...

Page 39: ...2 2 Use the default user name and password for first time login to ASTER Field Default UserName root Password superuser Note The default user name and password are in lower case characters Note Users...

Page 40: ...39 3 Information of ASTER firmware 4 Server Health Sensor Readings 5 Configuration Please refer to AIC BMC User Guide for more information on AIC BMC...

Page 41: ...40 Mouse Mode setting For Windows OS environment set mode to absolute For Linux OS environment set mode to relative 6 Remote Control Environmental setting...

Page 42: ...The latest BMC firmware version is available from the FAE or AIC website 4 After update BMC firmware please power off and then power on system Note close all other applications This step is required f...

Page 43: ...IGURATION IS UPDATED EACH BMC CONFIGURATION HAS A CORRESPONDING BMC FIRMWARE THAT HAS BEEN TESTED AND APPROVED FOR EACH SPECIFIC PRODUCT PLEASE MAKE SURE FIRMWARE AND CONFIGURATION VERSIONS ARE CORREC...

Page 44: ...m CHINA Tel 021 54961421 021 54961422 Fax Extension 608 Email Technical Support support aicipc com AMERICA West coast Tel 1 909 895 8989 Fax 1 909 895 8999 Email Technical Support support aicipc com A...

Page 45: ...44 Note...

Reviews: