VI. INSTALLATION
A. GENERAL
1. PRE-INSTALLATION CHECK-POINTS
Before attempting any installation, the following points should be carefully consid-
ered:
a. Structural strength of supporting members.
(rooftop installation)
b. Clearances and provision for servicing.
c. Power supply and wiring.
d. Air duct connections.
e. Drain facilities and connections.
f. Location for minimum noise.
2. LOCATION
These units are designed for outdoor installations. They can be mounted on a
slab or rooftop. They are not to be installed within any part of a structure such as
an attic, crawl space, closet, or any other place where condenser air flow is
restricted or other than outdoor ambient conditions prevail. Since the application
of the units is of the outdoor type, it is important to consult your local code authori-
ties at the time the first installation is made.
B. OUTSIDE SLAB INSTALLATION
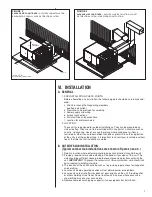
(Typical outdoor slab installations are shown in Figures 3 and 4.)
1. Select a location where external water drainage cannot collect around the unit.
2. Provide a level concrete slab extending 3" beyond all four sides of the unit. The
slab should be sufficient above grade to prevent ground water from entering the
unit.
IMPORTANT:
To prevent transmission of noise or vibration, slab should not
be connected to building structure.
3. The location of the unit should be such as to provide proper access for inspection
and servicing.
4. Locate unit where operating sounds will not disturb owner or neighbors.
5. Locate unit so roof runoff water does not pour directly on the unit. Provide gutter
or other shielding at roof level. Do not locate unit in an area where excessive
snow drifting may occur or accumulate.
6. Remove compressor shipping supports (if so equipped) after installation.
36“
60“
48“
VERTICAL
CLEARANCE
18“
12“
FIGURE 3
PACKAGE AIR CONDITIONER –
OUTSIDE SLAB INSTALLATION,
BASEMENT OR CRAWL SPACE DISTRIBUTION SYSTEM
FIGURE 4
PACKAGE AIR CONDITIONER –
OUTSIDE SLAB INSTALLATION, CLOSET
DISTRIBUTION SYSTEM. SLAB FLOOR CONSTRUCTION
*
Allow 57" for
economizer on duct side.
7
Summary of Contents for RLNL-C 13 SEER Series
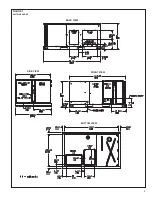
Page 5: ...5 FIGURE 1 UNIT DIMENSIONS BACK VIEW SIDE VIEW FRONT VIEW BOTTOM VIEW ...
Page 39: ...39 FIGURE 14 WIRING DIAGRAM ...
Page 41: ...3 5 TON AIR CONDITIONER 13 14 SEER 41 ...
Page 42: ...4 TON AIR CONDITIONER 13 14 SEER 42 ...
Page 43: ...5 TON AIR CONDITIONER 13 SEER 43 ...
Page 46: ...46 ...
Page 47: ...47 ...
Page 48: ...48 CM 0610 ...


