4
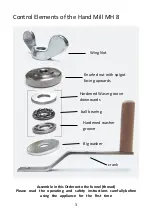
Assembly of the hand mill:
Please see the picture on page 3
1.
Position the winch onto the threaded rod.
2.
Then fit the washer.
3.
Then fit the bearing.
4.
Position the knurled nut with the spigot facing upwards until
you have contact with the bearing.
5.
Now turn the knurled nut back by one turn and so secure
(counter-lock) the same.
You now have the best adjustment to begin the milling process!
The distance between the bearing and the knurled nut determines the
degree of fineness of the flour.
For a finer milling result tighten the knurled nut step by step with
renewed locking checks.
For a coarser milling result loosen the knurled nut step by step with
renewed locking checks.
Attention:
If the knurled nut is not suffiently secured by the wing nut, it may be
over-tightened during the milling process, causing the mill to either
block or become difficult to operate.
Correct Countering (Locking):
The easiest way is for you to use your left hand to hold the knurled nut
and with your right hand the wing nut.
Hold the knurled nut firmly and turn the wing-nut in the clockwise
direction on to it. So the knurled nut cannot
become over-tightened when milling.

