background image

6

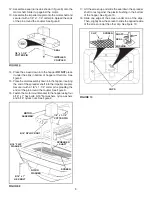
FIGURE 9

14.  Place the screen down into the hopper. 

DO NOT

 place 

it under the clips in bottom of hopper at this time.  See 
fi gure 9.

15.  Place the motor assembly down into the hopper, inserting 

the end of the spreader shaft into the impeller coupler. 
Secure it with a 1/8" x 1-1/4" cotter pin, spreading the 
ends of the pin around the coupler. See fi gure 9.

16.  Fasten the motor mount bracket to the hopper using four 

5/16" x 1" hex bolts, 5/16" fl at washers, nylon washers 
and 5/16" nylock nuts. See fi gure 9.

12.  Assemble a seal (turned as shown in fi gure 8) onto the 

motor shaft. Slide it up against the motor.

13.  Assemble the impeller coupler onto the motor shaft and 

secure it with a 1/8" x 1-1/4" cotter pin. Spread the ends 
of the pin around the coupler. See fi gure 8.

5/16" x 1"

HEX BOLT

NYLON
WASHER

5/16" NYLOCK NUT

MOTOR

ASSEMBLY

5/16" FLAT 

WASHER

SCREEN

1/8" x 1-1/4"
COTTER PIN

SPREADER

SHAFT

17.  Lift the screen up and slide the seal down the spreader 

shaft to rest against the plastic bushing in the bottom 
of the hopper. See fi gure 10.

18.  Slide one edge of the screen under one of the clips. 

Then, slightly bow the screen to slide the opposite side 
of the screen under the other clip. See fi gure 10.

FIGURE 10

CLIPS

CLIP

SCREEN

SHAFT

SEAL

BUSHING

1/8" x 1-1/4"
COTTER PIN

SEAL

IMPELLER
COUPLER

Summary of Contents for 45-0324

Page 1: ...AL CAUTION Read Rules for Safe Operation and Instructions Carefully Model No 45 0324 PRINTED IN USA ATV MOUNTED 125 LB BROADCAST SPREADER Assembly Operation Maintenance Repair Parts the fastest way to...

Page 2: ...spreader attachment Do not allow adults to operate the vehicle or spreader attachment without proper instructions Neveroperatevehicle andspreaderattachmentwithout wearing solid substantial footwear W...

Page 3: ...6 x 2 B 8 Hex Bolt 5 16 x 1 C 2 Hex Bolt 1 4 x 3 4 D 1 Carriage 5 16 x 1 E 5 Carriage Bolt 5 16 x 1 3 4 F 4 Nylock Hex Nut 1 4 G 12 Nylock Hex Nut 5 16 H 2 Flat Washer 1 4 I 4 Flat Washer 5 16 J 4 Nyl...

Page 4: ...hat the de ector curves naturally between the angle brackets and then tighten all nuts See gure 2 1 4 NYLOCK NUT 1 4 FLAT WASHER 1 4 x 3 4 HEX BOLT DEFLECTOR ANGLE BRACKET 1 4 NYLOCK NUT PLUG 5 16 x 1...

Page 5: ...ex bolts and 5 16 nylock nuts Tighten Repeat on the other frame leg with the L H mounting bracket FIGURE 5 FIGURE 4 5 16 x 1 3 4 CARRIAGE BOLT MOUNTING CLAMP PLASTIC KNOB MOUNTING BRACKET ADHESIVE PAD...

Page 6: ...the motor shaft Slide it up against the motor 13 Assemble the impeller coupler onto the motor shaft and secure it with a 1 8 x 1 1 4 cotter pin Spread the ends of the pin around the coupler See gure...

Page 7: ...ntroltothemotormountbracketonthe spreader using the 5 16 x 1 carriage bolt a mounting clamp and a plastic knob See gure 11 NOTE You can also attach to the rear rack if you use a 5 16 x 1 3 4 carriage...

Page 8: ...he Flow Control Lever against the Adjustable Stop and ip the ON OFF switch to the on position STOPPING THE SPREADER 1 MovetheFlowControlLevertothe OFF position Make sure that the switch is turned off...

Page 9: ...battery 1 Wired backwards to battery 2 Spreader on off switch is broken Hopper closure plate does not open to the correct position Spreader motor doesn t run Spreader motor runs backwards Motor runs w...

Page 10: ...LB BROADCAST SPREADER MODEL 45 0324 44 43 38 36 36 45 34 35 39 40 41 42 22 25 4 6 5 55 3 6 5 21 33 35 1 7 7 7 27 47 46 7 24 26 9 8 31 5 37 30 51 29 12 15 14 16 11 52 28 17 36 10 2 6 20 18 27 30 29 28...

Page 11: ...unting Bracket 29 23442 5 Mounting Bracket 29 23442 5 Mounting Bracket 29 23442 5 Mounting Bracket 30 44215 5 Carriage Bolt 5 16 18 x 1 3 4 30 44215 5 Carriage Bolt 5 16 18 x 1 3 4 30 44215 5 Carriage...

Page 12: ...REPAIR PARTS Agri Fab Inc 303 West Raymond Sullivan IL 61951 217 728 8388 www agri fab com the fastest way to purchase parts www speedepart com 2004 Agri Fab Inc...

Reviews: