background image

12

ENTRETIEN

1.  Au  commencement  de  chaque  saison,  graissez  au  moyen 

d'une machine à graisser légère, le verrou, le boulon pivot du 
verrou, et la zone de l'essieu où la barre de traction d'attelage 

pivote. 

2.  Graissez ou lubrifiez les roulements des roues périodiquement. 

Utilisez de la graisse pour roulement de roue d'automobile ou 
de l'huile de poids 20. 

3.  Maintenez les pneus bien gonflés à la pression recommandée 

de 12-14 psi. 

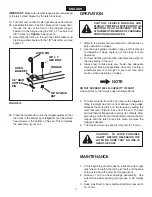
5.   Pour décharger des matériaux hors de la remorque, retirez le 

hayon (1) arrière en le soulevant tout droit et hors des guides. 
Relâchez le ressort de verrouillage de la barre d'attelage en 
tirant le levier du loquet de verrouillage (13) vers l'avant, hors 
de la remorque. Le plancher de la remorque va ainsi s'incliner 
vers l'arrière pour vider son contenu. Après avoir tout déchargé, 
tirez l'avant du plancher vers le bas et vers la barre d'attelage 
de la remorque jusqu'à ce que le loquet s'enclenche en place. 
Replacez le hayon arrière si vous le désirez.

6.  La vitesse de conduite maximale permise pour le remorquage 

est de 16 km/heure.

UTILISATION

1.  Se référer au manuel du tracteur pour des instructions précises 

concernant la conduite en pentes.

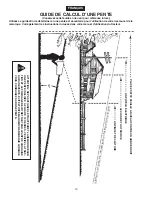
2.  Utiliser le guide fourni en page 13 de ce manuel pour savoir 

si l’angle de la pente est trop prononcé pour une conduite 

sécuritaire.

3.  Pour une meilleure traction et une plus grande stabilité, répartir 

également le poids de la charge à transporter.

4.  Toujours  vérifier  si  le  véhicule  freine  et  peut  remorquer 

adéquatement avant de tirer toute charge dans la remorque.  
Soyez doublement vigilant dans les pentes.

ATTENTION:  

LA STABILITÉ ET LA CAPACITÉ 

DE  FREINAGE  D’UN  VÉHICULE  PEUT  ÊTRE 
DIMINUÉE PAR L’AJOUT D’UN ACCESSOIRE.  

SOYEZ VIGILANT DANS LES PENTES.

NE PAS DÉPASSER LA CHARGE MAXIMALE DE LA REMORQUE 

(voir les caractéristiques sur cette page).  

Un pied cube de déchets 

pèse approximativement 36 kg.

N.B.

ATTENTION: 

AFIN D’ÉVITER TOUT RISQUE DE 

BLESSURE, ASSUREZ-VOUS QUE PERSONNE 
NE SOIT PRÈS DE LA REMORQUE LORSQUE 
VOUS  RELÂCHEZ  LE  LOQUET  D'ATTELAGE 

À RESSORT.

FRANÇAIS

Summary of Contents for 45-02402 ATV

Page 1: ...écurité de cette notice PRECAUCION Lea cuidadosamente los Procedimientos e Instrucciones para la Operación Segura de la Máquina Assembly Safety Operation Maintenance Parts Montaje Seguridad Operación Mantenimiento Piezas de Repuesto Assemblage Sécurité Utilisation Entretien Pièces de Rechange UTILITY ATV CART CARRITOS REMORQUE UTILITAIRE 45 02402 ATV the fastest way to purchase parts www speedepar...

Page 2: ...carry passengers 4 Never allow children to operate the tractor or the cart attachment 5 Do not allow adults to operate the tractor or cart attachment without proper instructions 6 Always begin with the transmission in first low and gradually increase speed as conditions permit 7 Tow the cart at reduced speed over rough terrain and hillsides or near creeks and ditches to prevent tipping over and lo...

Page 3: ...Nut 5 16 G 13 Nylock Nut 5 16 H 1 Nylock Nut 3 8 I 4 Flat Washer 1 J 2 Cotter Pin 1 8 x 1 1 2 Lg K 1 Spring L 1 Spring Puller Tool M 2 Hub Cap N 1 Hair Cottter Pin 1 8 O 1 Hitach Pin P 2 Spacer ENGLISH B C D E I J K L N Not Shown Full Size HARDWARE SHOWN FULL SIZE A M O H F G 23353 43343 43014 47622 HA21362 47810 43001 43814 47189 46980 47407 43093 43601 43012 47407 45132 P ...

Page 4: ...t bracket asshowninfigure4 Proceedwiththeassembly steps which follow DO NOT LEAVE THE CART UNATTENDED IN UPRIGHT POSITION DURING ASSEMBLY A FALLINGCARTCANCAUSEPERSONALINJURY PAY CLOSE ATTENTION TO THE STABILITY OF THE CART WHILE IT REMAINS IN AN UPRIGHT POSITION FOR BEST STABILITY ASSEMBLE ON A SMOOTH LEVEL SURFACE CAUTION TOOLS REQUIRED FOR ASSEMBLY 1 Screwdriver 1 Pliers 2 7 16 Wrenches 2 1 2 Wr...

Page 5: ...h fasten the bottom of the cart together FIGURE 8 12 Assemble the two corner caps to the front corners of the cart using four 1 4 x 3 4 hex bolts and 1 4 nylock nuts Also assemble two 1 4 x 3 4 hex bolts and 1 4 nylocknutstothetworearcornersofthecart TIGHTEN See figure 8 11 Turn the latch stand bracket so that the aligning tab is at the rear bottom of the bracket Assemble the latch stand bracket t...

Page 6: ...bolt can still rotate freely Tighten the two 5 16 SEMS nuts against the sides of the latch lock lever so that the lever is centered in the slot See figure 10 AXLE DRAW BAR TONGUE LATCH STAND BRACKET 13 To prevent accidental tipping during the following assemblyprocedures lowerthecarttorestupsidedown on its top flanges so that the wheel support is facing up See figure 9 14 Lay the drawbar tongue op...

Page 7: ...r emptying pull the front of the bed down toward the cart tongue until the latch snaps into place Replace the tailgate if desired 6 The maximum towing speed for this cart is 10 m p h DO NOT EXCEED 1200 LB CAPACITY OF CART One cubic foot of dirt weighs approximately 80 lbs CAUTION TO AVOID POSSIBLE INJURY BEFORE RELEASING THE LATCH BE SURE THAT NO ONE IS NEAR THE CART CAUTION VEHICLE BRAKING AND ST...

Page 8: ...ers manual CAUTION DO NOT OPERATE YOUR TRACTOR AND CART ON A SLOPE IN EXCESS OF 10 DEGREES BE SURE OF YOUR TRACTOR S TOWING AND BRAKING CAPABILITIES BEFORE OPERATING ON A SLOPE AVOID ANY SUDDEN TURNS OR MANEUVERS WHILE ON A SLOPE A POWER POLE A CORNER OF A BUILDING OR A FENCE POST F O L D A L O N G D O T T E D L IN E R E P R E S E N T IN G A 1 0 D E G R E E S L O P E SIGHT AND HOLD THIS LEVEL WITH...

Page 9: ...9 ...

Page 10: ...PORTANTES IL SIGNIFIE ATTENTION DEMEUREZ VIGILANT VOTRE SÉCURITÉ EN DÉPEND FRANÇAIS INSTRUCTIONS DE MONTAGE ATTENTION OUTILS REQUIS POUR LE MONTAGE 1 Tournevis 1 Pinces 2 Clés 7 16 2 Clés 1 2 2 Clés 9 16 NELAISSEZPASLAREMORQUESANSSURVEILLANCE EN POSITIONVERTICALE PENDANT L ASSEMBLAGE CAR ELLE RISQUE DE TOMBER ET DE BLESSER QUELQU UN FAITES ATTENTION À LA STABILITÉ DE LA REMORQUE PENDANT QU ELLE DE...

Page 11: ...4 au travers de la barre le levier loquet et deux contre écrous hex de 5 16 un de chaque côté du levier Montez le contre écrou hex de 5 16 sur l extrémité du boulon et serrez de telle sorte que le boulon puisse encore pivoter librement Serrez les deux contre écrous hex de 5 16 contre les côtés du levier loquet de verrouillage de telle sorte que le levier soit centré dans l emplacement Voir figure ...

Page 12: ...enclenche en place Replacez le hayon arrière si vous le désirez 6 La vitesse de conduite maximale permise pour le remorquage est de 16 km heure UTILISATION 1 Seréféreraumanueldutracteurpourdesinstructionsprécises concernant la conduite en pentes 2 Utiliser le guide fourni en page 13 de ce manuel pour savoir si l angle de la pente est trop prononcé pour une conduite sécuritaire 3 Pourunemeilleuretr...

Page 13: ...racteur ATTENTION NE PAS UTILISER LE TRACTEUR ET LA REMORQUE SUR UNE PENTE INCLINÉE À PLUS DE 10 DEGRÉS VÉRIFIEZ LA TRAC TION ET LE FREINAGE DE VOTRE TRACTEUR AVANT DE CONDUIRE SUR UNE PENTE ÉVITEZ TOUTE MANOEUVRE BRUSQUE LORSQUE VOUS CONDUISEZ SUR UNE PENTE FRANÇAIS UN POTEAU ÉLECTRIQUE LE COIN DE TOUT ÉDIFICE UN PIQUET DE CLÔTURE P L IE Z S E L O N L E S P O IN T IL L É S R E P R É S E N T A N T...

Page 14: ...rreteras o caminos públicos 11 La máxima velocidad de remolque es de 10 MPH 16 km h 12 Observe las instrucciones de mantenimiento y lubricación según se describen en este manual Cualquier equipo movido por motor puede causar lesiones si se opera inadecuadamente o si el usuario no entiende cómo debe operarlo Manténgase atento y cauteloso siempre que opere el equipo ESPAÑOL INSTRUCCIONES DE MONTAJE ...

Page 15: ...remodelcarritoutilizando seis tornillos con cabeza hex 1 4 x 3 4 ytuercas de bloqueo hex1 4 tal y como se muestra en la figura 5 Deje dos orificios vacíos en la parte inferior del panel tal y como se muestra Con ambas mitades del cuerpo del carrito juntas apriete los tornillosdelaparteinferiordelpaneldelantero acontinuación apriete los tornillos a ambos lados Vea la figura 5 En este momento apriet...

Page 16: ...nganchado en su posición Vuelva a colocar la puerta trasera si así lo desea 6 La velocidad de remolque máxima para este carrito es de 16 5 km h NO SUPERE LA CAPACIDAD DE CARGA DEL CARRITO Consulte las especificaciones en esta misma página para cada uno de los modelos 30 cm cúbicos de tierra pesa aprox 36 kg OPERACIÒN PRECAUCIÓN LA CAPACIDAD DE FRENADO Y LA ESTABILIDAD DEL VEHÍCULO PUEDEN VERSE AFE...

Page 17: ...DE 10 VERIFIQUE LA CAPACIDAD DE SU TRACTOR PARA REMOLCAR Y FRENAR ADECUADAMENTE ANTES DE OPERAR EN UNA PENDIENTE EVITE GIROS O MANIOBRAS BRUSCAS CUANDO OPERA EN UNA PENDIENTE UN POSTE DE CORRIENTE ELECTRICA O TELEFONO UNA ESQUINA DE UN EDIFICIO O UN POSTE DE UNA CERCA D O B L E L A H O J A A L O L A R G O D E L A L IN E A P U N T E A D A L A C U A L R E P R E S E N T A U N A P E N D IE N T E D E 1...

Page 18: ...18 REPAIR PARTS FOR UTILITY CART MODEL NO 45 02402 ATV 11 15 13 15 14 2 17 17 20 A 19 12 17 19 9 5 26 12 6 11 10 A 17 19 7 8 24 1 3 19 4 19 20 21 17 1 21 22 29 25 27 18 21 28 28 16 31 31 30 ...

Page 19: ...0 1 Draw Bar Tongue 11 27336 1 Axle 1 Dia 12 23484 2 Front Corner Cap 13 40758 2 Wheel 14 43093 2 Cotter Pin 1 8 Dia x 1 1 2 15 43601 4 Washer Flat 1 16 43014 2 Hub Cap 17 43012 23 Hex Bolt 1 4 20 x 3 4 18 43343 1 Hair Cotter Pin 1 8 4 19 47189 23 Nylock Nut 1 4 20 20 43814 12 Truss Hd Bolt 5 16 18 x 3 4 Lg 21 47810 13 Nylock Nut 5 16 18 22 43001 1 Hex Bolt 3 8 16 x 1 Lg 24 HA21362 1 Nylock Nut 3 ...

Page 20: ... to the Universal Copyright Convention and the Berne convention No part of this document may be reproduced or transmitted in any form or by any means electronic or mechanical including photocopying or recording or by any information storage or retrieval system without the express written permission of Agri Fab Inc Unauthorized uses and or reproductions of this manual will subject such unauthorized...

Reviews: