background image

9

CHECK FOR LOOSE FASTENERS

1.

Before each use make a thorough visual check of
the sreader for any bolts and nuts which may have
loosened. Retighten any loose bolts and nuts.

CHECK FOR WORN OF DAMAGED PARTS

2.

Check for worn or damaged parts before each use.
Repair or replace parts if necessary.

CHECK TIRE INFLATION

3.

Check if tires are adequately inflated before each
use. Do not inflate beyond maximum recommended
pressure.

FIGURE 14

1.

Rinse inside of hopper and exterior of spreader and
dry off before storing.

2.

Store in a clean, dry area.

CAUTION:  DO NOT 

inflate tires beyond

the  maximum  recommended  pressure
printed on side of tire.

CLEANING

4.

Rinse inside of hopper and exterior of spreader and
dry off before storing.

LUBRICATE 

(See figure 14.)

5.

Lightly apply automotive grease as needed to the
sprocket and gear.

6.

Oil the nylon bushings on the vertical sprocket shaft
and on the axle at least once a year, or more often
as needed.

7.

Oil right hand (idler) wheel bearing at least once a
year or more often as needed.
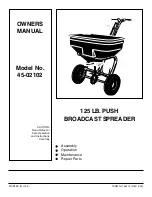
FIGURE 15

MAINTENANCE

SPROCKET
SHAFT

AGITATOR 
WIRE

3/8" LOCKNUT

AGITATOR 
SLEEVE

STORAGE

1.

If  the  axle,  slotted  gear  and  sprocket  assembly  is
disassembled, mark down the positions of the parts
as they are removed. The drive wheel and sprocket
positions  in  relation  to  the  slotted  gear  determine
which direction the spreader plate will spin. Be sure
to reassemble them in their original positions. (Re-
fer to figure 2 on page 4.) Use shim washers (Ref.
no. 20 on pages 10 and 11) as needed for minimum
backlash.  Add grease to gear and sprocket.

2.

If the agitator wire becomes damaged or worn it can
be replaced. Loosen the 3/8" hex nut on top of the
sprocket  shaft  until  agitator  wire  is  free.  Remove
old  agitator  wire  from  hole  in  agitator  sleeve  and
replace with new agitator wire. Position agitator wire
so that sprocket shaft turns freely, then tighten 3/8"
hex nut on top of sprocket shaft. See figure 15.

SERVICE AND ADJUSTMENTS

GREASE

OIL

OIL

Summary of Contents for 45-02102

Page 1: ...ON Read Rules for Safe Operation and Instructions Carefully 125 LB PUSH BROADCAST SPREADER PRINTED IN U S A FORM NO 48313 REV 5 02 OWNERS MANUAL Model No 45 02102 Assembly Operation Maintenance Repair Parts ...

Page 2: ...icals 4 Read the chemical label instructions and cautions for handling and applying the chemicals purchased for spreading 5 Keep all nuts bolts and screws tight to be sure equipment is in safe working condition 6 Follow maintenance and lubrication instructions as outlined in this manual LOOKFORTHISSYMBOLTOPOINTOUT IMPORTANT SAFETY PRECAUTIONS IT MEANS ATTENTION BECOMEALERT YOUR SAFETY IS INVOLVED ...

Page 3: ... Lock Nut 1 4 20 Thd F 6 Flat Washer 5 16 SAE G 4 Nylon Washer H 4 Flat Washer 1 5 8 x 25 32 I 1 Cotter Pin 1 8 x 1 1 2 KEY QTY DESCRIPTION J 1 Cotter Pin 3 32 x 3 4 Long K 1 Flow Control Link L 1 Spacer Tube Short M 1 Spacer Tube Long N 1 Grip O 1 Vinyl Cap P 1 Nut Plastic Wing 1 4 Q 2 Handle Grip R 1 Flow Control Gage NOT FULL SIZE FULL SIZE G H I A B C J D E F K L M N O R Q P ...

Page 4: ...GURE 2 FIGURE 3 8 Remove the middle 3 8 hex bolt flat washer and hex lock nut from the crossover tube See figure 3 5 Place the short spacer tube and a 3 4 washer onto the end of the axle that has the large drilled hole left hand side See Figure 2 6 Place the drive wheel onto the axle The notched hub and the air valve should face to the outside See Figure 2 7 Fasten the wheel to the axle using a 1 ...

Page 5: ...pposite side 9 Place the long handle tube onto the crossover tube on the opposite side from the shaft support plate Fasten with 3 8 hex bolt flat washer and hex lock nut removed in the previous step See figures 3 and 4 Do not tighten at this time 10 Assemble two handle braces to the inside of the hopper frame one on each side using two 1 4 x 1 3 4 hex bolts and two 1 4 lock nuts See figure 4 Do no...

Page 6: ...GRIP FLOW CONTROL ROD FLOW CONTROL LINK 3 32 COTTER PIN 5 16 FLAT WASHER SLOT 18 Place a 5 16 flat washer onto the end of the flow control rod Insert the end of the rod through the slot in the flow control mounting bracket and through the hole in the flow control link Secure with a 3 32 x 3 4 cotter pin See figure 8 20 Assemble both the flow control mounting bracket and the short handle tube to th...

Page 7: ...f hopper just closes c Snug the 1 4 lock nuts just enough to hold flow control mounting bracket in place d Set adjustable stop at 5 Pull flow control arm against stop Verify that closure plate has opened about half way e If closure plate does not open half way it may be closed too far at OFF Adjust position of flow control mounting bracket until closure plate will open about half way at 5 and stil...

Page 8: ...the flow control arm is in the off position and the closure plate is shut 3 Break up lumpy fertilizer as you fill the hopper 4 Set the adjustable stop with the flow control arm still in the off position Refer to the application chart on this page and to the instructions on the fertilizer bag to select the appropriate flow rate setting 5 The application chart is calculated for light to heavy applic...

Page 9: ...nd on the axle at least once a year or more often as needed 7 Oil right hand idler wheel bearing at least once a year or more often as needed FIGURE 15 MAINTENANCE SPROCKET SHAFT AGITATOR WIRE 3 8 LOCKNUT AGITATOR SLEEVE STORAGE 1 If the axle slotted gear and sprocket assembly is disassembled mark down the positions of the parts as they are removed The drive wheel and sprocket positions in relatio...

Page 10: ... 49 17 35 35 B A D E D 16 13 28 48 37 37 43 44 34 41 42 8 11 11 45 39 23 24 21 53 53 7 32 40 40 9 9 9 9 9 54 9 9 9 56 59 50 7 7 7 58 51 7 62 62 57 A B 25 32 61 4 E 9 39 52 40 9 39 39 C C 40 55 32 47 14 9 7 63 15 62 2 64 REPAIR PARTS FOR BROADCAST SPREADER MODEL 45 02102 ...

Page 11: ... Owner s Manual REF PART QTY DESCRIPTION NO NO 1 44466 1 Hopper 2 43882 4 Rivet Stainless 3 62482 1 Ass y Guide Closure 4 44462 1 Tube Frame 5 23753 1 Slide Gate Angle Bracket 6 23758 1 Slide Gate Bracket 7 1509 69 12 Bolt Hex 1 4 20 x 1 3 4 Lg 8 24857 1 Flow Control Link 9 43013 18 Nut Hex Lock 1 4 20 Thd 10 43808 1 Tube Crossover 11 43012 3 Bolt Hex 1 4 20 x 3 4 Lg Gr 5 12 44566 1 Spring Torsion...

Page 12: ...rmal maintenance 5 AGRI FAB does not extend any warranty for products sold or exported outside of the United States of America its possessions and territories except those sold through AGRI FAB s authorized channels of export distribution WHAT AGRI FAB WILL DO Repair or replace your AGRI FAB product or part HOW TO GET SERVICE Deliver the AGRI FAB product or part to AGRI FAB s local authorized serv...

Reviews: