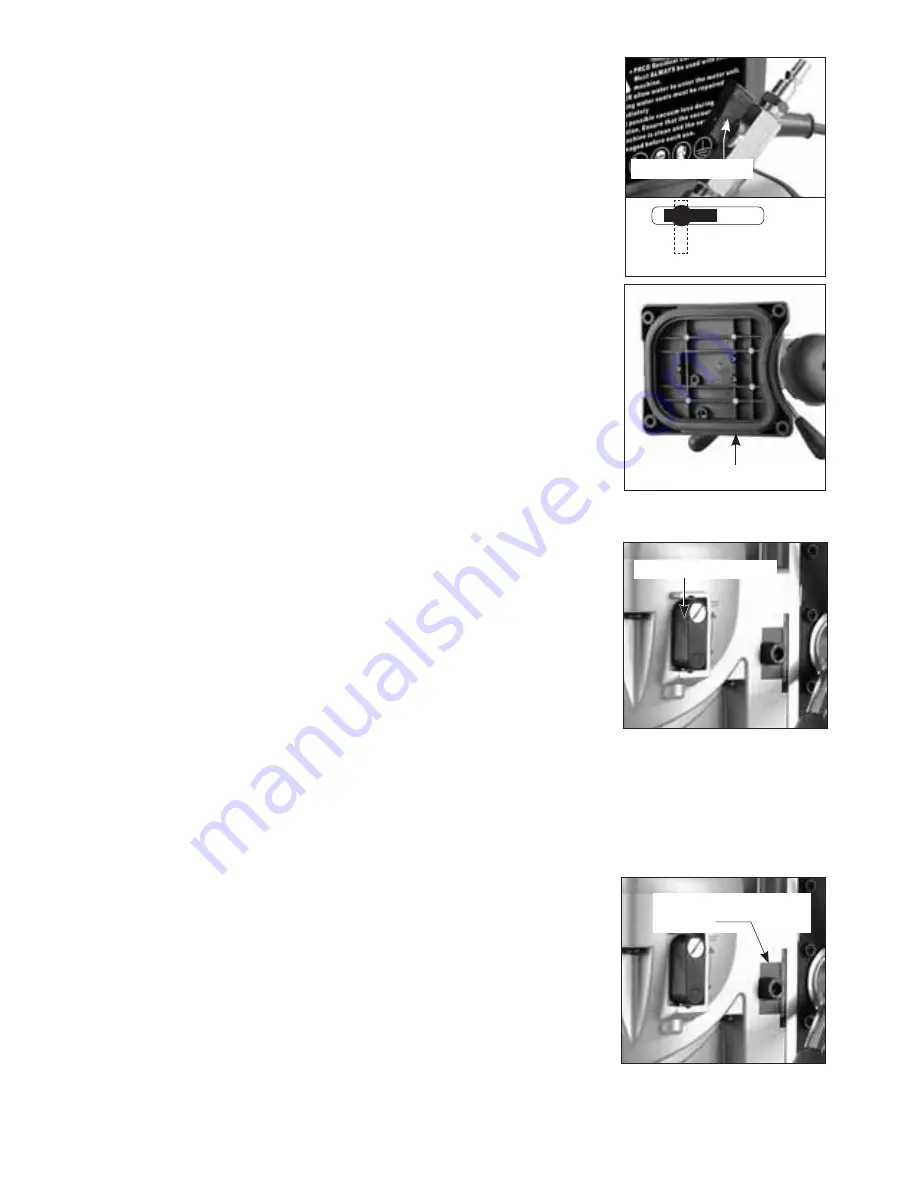
AGP TC100 Original Operating Instructions Download Page 8

8

3. Vacuum Pump

This machine must be used in conjunction with a vacuum pump. 
Connect the vacuum hose quick-release coupling to the vacuum 

valve  fitting on the vacuum base of the machine.  

WARNING: Never attempt to use this machine without a vacuum 
pump or if the vacuum base is damaged. Ensure that the vacuum 
base of the machine is clean and the seal is undamaged before 
each use. Never attempt to clamp the machine in any way other 
than that which it was designed. This could cause a hazard.  

WARNING: Never attempt to drill unless there is a minimum of 10 psi  
(0.7bar) of vacuum.

4. Selecting Speeds

There are 2 speed ranges to suit the bit size  and work piece 
hardness.  Choose the  slowest speed  for  large  diameter  bits  and  
hard materials. 

CAUTION:  Never  attempt  to  change  gears  on  a  running  

machine!  Only  adjust  when  the machine is at rest.

Select the desired gear range by first swinging the gear selector 
tab out of the detent slot then shifting up or down into the desired 
gear. Then pop the selector tab back  into the detent. It will usually 
be necessary to turn the spindle by  hand a little to get it to shift all 
the way. 

5. Motor Head Height Adjustment (See page 2 )   

The height of the motor head on the slide is adjustable on this 
machine to suit different sizes of diamond core bit. It is always 
wise to keep the slide as low as possible in the guidance gibs yet 

still have enough stroke to finish the cut. This will make the drilling 

operation more stable. A good starting point would be start with 
the slide at the bottom of its stroke. Then raise the slide slightly 
more than the amount of the desired depth of cut. Then loosen 
the motor head height adjustor (after you loosen it, give it a tap 
to unlock the motor head). Now raise the motor head just high 

enough on the slide so that the diamond core bit can fit with some 

clearance.
 

Gear Selector Tab

Motor Head Height 

Adjustor

Vacuum Base Seal

Vacuum Valve

Open

Closed

Summary of Contents for TC100

Page 1: ...Original operating instructions For your personal safety READ and UNDERSTAND before using SAVE THESE INSTRUCTIONS FOR FUTURE REFERENCE Version 20121227 ...

Page 2: ...m Guage Water Valve Water Coupling Vacuum Base Centering Aid Water Collector Voltage See Machine Nameplate Power Input 1100 W No Load min 1 1000 2000 Rated Load min 1 600 1200 Maximum Core Drilling Capacity 100mm Minimum Vacuum 0 7 Bar 10 psi Spindle Thread 1 2 BSP Female Protection Class Class 1 With RCD Dimensions 291 x 234 x 320mm Weight 10 45kg TECHNICAL DATA ...

Page 3: ... cord away from heat oil sharp edges or moving parts Damaged or entangled cords increase the risk of electric shock e When operating a power tool outdoors use an extension cord suitable for outdoor use Use of a cord suitable for outdoor use reduces the risk of electric shock f If operating a power tool in a damp location is unavoidable use a residual current device RCD protected supply Use of an R...

Page 4: ...ing parts breakage of parts and any other condition that may affect the power tool s operation If damaged have the power tool repaired before use Many accidents are caused by poorly maintained power tools f Keep cutting tools sharp and clean Properly maintained cutting tools with sharp cutting edges are less likely to bind and are easier to control g Use the power tool accessories and tool bits et...

Page 5: ... if the base can slip or shake WARNING Do not use this machine on a wall or ceiling Only use on the floor Explanation of symbols Read the operating instructions before use Power tool complies with protection class 1 Always ground Environmentally friendly disposal CE conformity mark INTRODUCTION This machine is for the intended purpose of on site core drilling of tiles which are already installed A...

Page 6: ...nd the core bit match Attempting to mount mismatched threads will result in damage to both threads Ensure both the core bit and the machine spindle are clean Any debris could cause excessive run out of the mounted core bit Excessive run out can cause premature failure of the core bit and or damage to the work piece such as chipping and cracking Tighten the bit to the spindle using two wrenches Cho...

Page 7: ...eated even the diamonds break down The most frequent cause of diamond drill damage is drilling without enough coolant water Water should always be used to cool and lubricate the bit and to flush out abrasive particles formed while drilling To connect the water supply Attach the quick release water coupling to a water hose Use the water feed valve to adjust water flow as needed WARNING Never allow ...

Page 8: ... range by first swinging the gear selector tab out of the detent slot then shifting up or down into the desired gear Then pop the selector tab back into the detent It will usually be necessary to turn the spindle by hand a little to get it to shift all the way 5 Motor Head Height Adjustment See page 2 The height of the motor head on the slide is adjustable on this machine to suit different sizes o...

Page 9: ...ool Then repeat this cycle until finished The diamond impregnated segments in a wet type sintered diamond core bit operate on a principle of controlled erosion The bond matrix holding the diamonds is continually worn away by abrasion with the work piece exposing the harder diamonds to stand proud from the bond matrix A bit with good diamond exposure is a sharp bit This erosion process causes heat ...

Page 10: ...acuum then first close the vacuum valve before removing the vacuum hose coupling Then the vacuum can be controllably released by slowly opening the valve SHARPENING A GLAZED BIT If the bit becomes glazed the ideal way to resharpen and true it up is by dressing with an appropriate alumina oxide or silicon carbide dressing stick Simply drill into the stick as many times as necessary to restore its c...

Page 11: ...seal needs to be replaced remove the old seal and clean the channel Then starting from one end gently press in the new seal Ensure that there is no gap at the ends NOTE Avoid deformation of the seal When storing the machine never place it in a position that would allow the seal to be pressed against an uneven surface This would lead to deformation and premature failure of the seal Store the machin...

Page 12: ...air THE CARBON BRUSHES The carbon brushes are a normal wearing part and must be replaced when they reach their wear limit Caution Always replace the brushes as a pair To replace 1 Remove the 2 screws and remove the motor tail cover 2 Using pliers rotate the brush spring out of the way and slide the old carbon brush out of the brush holder 3 Unscrew the screw to remove the brush lead The old carbon...

Page 13: ...13 WIRING MOTOR MAGNET SWITCH AC CARBON BRUSH CARBON BRUSH ...

Page 14: ... 45 46 44 47 48 39 41 40 42 43 49 52 53 17 18 50 16 54 55 83 84 56 2012 07 10 NO 01 101 V1 0 81 80 61 62 63 54 77 74 75 61 71 72 82 55 47 73 55 57 78 68 79 58 59 60 65 66 67 33 70 70 64 51 96 99 97 98 100 70 101 69 85 85 85 01 86 87 87 91 92 76 90 89 88 93 94 94 95 85 02 85 03 85 04 85 05 85 06 85 07 85 08 85 09 85 10 85 11 85 07 85 12 85 13 85 14 ...

Page 15: ...P Ø0 8 x Ø8 6 1 98 WATER COLLECTOR RING 1 99 CENTERING POINTER 1 100 TORSION SPRING 1 101 HAND KNOB M6 x 35 1 No Parts Name Q ty 1 PARALLEL KEY 5 x 5 x 10 1 2 SPINDLE 1 2BSP 1 3 INTERNAL CIRCLIP R 47 1 4 BEARING 6005 2RS 1 5 EXTERNAL CIRCLIP S 25 1 6 SCREW M5 x 65 2 7 SCREW M5 x 110 2 8 PUSH LOCK FITTING 1 9 GEAR CASE 1 10 SELECTORTAB 1 11 SPRING Ø1 x Ø9 x Ø11 x 4T x 10 5L 1 12 SHOULDER SCREW 1 13...

Page 16: ......

Reviews: