background image

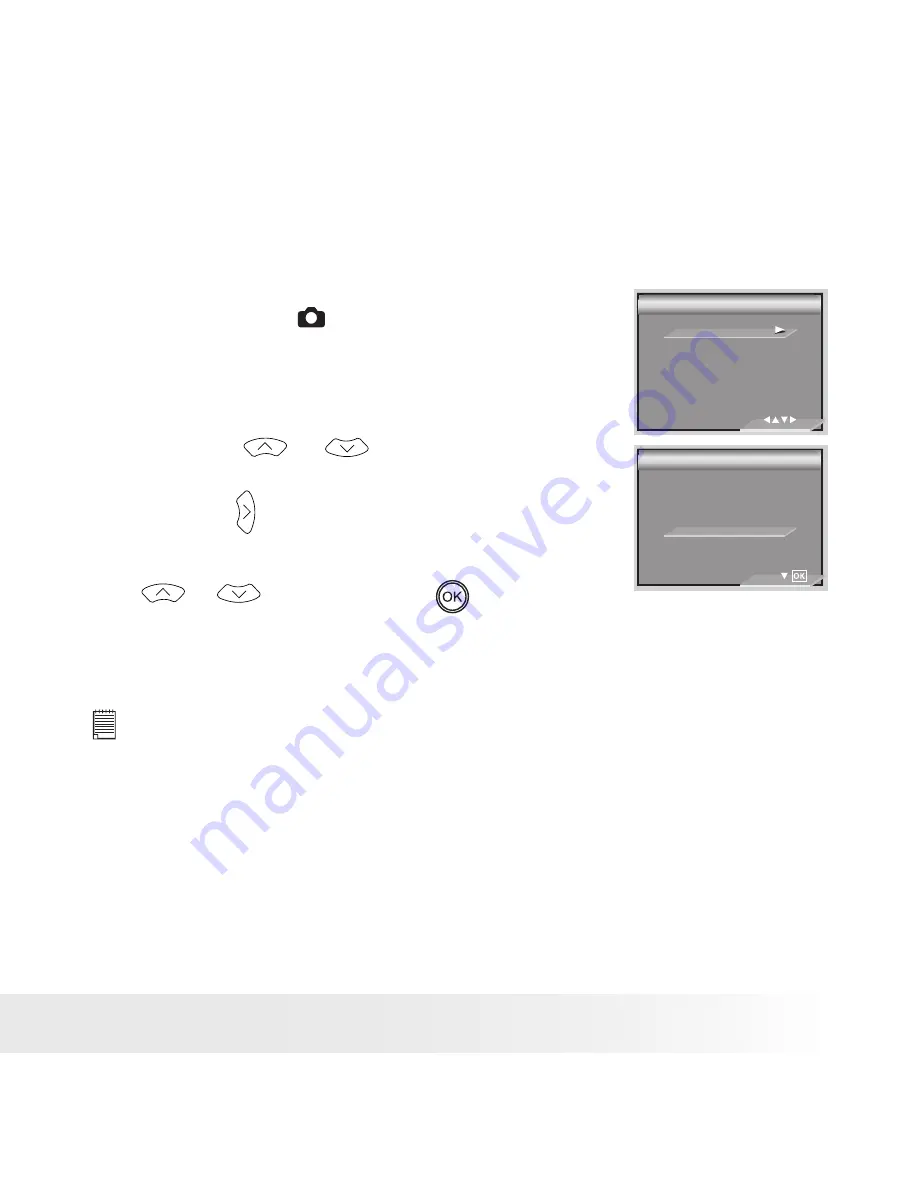
• Formatting Memory

Formatting  a  memory  card  erases  all  data  stored 

on it, including protected data. 

1. 

Press  the  mode  button  to  set  the 

camera mode to 

1/

FORMAT

DATE / TIME

AUTO OFF

BEEP

FREQUENCY

SETUP

SETUP

FORMAT MEMORY

ALL DATA WILL DELETE

FORMAT

FORMAT

CANCEL

OK

2. 

Follow  the  guidelines  in  “Setup 

Menu”  on  page  16  to  access  the 

SETUP menu. 

3. 

Press  the 

  or 

  button  to 

select the FORMAT CARD option. 

4. 

Press the   button. 

5. 

Select  OK  or  CANCEL  using  the 

 or 

 button. Press the 


button  to  confirm  your  choice  and 
exit from the menu window.  


NOTE:


•  SD cards formatted in another camera, computer or other devices may not work 

properly. It is recommended to format SD cards with your digital camera.

•  Note that data deleted by formatting operation cannot be recovered. Make 

sure  you  do  not  have  any  useful  data  currently  stored  on  a  memory  card 

before you format it.

•  When  SD  card  is  inserted,  only  SD  card  can  be  formatted.  The  option  for 

format internal memory will be disabled.

Summary of Contents for DC-630x

Page 1: ...DC 630x User manual ...

Page 2: ...X FINE ZOOM 1 3 2 5 3 6 9 Zoom out Thumbnail button 10 Zoom in button 11 Mode button 12 LCD Screen 13 Menu button 14 Wrist Strap holder 15 Flash LED 16 Power LED 17 LCD Screen on off button 18 Left button 19 OK button 20 Flash Up button 21 Right button Self timer button 22 Close Up Down button 9 13 14 11 12 16 15 8 9 10 19 20 21 17 18 10 11 12 13 14 15 16 17 20 21 22 18 19 ...

Page 3: ... 23 Battery door SD card slot 24 USB port 25 Tripod mount 23 23 24 22 24 25 DC 630x 6 0 Megapixel agfa 3X FINE ZOOM 1 3 2 5 3 ...

Page 4: ...tting the Display Language 22 Setting the Date Stamp On Off 23 Changing the USB Mode Between MSDC and Pictbridge 24 Restoring Default Settings 25 Switching the Information Display and LCD Screen On and Off 26 3 Taking Pictures 28 Taking Pictures in Normal Mode 28 Taking Pictures in Different Scene Shooting Modes 30 Taking Pictures in Close Up Mode 32 Setting Flash Mode 33 Setting the Image Size an...

Page 5: ...mory Card 64 Using memory card 64 Formatting Memory 67 Copying Pictures and Video Clips to Memory Card 68 8 Installing the Software Onto a Computer 69 Installing the Software 69 Software Included with Your Camera 71 Computer System Requirements 72 Uninstalling AGFAPHOTO Digital Camera Driver PC Only 73 9 Transferring Pictures and Video Clips to a Computer 74 Before you Transfer Pictures 74 Connect...

Page 6: ... ArcSoft Software Help 79 12 Appendix 80 Technical Specifications 80 Capacity of SD Card 82 Camera Default Settings 85 Tips Your Safety Maintenance 86 Regulatory Information 86 ...

Page 7: ...era has these features A glass lens system for well exposed sharp pictures from 3 9 inches 10 cm to infinity Your camera has 3X optical zoom and 4X digital zoom modes 9 scene shooting modes plus video recording functionality Built in flash with five modes off auto flash aways red eye reduction and slow sync Adjust your picture s resolution for printing or emailing Light metering white balance expo...

Page 8: ...Camera Driver PC only ArcSoft PhotoStudio 5 5 PC ArcSoft PhotoStudio 4 3 Mac ArcSoft PhotoPrinter 5 PC ArcSoft PhotoPrinter 4 Mac Adobe Acrobat Reader PC Mac User Manual in PDF format Warranty Card USB Cable agfa DC 633xs 6 0 Megapixel agfa 3X FINE ZOOM 1 3 2 5 3 agfa DC 633 xs 6 0 Megapixel agfa 3X FINE ZOOM 1 3 2 5 3 ...

Page 9: ...he battery door by pressing and sliding it back to lock 2 3 1 2 1 1 2 4 To remove the battery open the camera battery door by pushing it outwards as illustrated 5 Remove the battery as shown 6 Close the battery door by pressing and sliding it back to lock 5 6 1 2 4 1 2 For more guidelines on battery usage please see Using Your Battery on page 10 ...

Page 10: ... camera usage These instructions should be retained for future reference Checking the Battery Level Check the battery power level that appears on the LCD screen before shooting Battery power is full Battery has adequate power Battery power is low Battery is empty Batter power is exhausted NOTE 1 When battery power is empty the icon appears on the LCD screen Taking pictures is possible while flash ...

Page 11: ...on until the Power On LED screen turns on 2 Press the button again to turn off the camera IMPORTANT All operations including taking pictures and video clips and adjusting settings for shooting and playback are performed while the camera is powered on ...

Page 12: ...er Flash Mode Flash Off Auto Flash Flash Always Red eye Reduction Slow Sync Number of pictures that can be taken Battery Power Level Full Adequate Low Empty Exhausted Optical and digital zoom bar Digital Zoom Status SD Card Capture Mode Still Image Image Size 2816 x 2112 2304 x 1728 2048 x 1536 1600 x 1200 640 x 480 Histogram N 2048X1536 Scene Shooting Mode Auto Portrait Landscape Night Sunset Nig...

Page 13: ...Normal Sharpness st Strong N Normal s Soft ISO Sensitivity Auto 100 100 200 200 400 400 White Balance Auto Daylight Cloudy Tungsten Fluorescent Exposure Compensation Value 2 0 1 5 1 0 0 5 0 Light metering Average Center Spot 0012 Default setting ...

Page 14: ...ator Video Mode Elapsed Time Video Resolution 320 x 240 640 x 480 White Balance Auto Daylight Cloudy Tungsten Fluorescent Playback Mode File Type Picture Video Clip Locked File File Number 001 002 2004 09 05 13 05 12 Date and Time ...

Page 15: ...and play settings as well as other camera settings like the Date Time Auto Power Off and so on Press the button to enter the menu and press the right button to enter an submenu Use the up and down buttons to scroll up and down and use the left and right buttons to scroll left and right Use the button to confirm your choice and left button to return previous in first and second level menu Press the...

Page 16: ...modes to customize your camera settings Here we take the mode for an example 1 Press the button to access the main menu FORMAT DATE TIME AUTO OFF BEEP FREQUENCY SETUP SETUP SETUP SETUP NORMAL AVERAGE AUTO SETUP 1 2 2 2 2 Press the or button to select the SETUP option ...

Page 17: ...a setup option and then press the button to enter the next submenu for that particular option 1 2 FORMAT DATE TIME AUTO OFF BEEP FREQUENCY SETUP SETUP 2 2 LANGUAGE DATE STAMP USB MODE DEFAULT SETTING SETUP SETUP page 67 page 18 page 19 page 20 page 21 page 22 page 23 page 24 page 25 ...

Page 18: ...e desired setting 6 Press the button Setting the Date and Time 3 Press the or button to select DATE SETUP 4 Press the button DATE TIME DATE TIME 1 2 FORMAT DATE TIME AUTO OFF BEEP FREQUENCY SETUP SETUP DATE TIME DATE TIME DD MM YY MM DD YY YY MM DD DATE TIME DATE TIME DATE TIME DATE TIME DD MM YY 00 00 2006 01 01 01 DATE FORMAT DATE SETUP DATE FORMAT DATE SETUP 5 Press the or button to adjust the ...

Page 19: ...eriod using the or button Press the button to confirm your choice and exit from the menu window AUTO OFF AUTO OFF 1 2 FORMAT DATE TIME AUTO OFF BEEP FREQUENCY SETUP SETUP OFF 1 MIN 3 MINS 1 MINUTE 3 MINUTES The camera is designed to switch off automatically to save battery life after the specified period of inactivity OFF The power saving function is not active NOTE Auto power off is automatically...

Page 20: ... the buttons 1 Follow the guidelines in Setup Menu on page 16 to access the SETUP menu 2 Select the BEEP option using the and button 3 Press the button to access the BEEP submenu 4 Select ON or OFF using the or button Press the button to confirm your choice and exit from the menu window BEEP BEEP 1 2 FORMAT DATE TIME AUTO OFF BEEP FREQUENCY SETUP SETUP ON OFF ...

Page 21: ...elect the FREQUENCY option using the and button 3 Press the button to access the FREQUENCY submenu 4 Select the frequency of your own country using the or button Press the button to confirm your choice and exit from the menu window 1 2 FORMAT DATE TIME AUTO OFF BEEP FREQUENCY SETUP SETUP FREQUENCY FREQUENCY 50 Hz 60 Hz NOTE 50 HZ For European users 60 HZ For United States users ...

Page 22: ...s the SETUP menu 2 Select the LANGUAGE option using the and button LANGUAGE LANGUAGE 2 2 LANGUAGE DATE STAMP USB MODE DEFAULT SETTING SETUP SETUP ENGLISH DEUTSCH FRANÇAIS ESPAÑOL ITALIANO 1 2 3 Press the button to access the LANGUAGE submenu 4 Select the language you prefer using the or button Press the button to confirm your choice and exit from the menu window ...

Page 23: ...w the guideline in Setup Menu on page 16 to access the SETUP menu 2 Select the DATE STAMP option using the and button 3 Press the button to access the DATE STAMP submenu 4 Select ON or OFF using the or button Press the button to confirm your choice and exit from the menu window DATE STAMP DATE STAMP 2 2 LANGUAGE DATE STAMP USB MODE DEFAULT SETTING SETUP SETUP ON OFF ...

Page 24: ...d to the computer You may view and download pictures and video clips stored in your camera s internal memory or a SD memory card onto your computer 1 Set the camera to Still Image mode 2 Access the Setup menu 3 Press the or button to select USB MODE 4 Press the button 5 Press the or button to select the desired setting 6 Press the button 2 2 LANGUAGE DATE STAMP USB MODE DEFAULT SETTING SETUP SETUP...

Page 25: ...s the SETUP menu 2 Select the DEFAULT SETTING option using the and button 3 Press the button 4 Select OK using the button Press the button to restore default settings and exit from the menu window DEFAULT SETTING DEFAULT SETTING 2 2 LANGUAGE DATE STAMP USB MODE DEFAULT SETTING SETUP SETUP CANCEL OK RETURN MENU SETTING TO DEFAULTS NOTE Selecting CANCEL will cancel the operation and exit from the me...

Page 26: ...een On and Off The LCD Screen can be changed by pressing the button N 2048X1536 LCD screen on with basic information display LCD screen on with basic information and a histogram LCD screen on with information display off Press Press Press N 2048X1536 ...

Page 27: ...ram LCD screen on with information display off Press 320x240 320x240 Press LCD screen on with basic information display Press In mode LCD screen on with basic information display LCD screen on with information display off Press Press 2006 01 01 12 00 00 001 002 ...

Page 28: ...al memory or a memory card Taking Pictures in Normal Mode Use this mode to capture subjects and make sure they are at least the distance from the taking lens as indicated below Wide Angle 0 3 m 1 ft Infinity Telephoto 0 4 m 1 3 ft Infinity NOTE Most settings are saved by the camera when the power is turned off so that the same setting is automatically available when the power is turned on again Ma...

Page 29: ...green the user can take photos normally When the camera s focus mark is highlighted in red the subject is not in proper focus as the subject is either out of range or the light is too low Release the shutter button recompose the scene and press the shutter button halfway to reset the focus When the light is relatively low the focus lamp helps the camera easily focus on the subject The LCD screen w...

Page 30: ... Still Image mode 2 Press the button to access the main menu 3 Press the or button to select the SCENE MODE option NORMAL AVERAGE AUTO SETUP AUTO PORTRAIT LANDSCAPE NIGHT SUNSET SCEME MODE SCEME MODE 1 2 SHARPNESS SHARPNESS 4 Press the botton to enter the submenu 5 Press the or button to select one setting desired 6 Press the button to confirm your choice ...

Page 31: ...rtrait Produce largest depth of field by locking the focus at infinity and keeping the smallest aperture value Landscape Used for the wide scenic views at night Night Enhance the red hue for recording sunset images Sunset Blurring the background to focus on the subject at night Night Portrait Freeze the subject in motion by using a faster shutter speed in combination with ISO 100 sensitivity for a...

Page 32: ...the lens Wide Angle 0 1 m 4 inches 1 m 3 3 ft Telephoto 0 2 m 7 9 inches 1 m 3 3 ft 1 Set the camera to Still Image mode 2 Press the button and the icon appears on the LCD screen 3 Capture procedures are the same as for taking a picture in the normal capture mode See page 28 N 0012 2816X2112 ...

Page 33: ...elephoto 1m 3 3 ft to 2 5 m 8 ft Close Up Wide 0 1m 4 inches to 1m 3 3 ft Telephoto 0 2m 7 9 inches to 1 m 3 3 ft 1 Press the mode button to set the camera mode to 2 Press the button to cycle through the flash options and select the one you need NOTE When you press the button the Flash LED blinks which indicates the flash is charging The icon according to the flash setting you selected will appear...

Page 34: ...s needed Use this setting to take most pictures Auto Flash Use this setting to avoid red eye in your subject s eyes The camera fires a brief preflash before the regular flash Red eye Reduction The flash fires for every picture Use this setting in high contrast situations to provide fill light or use it indoors in low light Flash Always There is a slight delay in the flash than it does in Auto Hold...

Page 35: ...the mode button to set the camera mode to 2 Press the button to access the main menu Press the or button until the IMAGE SIZE option is highlighted IMAGE SIZE IMAGE SIZE 1 2 IMAGE SIZE IMAGE SIZE 2816 X 2112 SUPER FINE AUTO AUTO AUTO 2816 X 2112 2304 X 1728 2048 X 1536 1600 X 1200 640 X 480 3 Press the button to access the IMAGE SIZE submenu 4 Select the image size you prefer using the or button P...

Page 36: ...on COMPRESSION COMPRESSION COMPRESSION COMPRESSION 2816 X 2112 SUPER FINE AUTO AUTO AUTO SUPER FINE FINE NORMAL 1 2 4 Press the button to access the COMPRESSION submenu 5 Select the compression you prefer using the or button Press the button to confirm your choice and exit from the menu window or press the button to give up confirmation and return to the previous menu ...

Page 37: ...er details Compression Resolution Super Fine Fine Normal 2816 x 2112 4 9 16 2304 x 1728 9 15 26 2048 x 1536 12 19 33 1600 x 1200 21 33 54 640 x 480 118 179 238 NOTE Scene complexity affects a picture s file size For example a picture of trees in autumn has a larger file size than a picture of blue sky at the same resolution and quality setting Therefore the number of picture or the length of video...

Page 38: ...e mode button to set the camera mode to 2 Press the button to access the main menu 3 Press the button to enter Exposure submenu 4 Adjust the exposure compensation value using the or button 5 Press the button to confirm The currently selected option will be accessed and takes effect immediately NOTE A higher EV is best used for light colored subjects and backlit subjects A lower EV is best for dark...

Page 39: ... camera mode to 2 Press the button to access the main menu 3 Press the or button to select the ISO option 4 Select the ISO speed using the button ISO ISO ISO ISO 2816 X 2112 SUPER FINE AUTO AUTO AUTO AUTO ISO100 ISO200 ISO400 1 2 5 The currently selected option will be accessed and takes effect immediately Press the button to exit from the function bar or press the button to return to the previous...

Page 40: ...lance using the or button 1 2 2816 X 2112 SUPER FINE AUTO AUTO AUTO AUTO DAYLIGHT CLOUDY TUNGSTEN FLUORESCENT WHITE BALANCE WHITE BALANCE WHITE BALANCE WHITE BALANCE 6 The currently selected option will be accessed and takes effect immediately Press the button to exit from the main menu or press the button to return to the previous menu When shooting under these conditions Select this setting Icon...

Page 41: ...G NORMAL SOFT SHARPNESS SHARPNESS 1 2 4 Press the button to access the SHARPNESS submenu 5 Select the sharpness you prefer using the or button 6 The currently selected option will be accessed and takes effect immediately Press the button to exit from the function bar or press the button to return to the previous menu STRONG Increases contrast on the edge of the picture Image color noise may occur ...

Page 42: ...selected option will be accessed and takes effect immediately Press the button to confirm and exit from the function bar or press the button to return to the previous menu When shooting under these conditions Select this setting Icon shown on the LCD screen Evaluates the lighting conditions throughout the picture to give an optimum picture exposure Ideal for general picture taking Average Evaluate...

Page 43: ...mode button to set the camera mode to 2 Press the right self timer button to select N 2048X1536 0012 OFF Disable the self timer function 2 second self timer indicates a countdown of two seconds The Self timer LED will blink before the picture is taken 10 second self timer indicates a countdown of 10 seconds The Self timer LED will blink before the picture is taken ...

Page 44: ...age N 2048X1536 Digital Zoom Status Opticla zoom Digital zoom 0012 1 Turn on the camera 2 Press the mode button to set the camera to Still Image or Video mode 3 Press the Zoom In or Zoom Out button to zoom in or zoom out the subject image The zoom status is shown on the LCD screen 4 Now you can takes pictures and review them under the zoom setting The zoom setting will remain after taking pictures...

Page 45: ...cording automatically stops when the current memory is full Recording Indicator Video Time Elapsed While recording the red icon will appear on the LCD screen NOTE The zoom feature is not available during recording video clips The maximum length that the camera can hold at either 320 x 240 or 640 x 480 pixels depends on the memory capacity The length of clips may vary with scene complexity The leng...

Page 46: ...ghlighted 3 Press the button to access the IMAGE SIZE submenu IMAGE SIZE IMAGE SIZE 640 X 480 AUTO SETUP 640 X 480 320 X 240 IMAGE SIZE IMAGE SIZE 4 Select the resolution using the or button 5 Press the button to confirm your choice and exit from the menu window Here are the approximate length of video clips you can expect the camera to hold at each setting based on the 16 MB internal memory card ...

Page 47: ...ct the value by pressing or button WHITE BALANCE WHITE BALANCE 640 X 480 AUTO SETUP AUTO DAYLIGHT CLOUDY TUNGSTEN FLUORESCENT WHITE BALANCE WHITE BALANCE 5 The currently selected option will be accessed and takes effect immediately Press the button to exit from the function bar or press the button to return to the previous menu When shooting under these conditions Select this setting Icon shown on...

Page 48: ...re and Video Clip Files in Thumbnail You can view up to nine pictures and video clip files at a time on the LCD screen by using the thumbnail function 1 Press the mode button to set the camera mode to 2 Press the button once and nine thumbnail files will be shown on the LCD screen with the latest displayed file highlighted 3 Use the up down left and right buttons to select a thumbnail file and vie...

Page 49: ... Video Clip Use the left or right button to select the picture or video clip you want to protect or unprotect 1 Press the mode button to set the camera mode to 2 Press the button to access the main menu Press the or button until the PROTECT option is highlighted 3 Press the button to access the PROTECT submenu 4 Select ON or OFF using the or button MENU MENU ERASE PROTECT SLIDE SHOW COPY TO CARD P...

Page 50: ...utton to access the main menu 3 Press the or button until SLIDE SHOW option is highlighted 4 Press the button to access the SLIDE SHOW submenu ERASE PROTECT SLIDE SHOW COPY TO CARD PRINT SETTING ON SETUP AUTO PLAY AUTO PLAY MENU MENU 5 Press or button to select ON press shutter button to exit The slide show will automatically run from the currently displayed picture after you press the button Pres...

Page 51: ... 7 Press or button to select INTERVAL 8 Press or button to select one setting desired ON SETUP AUTO PLAY AUTO PLAY DIRECTION INTERVAL SLIDE SHOW SLIDE SHOW 1 SEC 10 SEC SLIDE SHOW SLIDE SHOW 1 10 SECONDS Every picture will continually exist on the LED at an interval of 1 10 seconds ...

Page 52: ...5 Press or button to select SETUP 6 Press to enter submenu 7 Press or button to select DIRECTION 8 Press or button to select one setting desired ERASE PROTECT SLIDE SHOW COPY TO CARD PRINT SETTING MENU MENU ON SETUP AUTO PLAY AUTO PLAY DIRECTION INTERVAL FORWARD BACKWARD SLIDE SHOW SLIDE SHOW SLIDE SHOW SLIDE SHOW NOTE The slide show will keep running as long as all the pictures or video clips sto...

Page 53: ... PRINT SETTING ERASE THIS ERASE ALL ERASE ERASE ERASE THIS Erase the selected picture or video clip Please select the picture or video you want to delete before pressing the Erase button ERASE ALL Erase all pictures and video clips stored in the current memory 6 Press the button 7 Select OK or CANCEL using the or button CANCEL OK ERASE THIS ERASE THIS NOTE Protected files can not be deleted Remove...

Page 54: ...ng Printer Refer to the user guide that comes with your printer and make preparations paper ink cassette cartridge etc as required Turn on the camera and the printer 2 Selecting PictBridge mode Set the camera to Playback mode and select the PictBridge mode Refer to page 57 for details 3 Connecting the camera to the printer Refer to Camera Printer Connection on page 58 for details 4 Select print se...

Page 55: ...ing Select CANCEL or CONTINUE Or please refer to the printer s user guide for the solutions Printing may resume once the problem is solved MENU MENU ERASE PROTECT SLIDE SHOW COPY TO CARD PRINT SETTING PICTBRIDGE PICTBRIDGE PLEASE CONNECT TO DEVICE PICTBRIDGE DPOF PLEASE CONNECT TO DEVICE NOTE Printing operation may still fail with some errors even if you press the button after selecting CONTINUE I...

Page 56: ...f ink INK LOW Ink cassette is almost empty WASTE INK RESERVOIR FULL Waste ink reservoir is full HARDWARE FATAL ERROR A serious error occurs with the printer s hardware PRINTER IS BUSY The printer is busy with other print jobs from another source PRINTER IS OCCUPIED The printer is performing maintenance or occupied by other external device COVER IS OPENED The printer s cover is open or not securely...

Page 57: ...s the main menu 3 Press the or button to select the PICTBRIDGE option 4 Press the button 5 Connect the camera with the printer via a USB cable PICTBRIDGE PICTBRIDGE PLEASE CONNECT TO DEVICE PICTBRIDGE DPOF PLEASE CONNECT TO DEVICE NOTE To print a single image select the image before enabling PictBridge mode ...

Page 58: ...the port on your camera PLEASE CONNECT TO DEVICE DEVICE IS CONNECTED PICTBRIDGE PICTBRIDGE THIS IMAGE ALL IMAGES ALL INDEX NOTE DEVICE IS CONNECTED displays on the LCD screen indicating a proper connection to the printer Do not connect the USB cable to the camera until PictBridge is enable and when prompted by the PLEASE CONNECT TO DEVICE screen Or if you already have connected the cable to the ca...

Page 59: ...cording to the specified settings NOTE To print a single image select the image before enabling PictBridge Print settings are configured for images only Make sure there are no video clips or other file besides images in the memory before printing Not all printers will support all these print options Please refer to the printer user guide for options available 3 Press the or button to select the pr...

Page 60: ...r of printed images on a page LAYOUT LAYOUT X01 DEFAULT DEFAULT DEFAULT DEFAULT DEFAULT Print settings differ according to the printer model N UP Print 1 to 256 pictures on one piece of paper BORDERLESS Print right to the edge of the page INDEX PRINT Specify the number of printed images on a page Setting the File Name On Off 1 Press the button to select FILE NAME 2 Press the or button to select DE...

Page 61: ...t or right button to select the paper size The following paper sizes are supported Default L 2L postcard cardsize 100mm x 150mm A4 A6 4 x 6 8 x 10 letter PAPER SIZE PAPER SIZE X01 DEFAULT DEFAULT DEFAULT DEFAULT DEFAULT Print settings differ according to the printer model Printing 1 Press the button 2 Press the button to continue printing 3 Press the button to cancel printing Press the button to r...

Page 62: ... file contents NOTE Print settings are configured for images only Make sure there are no video clips or other file besides images in the memory before printing 1 Insert an SD card into the camera 2 Turn on the camera 3 Press the mode button to set the camera mode to 4 Press the button to access the main menu 5 Press the button until DPOF bar is highlighted PICTBRIDGE DPOF PICTBRIDGE PICTBRIDGE DPO...

Page 63: ... 10 Press the button to confirm your choice and exit from the menu window PRINT 00 COPIES SELECT IMAGES SELECT IMAGES 11 Remove the memory card from the camera and insert it into the printer s card slot as illustrated Location of the card slot may vary from printer to printer model NOTE Make sure you turn off the camera before inserting or removing a memory card 12 Press the Print button on the pr...

Page 64: ...cautions 1 An electrostatic charge electrical noise and other phenomena can cause data corruption or even loss Always make sure that you always back up important data on other media MO disc computer hard drive etc 2 If a memory card starts to behave abnormally you can restore normal operation by formatting it However we recommend that you always take along with more than one memory card whenever u...

Page 65: ...you want to record new files onto it format it or delete its files Files contained in the SD card recorded by other cameras may conflict with your digital camera and valuable data in your existing SD card may be distorted or lost when the card is inserted in your digital camera We strongly recommend the user to use a NEW or formatted SD card for your digital camera The manufacturer is not liable f...

Page 66: ...the SD Card 1 Turn off your camera and open the SD card door 2 Gently push the SD card inwards and then release it The SD card will eject out of the SD card slot IMPORTANT Never insert any other objects into the camera s card slot Doing so will create the risk of damage to the camera and card slot Should water or any foreign objects ever get into the card slot immediately turn off the camera remov...

Page 67: ... FORMAT CARD option 4 Press the button 5 Select OK or CANCEL using the or button Press the button to confirm your choice and exit from the menu window NOTE SD cards formatted in another camera computer or other devices may not work properly It is recommended to format SD cards with your digital camera Note that data deleted by formatting operation cannot be recovered Make sure you do not have any ...

Page 68: ...MENU MENU DELETE PROTECT SLIDESHOW COPY TO CARD PRINT SETTING 4 Press the button 5 Press or button to select COPY TO CARD COPY CANCEL COPY TO CARD COPY TO CARD 6 Press the button to enter the submenu 7 Press or button to select COPY or CANCEL NOTE With a memory card inserted into the camera the card memory has a higher priority over the internal memory The selected picture or video clip can be onl...

Page 69: ...Windows 98SE needs to install your digital camera Driver for Mass Storage function After the installation please restart the Windows before connecting the camera to the PC IMPORTANT For Windows Me 2000 XP Directly plug in the camera to transfer and play the pictures and video clips No need to install the driver IMPORTANT To experience higher performance in graphics and sound when you are watching ...

Page 70: ... Close NOTE If the setup screen does not appear after loading the CD then you can manually start it by double clicking the My Computer icon on your desktop then double clicking the icon for the CD ROM drive When the CD ROM window opens double click the INSTALL E EXE icon For Macintosh Users Mac 1 Before you begin close all other software applications open on your computer 2 Insert the CD supplied ...

Page 71: ...es on your computer for example removing red eye and cloning objects to a different picture In some quick actions you could also add special effects or place them in cards calendars frames and fantasy templates ArcSoft PhotoStudio also includes a wide variety of printing options ArcSoft PhotoPrinter Picture Editing Software A quick easy way to get great looking photo prints at home In just a coupl...

Page 72: ...MB RAM 256 MB recommended USB Port DirectX 9 0 or higher 500MB free disk space Color monitor with high color 16 bit graphic capability or higher CD ROM drive Standard mouse and keyboard Stereo speakers For Macintosh Users Mac PowerPC G3 or higher Processor Mac OS Version 9 2 X USB Port 128MB RAM 256 MB recommended 500MB free disk space Color monitor with high color 16 bit graphic capability or hig...

Page 73: ...ause only Windows 98SE needs to install the digital camera driver 1 Open Add Remove Program Properties in Control Panel and select AGFAPHOTO program then click Add Remove 2 The following dialog box appears click OK to confirm removing the camera driver 3 The uninstallation program runs automatically please restart your computer when it is finished ...

Page 74: ...ing the Camera to Your Computer via USB Cable Connecting with the USB cable Plug mini USB cable into the port of your camera USB Series A plug connects to your computer 1 Turn the camera off 2 Plug the labelled end of the USB cable into the marked socket on your computer 3 Plug the other end of the USB cable into the port on your camera 4 Turn on the camera and an interface Found New Hardware will...

Page 75: ...a folder of your choice NOTE This drive name will vary from different version of Windows OS system For Macintosh Users Mac NOTE For Mac users directly plug in the camera no need to install the driver 1 Connect the camera to Mac via the USB cable the systems will automatically recognize the MASS STORAGE drive System will automatically create a Mass Storage named Unlabelled NOTE This drive name will...

Page 76: ...nections are secured Camera Driver is not installed You need to install the camera driver for Windows 98SE systems I cannot run the AFGAPHOTO Driver Conflict with another camera driver or capture device If you have another camera installed on your computer remove it and its driver completely from your system to avoid conflicting with your digital camera My CD Installation Wizard does not work The ...

Page 77: ...other memory card Camera powers off during self timer countdown The battery is exhausted Replace your batteries LCD screen image is out of focus Normal focus is being used for macro images Select a correct scene shooting mode for taking pictures AVI file cannot be played DirectX version is lower than 9 0 Install DirectX 9 0 or above Visit http www microsoft com directx for more details The camera ...

Page 78: ...eed or use another memory card Color of the playback pictures is different from the picture on the LCD screen during recording Sunlight or light from another source is shinning directly into the lens during recording Position the camera so that sunlight does not shine directly onto the lens Pictures are not displayed A memory card with non DCF pictures recorded with another camera is loaded in the...

Page 79: ...t CA 94538 Tel 1 510 979 5599 Fax 1 510 440 7978 E mail support arcsoftsupport com Web http www arcsoft com en support For Europe For China ArcSoft Europe Support Center ArcSoft China Support Center Ireland Hangzhou Tel 353 0 61 702087 Tel 86 571 88210575 Fax 353 0 61 702001 E mail support arcsoft com cn E mail eurosupport arcsoft com Web http www arcsoft com cn new support For Japan For Taiwan Ar...

Page 80: ...uilt in Flash Modes Flash Off Auto Flash Red eye Reduction Forced On Slow Sync Flash Range Normal 1m 3 3 ft to 3 m 9 9 ft Macro 0 1m 4 inches to 1m 3 3 ft Exposure Control 2 EV in 1 2 increments ISO Speed Auto 100 200 400 Shutter Speed Mechanical shutter 1 1000 sec 2 sec White Balance Auto Daylight Cloudy Tungsten Fluorescent Storage Internal Memory 16 MB Supports SD card up to 1 0 GB ...

Page 81: ... AA batteries included Self timer 2 or 10 seconds Tripod Socket Yes Connectivity With computer via USB cable Dimension Size 92 mm 3 6 inches W x 60 mm 2 4 inches H x 23 mm 0 9 inches D Weight Approximately 125g excluding batteries or card Operating System For Windows Users Microsoft Windows 98SE Me 2000 or XP For Macintosh Users Mac OS 9 2 X ...

Page 82: ...ine 4 17 34 Fine 9 27 54 Normal 16 45 91 2304 x 1728 Super Fine 9 27 54 Fine 15 42 85 Normal 26 69 140 2048 x 1536 Super Fine 12 35 71 Fine 19 54 109 Normal 33 87 176 1600 x 1200 Super Fine 21 57 115 Fine 33 90 183 Normal 54 141 286 640 x 480 Super Fine 118 307 624 Fine 179 460 935 Normal 238 613 1247 ...

Page 83: ...28 Super Fine 109 225 453 898 Fine 170 350 705 1397 Normal 279 576 1159 2295 2048 x 1536 Super Fine 141 292 588 1164 Fine 218 450 907 1796 Normal 352 726 1461 2894 1600 x 1200 Super Fine 231 475 957 1896 Fine 364 751 1512 2993 Normal 571 1177 2369 4690 640 x 480 Super Fine 1244 2563 5158 10212 Fine 1865 3841 7729 15301 Normal 2485 5118 10300 20391 ...

Page 84: ...MB SD 320 x 240 0 01 10 64 MB SD 320 x 240 0 02 22 128 MB SD 320 x 240 0 04 43 256MB SD 320 x 240 0 09 44 512MB SD 320 x 240 0 19 36 1GB SD 320 x 240 0 38 48 NOTE Scene complexity affects a picture s file size For example a picture of trees in autumn has a larger file size than a picture of blue sky at the same resolution and quality setting Therefore the number of pictures and length of video cli...

Page 85: ...ompression Super fine ISO Sensitivity Auto White Balance Auto Sharpness Normal Light Metering Average Scene Mode Auto Resolution 640 x 480 Exposure Compensation 0 White Balance Auto Setup Mode Date Format MM DD YY Auto Off 3 minutes Beep Sound On Frequency 50 Hz Date Stamp Off USB Mode MSDC ...

Page 86: ...a soft cloth dampened with water or neutral detergent NEVER place hot items on the surface of the Camera NEVER attempt to open or disassemble Camera as this will affect any warranty claim Regulatory Information FCC Notice This device complies with Part 15 of FCC Rules Operation is subject to the following two conditions 1 This device may not cause harmful interference and 2 This device must accept...

Page 87: ...urning the equipment off and on the user is encouraged to try to correct the interference by one or more of the following measures Reorient or relocate the receiving antenna Increase the separation between the equipment and receiver Connect the equipment into an outlet on a circuit different from that to which the receiver is needed Consult the dealer or an experienced radio TV technician for help...

Page 88: ...shop where you purchased the product Declaration of Conformity We herewith confirm the following designated product DC 630x has been tested and found to comply with the requirements set up in the council directive on the approximation of the low of members states relating to the EMC Directive 89 336 EEC amended by 92 31 EEC 93 68 EEC For the evaluation regarding to the electromagnet compatibility ...

Page 89: ... For service support and warranty information contact the distributor or manufacturer All other brands and product names are registered trademarks of their respective owners Product design and technical features can be changed without notice AgfaPhoto Holding GmbH www agfaphoto com Manufactured by plawa feinwerktechnik GmbH Co KG www plawa com ...

Reviews: