background image

Chapter 3: Configuring Buttons on your PC (SnapScan e50)

28

10 

Click Close.

You return to the Configure Buttons window.

11 

Select My Scan Image to File (autoselect) from the drop-down list next to the e-mail button.

12 

Click OK.

Pushing the e-mail button will send the scanned image to a file instead of to your mail
recipient.

#


Note: For low quality originals (originals that are too bright or too dark), we advice you to
select the PhotoGenie checkbox, which will enhance the colors.

Creating a New Configuration (SnapScan e50)

It is possible to create a new configuration and assign it to one of the four buttons of your SnapScan
e50. The following example will show you how this is done.

In this example we will create a new configuration and assign it to the e-mail button.

Open the Agfa ScanWise software.

Select Configure Buttons from the Tools menu.

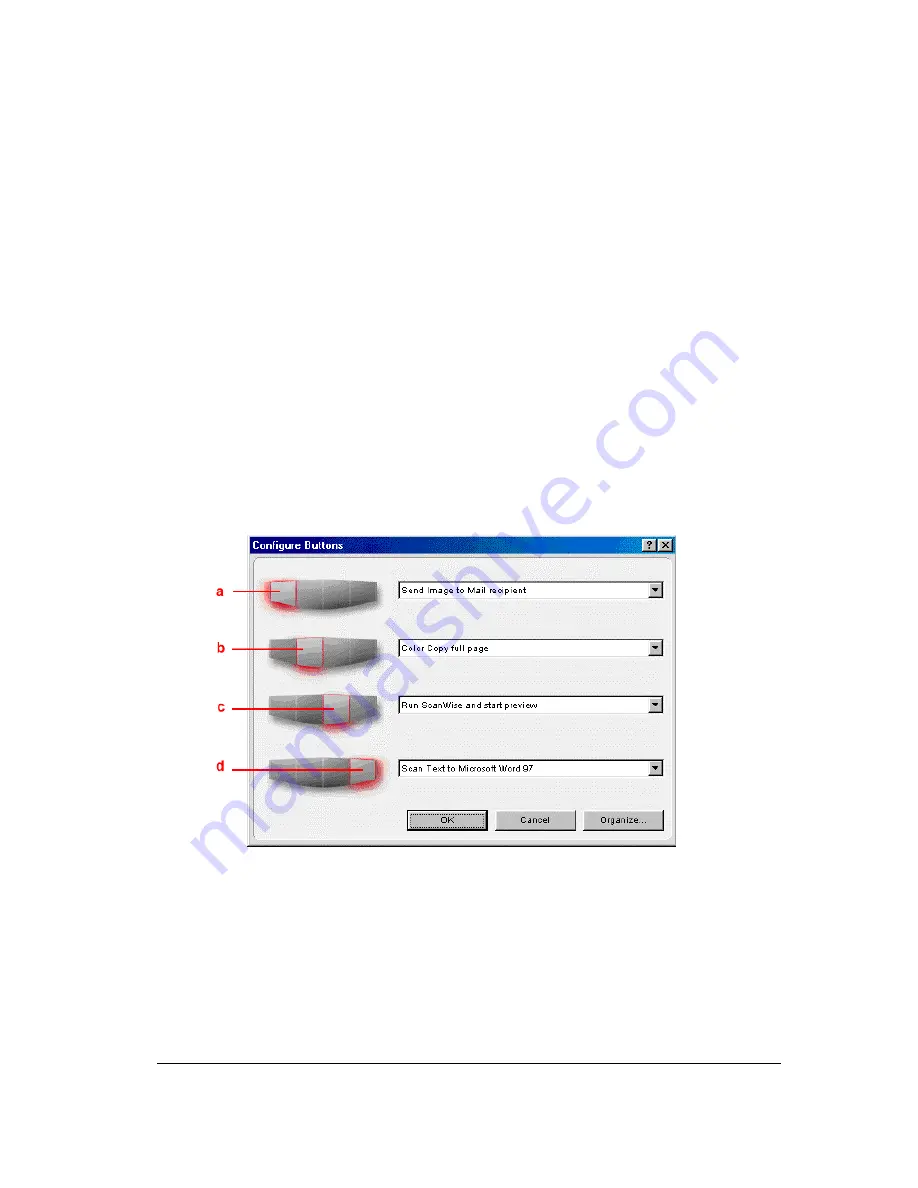
The Configure Buttons window appears.

a. e-mail button

b. print button

c. ScanWise button

d. OCR button

Summary of Contents for SnapScan e40

Page 1: ...r Macintosh computer Chapter 5 Configuring Buttons on your Macintosh Computer SnapScan e50 This chapter shows you how to configure your SnapScan Buttons on your Macintosh computer Chapter 6 Making your First Scan Here you find instructions on how to place reflective originals on the glass plate of your scanner Chapter 7 Using the Transparency Module SnapScan e50 Here you find instructions on how t...

Page 2: ...red trademark of I R I S Corel is a registered trademark of the Corel Corporation Pentium is a registered trademark of the Intel Corporation IBM PC is a trademark of the International Business Machines Corporation Microsoft Windows and Windows NT are registered trademarks of the Microsoft Corporation in the U S and other countries Other product or company names are trademarks or registered tradema...

Page 3: ...utton Cap SnapScan e50 15 Unlocking the Scanner 16 Chapter 2 Installing the Scanner for PC 17 Minimum System Requirements 18 Installing the Scanner Software 19 Connecting the Scanner to your PC 20 Installing Additional Software 22 Chapter 3 Configuring Buttons on your PC SnapScan e50 23 Selecting a Different ScanWise Configuration SnapScan e50 24 Modifying an Existing Configuration SnapScan e50 25...

Page 4: ...0 39 Modifying an Existing Configuration SnapScan e50 40 Creating a New Configuration SnapScan e50 43 Modifying the ScanWise Settings SnapScan e50 45 Chapter 6 Making your First Scan 47 Chapter 7 Using the Transparency Module SnapScan e50 49 Appendix A Troubleshooting 53 Appendix B Technical Information 56 Appendix C Regulation Compliance 58 Safety Regulations 59 UL Safety Statement 59 TÜV Wichtig...

Page 5: ...Preface 5 Preface About SnapScan Environmental Requirements Precautions Cleaning your Scanner How to Use this Online Guide How to Print this Guide ...

Page 6: ...come to life SnapScan supports multiple scanning modes and includes scanner software to get you started right away With its powerful and easy to use scanner driver software SnapScan gives you easy access to high quality color scans The scanner driver software gives you a number of additional features to create special effects or to reproduce even the most difficult originals The document cover is ...

Page 7: ...for excessive periods of time The warmth of the scanner may cause them to deteriorate For safety reasons never use extension cables for the AC adapter Caution For safety reasons besides the personal maintenance mentioned in this Owner s Guide do not try to remove any mechanical parts or any electronic components from your scanner If your scanner needs service our dealer and service offices are ava...

Page 8: ...e last page retrace your steps in the document jump to the previous or to the next page zoom in and zoom out control click on the page search for a part of a word a complete word or multiple words print the document Note Due to rescaling some of the screenshots included in this document may appear unclear when displayed at 100 magnification You can view these screenshots more clearly by using the ...

Page 9: ...Preface 9 How to Print this Guide 1 Choose Page Setup from the File menu 2 Choose your paper format from the Paper popup menu 3 Select Orientation Portrait 4 Click OK 5 Choose Print from the File menu ...

Page 10: ...anner 10 Chapter 1 Preparing the Scanner This chapter helps you to prepare your SnapScan for installation Unpacking the Scanner Taking a Closer Look Changing the Handle Changing the Button Cap SnapScan e50 Unlocking the Scanner ...

Page 11: ... contact your dealer 3 Remove the plastic wrapping and the packing materials from the scanner Note Do not throw away the packing materials They can be useful to protect the scanner during later transport Taking a Closer Look When you have taken the scanner out of the box take a closer look at its parts The following figures illustrate the different parts of your SnapScan SnapScan e40 1 2 3 4 1 rep...

Page 12: ...ustable document cover 3 transparency lamp cover for reflective scanning 4 transparency module 5 glass plate 6 replaceable button cap 7 e mail button 8 print button 9 ScanWise button 10 OCR button 11 status indicator 12 holder for scanning slides 13 holder for scanning negatives transparencies 12 13 ...

Page 13: ...anner SnapScan e40 e50 1 2 3 1 USB Port labeled with the USB icon to make a connection to your computer 2 Transparency Module Port SnapScan e50 only 3 Power connector Changing the Handle It is possible to customize your SnapScan by changing its handle 1 Press the two clips at the inside of the cover upwards and lift the handle ...

Page 14: ...Chapter 1 Preparing the Scanner 14 2 Remove the handle by sliding it out of its lip 3 Choose a new handle 4 Slide the handle in the lip 5 Press the front of the handle down until you hear a click ...

Page 15: ...is possible to customize your SnapScan e50 by changing the button cap 1 Open the button panel by pushing the button cap 2 Remove the button cap by lifting it at the underside and sliding it out of its lip Note Do not remove the button cap while the button panel is still closed ...

Page 16: ...ntil you can see the locking slider at the bottom 2 Slide the locking slider to the right Your scanner is unlocked Note If you want to transport your scanner you have to lock it To do this first connect the AC adapter to the scanner so that its optical assembly moves to its home position Then slide the locking slider to the left and disconnect the scanner Your scanner is now locked and ready for t...

Page 17: ...or PC 17 Chapter 2 Installing the Scanner for PC This chapter shows you how to set up your SnapScan for your PC Minimum System Requirements Installing the Scanner Software Connecting the Scanner to your PC Installing Additional Software ...

Page 18: ... of RAM 64 MB of RAM is recommended A CD ROM drive Windows 98 ScanWise is compatible with all IBM PCs and compatibles running Windows 98 2000 The amount of disk space available on your PC determines the number and the size of the images that you can scan Make sure that you have enough free storage space on your hard disk You need about two times the size of the image to scan edit and save it ...

Page 19: ...ow or move the slider to about ScanWise A demonstration of ScanWise will start 5 Click the dotted right arrow or move the slider to Install 6 Click Acrobat Reader to start the installation You need Acrobat Reader to read the documentation 7 Follow the instructions on your screen When the installation is finished the Install screen appears again 8 Click ScanWise to start the Installation 9 Follow t...

Page 20: ...t technical issues 3 Automatic e mail notification Agfa notifies you immediately when new software and upgrades are available for downloading Note For support issues go to http support agfa com Note For the latest information consult the ScanWise Read Me File When installation is finished you are ready to connect your scanner to your PC Connecting the Scanner to your PC Caution For your safety use...

Page 21: ...port on your scanner Make sure you connect the correct plug as shown in the figure below 4 Connect the other end of your USB cable to a USB port on your computer Make sure you connect it to the correct port as shown in the figure below A USB port is labeled with the USB icon Windows 98 2000 will now detect the scanner and will install the necessary files for the scanner hardware driver ...

Page 22: ...OM and follow the instructions on your screen To install additional software insert the Corel Print Office 2000 CD ROM and follow the instructions on your screen If the Installer Program does not appear automatically double click the Setup exe file on your CD ROM For a general overview of the possible workflows please consult the Navigation Map which is supplied with your scanner ...

Page 23: ...tons on your PC SnapScan e50 23 Chapter 3 Configuring Buttons on your PC SnapScan e50 Selecting a Different ScanWise Configuration Modifying an Existing Configuration Creating a New Configuration Modifying the ScanWise Settings ...

Page 24: ...n into a configuration that will send the scanned image to a mail recipient 1 Open the Agfa ScanWise software 2 Select Configure Buttons from the Tools menu The Configure Buttons window appears a e mail button b print button c ScanWise button d OCR button 3 Click the drop down list next to the e mail button 4 Select Scan Image to File autoselect 5 Click OK Pushing the e mail button will send the s...

Page 25: ... buttons of your SnapScan e50 The following example will show you how this is done In this example we will change the settings of the e mail button into a configuration that will send the scanned image to a file 1 Open the Agfa ScanWise software 2 Select Configure Buttons from the Tools menu The Configure Buttons window appears a e mail button b print button c ScanWise button d OCR button ...

Page 26: ...n e50 26 3 Click Organize The Organize Actions window appears The Organize Actions window displays all predefined and user defined configurations Note Remove will be enabled when a user defined action is selected The default actions cannot be removed ...

Page 27: ... the choice of destination c The output dimensions can be managed via the Dimension drop down list Note There are several options to edit the existing configuration For more information see Modifying the ScanWise Settings 6 Click Save As The Save Action Configuration window appears 7 Enter the name of your configuration 8 Click OK You return to the Settings For window 9 Click OK You return to the ...

Page 28: ... too bright or too dark we advice you to select the PhotoGenie checkbox which will enhance the colors Creating a New Configuration SnapScan e50 It is possible to create a new configuration and assign it to one of the four buttons of your SnapScan e50 The following example will show you how this is done In this example we will create a new configuration and assign it to the e mail button 1 Open the...

Page 29: ...n e50 29 3 Click Organize The Organize Actions window appears The Organize Actions window displays all predefined and user defined configurations Note Remove will be enabled when a user defined action is selected The default actions cannot be removed ...

Page 30: ...ons can be managed via the Dimension drop down list Note There are several options to create a new configuration For more information see Modifying the ScanWise Settings 5 Select the settings that you want to apply 6 Click Save As The Save Action Configuration window appears 7 Enter the name of your configuration 8 Click OK You return to the Organize Actions window and your configuration will be a...

Page 31: ... Settings For window following options are available Original Type Destination Selection and Color Mode These options can be changed using the different drop down menus Use PhotoGenie Select the checkbox Use PhotoGenie if you want to activate the PhotoGenie software that will enhance both color and detail of your scanned image in case it is too bright or too dark Resolution The resolution depends ...

Page 32: ...utput range click the Dimension drop down list A list of additional options will appear Select the dimension width or height you want to specify Enter the desired range and select the correct unit from the drop down list The Keep original size selection will keep the original size of the image ...

Page 33: ...the Scanner for Macintosh This chapter shows you how to set up your SnapScan for your Macintosh Minimum System Requirements Installing the Image Editing Software Installing the Scanner Software Connecting the Scanner to the Macintosh Computer Installing Additional Software ...

Page 34: ...alling enable the virus protection software again 2 Restart your computer 3 Insert the Mac CD ROM of Corel Print Office 2000 4 Double click the Corel Print Office 2000 icon 5 Follow the instructions on your screen Installing the Scanner Software 1 Insert the Agfa ScanWise CD ROM in the CD ROM drive Note If the ScanWise program does not appear automatically carry out the following instructions 1 Do...

Page 35: ...the Agfa webpage opens Here you can register on line Register later If you choose to register later you can register afterwards by double clicking the Product Registration icon in the ScanWise folder By registering on line you will create your personal e Service account and you will enjoy the following benefits 1 Customized self help tools You have access to the following self help tools which are...

Page 36: ... Macintosh Computer Caution For your safety use the adapter that comes with this product Do not use any substitute Misuse of the power adapter can cause serious damage to the product and a safety hazard while using it Note Check if the AC Adapter complies with your local power supply Note Make sure the scanner is unlocked see Unlocking the Scanner before connecting it to the electric outlet 1 Conn...

Page 37: ...f your USB cable to a USB port on your computer Make sure you connect it to the correct port as shown in the figure A USB port is marked with the USB icon Installing Additional Software If you want to use OCR Optical Character Recognition you will have to install Readiris Pro Insert the CD ROM and follow the instructions on your screen For a general overview of the possible workflows please consul...

Page 38: ...Computer SnapScan e50 38 Chapter 5 Configuring Buttons on your Macintosh Computer SnapScan e50 Selecting a Different ScanWise Configuration Modifying an Existing Configuration Creating a New Configuration SnapScan e50 Modifying the ScanWise Settings ...

Page 39: ...mail button into a configuration that will send the scanned image to a file 1 Open the Agfa ScanWise software 2 Select Configure Buttons from the Tools menu The Configure Buttons window appears a e mail button b print button c ScanWise button d OCR button 3 Click the drop down list next to the e mail button 4 Select Scan Image to File autoselect 5 Click OK Pushing the e mail button will send the s...

Page 40: ...of your SnapScan e50 The following example will show you how this is done In this example we will change the settings of the e mail button into a configuration that will send the scanned image to a file instead of to your mail recipient 1 Open the Agfa ScanWise software 2 Select Configure Buttons from the Tools menu The Configure Buttons window appears a e mail button b print button c ScanWise but...

Page 41: ...he default actions cannot be removed 4 Select Scan Image to File autoselect 5 Click Edit to modify the selected configuration The Settings For window appears a All predefined settings are available via the different drop down menus b The resolution depends on the choice of destination c The output dimensions can be managed via the Dimension drop down list Note There are several options to edit the...

Page 42: ...dow and your configuration will be added to the Actions list 10 Click Close You return to the Configure Buttons window 11 Select My Scan Image to File autoselect from the drop down list next to the e mail button 12 Click OK Pushing the e mail button will send the scanned image to a file instead of to your mail recipient Note For low quality originals originals that are too bright or too dark we ad...

Page 43: ...ample will show you how this is done In this example we will create a new configuration and assign it to the e mail button 1 Open the Agfa ScanWise software 2 Select Configure Buttons from the Tools menu The Configure Buttons window appears a e mail button b print button c ScanWise button d OCR button 3 Click Organize The Organize Actions window appears The Organize Actions window displays all pre...

Page 44: ...rop down menus b The resolution depends on the choice of destination c The output dimensions can be managed via the Dimension drop down list Note There are several options to create a new configuration For more information see Modifying the ScanWise Settings 5 Select the settings that you want to apply 6 Click Save As The Save Action Configuration window appears 7 Enter the name of your configurat...

Page 45: ...uration or to create a new one In the Settings For window following options are available Original Type Destination Selection and Color Mode These options can be changed using the different drop down menus Use PhotoGenie Select the checkbox Use PhotoGenie if you want to activate the PhotoGenie software that will enhance both color and detail of your scanned image in case it is too bright or too da...

Page 46: ...pecified output range click the Dimension drop down list A list of additional options will appear Select the dimension width or height you want to specify Enter the desired range and select the correct unit from the popup list The Keep original size selection will keep the original size of the image ...

Page 47: ... quality is guaranteed for the entire scan area If you put more than one original on the glass plate position them as close to the center line as possible to optimize the quality 2 Close the document cover of the scanner SnapScan e50 note Please make sure the transparency lamp cover is attached Note The adjustable document cover makes it possible to scan from books and magazines When you put a thi...

Page 48: ...e you use ScanWise 5 Click Yes when the system asks to guide you 6 Follow the steps described in the ScanWise Guide Me mode For more information consult the ScanWise Application Guide and the Agfa Contacts on your Agfa ScanWise CD ROM After installation you can access these documents via the Start menu or via the ScanWise icon on your desktop Note If you encounter problems please consult the ScanW...

Page 49: ...negatives transparencies or slides you have to use the transparency module on your SnapScan e50 If you want to scan negatives transparencies or slides carry out the following instructions 1 Remove the transparency lamp cover 2 If you scan negatives or transparencies 1 Slide these negatives transparencies in the holder ...

Page 50: ...he Transparency Module SnapScan e50 50 2 Align the holder with the negatives transparencies on the scanner glass plate Then continue with instruction 4 3 If you scan slides 1 Align the holder on the scanner glass plate ...

Page 51: ...rencies and reflectives Transparent scanning Reflective scanning 7 In case ScanWise has not automatically recognized the original select the correct original from the list 8 Click the Scan button The negatives transparencies or slides will be scanned Note Make sure the calibration area of the slide holder is NEVER covered If the calibration area is covered the following message will appear Note If...

Page 52: ...sing the Transparency Module SnapScan e50 52 calibration area calibration area Note Please make sure not to touch the glass plate in the calibration area Otherwise the quality of your scanned image can be affected ...

Page 53: ...cannot find the scanner MACINTOSH ONLY If the scanner driver cannot find the scanner a message appears telling you that no scanner is connected Check if the scanner is connected with the USB cable to your computer and that the AC adapter is plugged in It can always happen that a USB port is damaged therefore try the other USB port of your computer Open the Apple System Profiler that you find under...

Page 54: ... experienced users only If you are not familiar with these tasks ask your computer dealer to do this for you You typically do this by pressing a key combination during the startup of your PC Consult your computer manual for more information 3 Exit and save the changes you made Your computer is rebooted automatically Check again if the Universal serial bus controller is present in the Device Manage...

Page 55: ...f you are using MS Outlook Express v4 x and it does not show up in the ScanWise destination list choose Options in the Tools menu in Outlook Express and make sure that the following items are checked Make Outlook Express my default e mail program Make Outlook Express my default Simple MAPI client This should solve the problem If you are using MS Outlook Express v5 choose Tools General in the Tools...

Page 56: ... color Scanning speed line art 8 ms line gray 8 ms line color 23 ms line Maximum scanning area for reflective scanning only 216 x 297 mm 8 5 x 11 7 Maximum scanning area for transparency scanning SnapScan e50 5 negatives or transparencies 3 slides Lamp for reflective scanning Cold cathode Lamp for transparent scanning SnapScan e50 Cold cathode Power on to ready time 15 seconds AC adapter Input vol...

Page 57: ...nformation 57 Interface USB port Transmission speed 1 mbyte s Environmental specifications operating temperature 10 C to 40 C 50 to 104 degrees Fahrenheit relative humidity 20 to 85 RH surrounding space 10 cm 4 on every side ...

Page 58: ...Appendix C Regulation Compliance 58 Appendix C Regulation Compliance Safety Regulations Electromagnetic Compatibility ...

Page 59: ...den sollten Sie nur Zuberhörteile verwenden die vom Hersteller zugelassen sind Das Gerät ist vor Feuchtigkeit zu schützen Bei der Aufstellung des Gerätes ist auf sicheren Stand zu achten Ein Kippen oder Fallen könnte Verletzungen hervorrufen Verwenden Sie nur sichere Standorte und beachten Sie die Aufstellhinweise des Herstellers Die Belüftungsöffnungen dienen zur Luftzirkulation die das Gerät vor...

Page 60: ...adio communications However there is no guarantee that interference will not occur in a particular installation If this equipment does cause harmful interference to radio or television reception which can be determined by turning the equipment off and on the user is encouraged to try to correct the interference by one or more of the following measures Reorient or relocate the receiving antenna Inc...

Reviews: