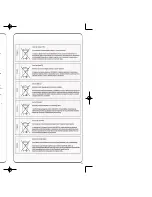
Agatec AGATEC220 User Manual Download Page 9

Low battery

Blinking: Normal volume

Solid: Loud

No horn: Mute

Standard

Default 

mode

(

)

Fine

Low

Near 
grade low

On-grade

Near 
grade high

High

B

ATTERY STATUS

S

OUND

A

CCURACY

• Using the detector 

1.

Press the On/Off key to turn on the detector.

2.

Press the middle key to select the accuracy (deadband).

3.

Press the top key to select the sound level.

4.

Turn the detection window towards the laser beam, and

move the detector up or down according to the information
given on the LCD display. There are 5 channels of information,
or grade indicators. 
A down arrow indicates you must move the detector down to
reach the laser reference; an up arrow, move it up. When a
horizontal line appears on the display, the detector is at the
same level as the laser beam.

5.

Press the On/Off key to turn the detector off. It will 

automatically shut off after 10 minutes if not used (and give a
warning beep).

6.

Keep the detection window clean, using a soft cloth and

glass cleaner.

* Troubleshooting
If you cannot pick up the beam with the detector, check how
you are lined up with the laser. One of the head protection 
supports on the laser may be blocking the beam; move to the
left or right to receive the beam.
The metal head protection can be removed from the laser by
pivoting the two security locks. This will not affect the 
performance or the water or dust resistance of the laser.

• LCD Display

7.1  Detector for grade rods or 

handheld applications

Choice of 
sound level

LCD 
screen 

(front)

LCD screen

(rear)

Bubble vial

to plumb

rod

9V battery 

compartment

(follow polarity

indications

inside)

On-grade 
alignment notch

Rod clamp

Detection
window

Level vial

Choice of 
accuracy

Turn to attach

clamp to detector

On/Off

Turn to tighten
or remove clamp
from rod

Keypad

15

14

GB F E D I N FIN 

GAT220-08-2007  7/10/07  22:38  Page 14

Summary of Contents for AGATEC220

Page 1: ......

Page 2: ...Safety The GAT220 is a Class 3R laser manufactured to comply with the international rules of safety IEC 60825 1 2001 Although the power of the emission of the beam is less than 5mW in Class 3R the fo...

Page 3: ......

Page 4: ...lf level ing After it has leveled the head will start to rotate 3 To select the H I Alert press the H I key 3 The H I Alert func tion will be active 30 seconds after the GAT220 has finished its self l...

Page 5: ...pe 6 Press the MAN key to return to automatic mode CAUTION In manual mode the beam rotates even if the laser is not leveled The H I Alert function is not available when the unit is in manual mode When...

Page 6: ...calibrate using the non rotating point If it s too bright to see the beam you ll use the detector and will need to have the beam rotating When you re in calibration mode press the rotation key 7 on th...

Page 7: ...to change to the Y axis When the Y LED blinks slowly it s ready to be calibrated in Y axis If you re no longer in calibration mode 1 Turn off the laser 2 Hold the MAN 5 key While holding momentarily p...

Page 8: ...apacity The GAT220 laser is guaranteed to be free of manufacturing defects for a period of one year Any abnormal usage or if the instrument has been subjected to shock will void this warranty Under no...

Page 9: ...erence an up arrow move it up When a horizontal line appears on the display the detector is at the same level as the laser beam 5 Press the On Off key to turn the detector off It will automatically sh...

Page 10: ...n m ar a Niveau Electronique...

Page 11: ...plications de nivellement 1 2 Avertissement Le GAT220 est un produit laser de Classe 3R laser Il respecte la norme de s curit internationale IEC 60825 1 2001 Bien que la puissance d mission du laser n...

Page 12: ...tale 1 Le GAT220 peut tre utilis m me le sol ou sur un tr pied standard 5 8 11 2 Appuyer sur la touche On Off 1 L instrument se met a niveau automatiquement 3 Pour s lectionner le mode Tilt appuyer su...

Page 13: ...ique Le mode semi automatique signifie L axe Y est en mode manuel L axe X est en mode automatique Il vous est donc possible de faire une pente manuelle sur l axe Y en utilisant les touches 8 et 9 du c...

Page 14: ...llule de r ception si la visibilit le permet Ou arr ter la rotation et diriger le point laser manuellement vers le mur 4 Faire pivoter le laser de 180 Lorsque le laser s est recal marquer la position...

Page 15: ...u sur la touche 9 pour descendre le rayon au niveau du milieu des 2 marques 7 Enregistrer les donn es de l axe Y en appuyant sur la touche MAN 5 du clavier Si une erreur a pu se produire lors des op r...

Page 16: ...t de la r paration voire au maximum le remplacement de l appareil Tout d montage de l appareil effectu par des techniciens non habilit s annule la garantie Les sp cifications de cet instrument peuvent...

Page 17: ...PR CISION e a er n Caract ristiques techniques Distance maximale d utilisation 150 m Pr cision Fin 1 mm Standard 2 5 mm Autonomie Batterie 50 heures 9 V Alcaline Environnement Etanche IP 66 Dimensions...

Page 18: ...33 r b n m dis u us...

Page 19: ...x 501 982 0880 Email sales agl lasers com QBL Liegnitzer Str 1 3 D 42489 W lfrath Tel 49 0 2058 7881 0 Fax 49 0 2058 7881 52 Info quante baulaser de PRIM TOOLS 17 F Morecrown Commercial Building 108 E...

Reviews: