background image

Warranty Information

Page 23 of 23

This product has been manufactured under the highest 

standards of quality and workmanship. We warrant to the 

original consumer purchaser that all aspects of this product will 

be free of defects in material and workmanship for one year 

from the date of purchase. A replacement for any defective 

part will be supplied free of charge for installation by the 

consumer. Defects or damage caused by the use of other than 

genuine parts are not covered by this warranty. This warranty 

shall be effective from the date of purchase as shown in the 

purchaser receipt. 

This warranty is valid for the original consumer purchaser only 

and excludes industrial, commercial or business use of the 

product, product damage due to shipment or failure which 

results from alteration, product abuse, or product misuse, 

whether performed by a contractor , service company , or 

consumer. We will not be responsible for labor charges and/or 

damage incurred in installation, repair or replacement nor for 

incidental or consequential damage. 

Summary of Contents for 129140741

Page 1: ...unshade Customer Service 888 922 2336 7 00 am to 12 00 am CST daily Live Chat at www academy com Email customerservice academy com Made in China Please keep this instruction manual for future reference Assembly Instructions User s Manual ...

Page 2: ...s with package content list and hardware contents If any part is missing or damaged do not attempt to assemble the unit Contact customer service for replacement parts Warnings 3 Basic Trampoline Skills 4 Tools and Parts 6 Assembly Instructions 8 Care and Maintenance 22 Warranty Information 23 Page 2 of 23 ...

Page 3: ...sure is to be used only in connection with this trampoline Read and follow all warnings and instruction This product is intended to be assembled by an adult Maximum weight limited 82 kg 180 lbs Warning Not suitable for children under 36 months Small parts and long cords may be a choking and strangulation hazard Warning Keep away from fire Never shelter in the sunshade during a thunderstorm remove ...

Page 4: ... bouncing from a standing position keeping your eyes on the frame pad 2 Land on your knees keeping your back straight and your body erect 3 Come back up to an erect position Hand and Knee Drop 1 Start bouncing from a standing position keeping your eyes on the frame pad 2 Land on the bed on your hands and knees 3 Push with your hands and come back up to an erect position Back Drop 1 Start from a lo...

Page 5: ...n Half Turntable 1 Start from the front drop position and push to the left or right with your arms to begin turning your body in the opposite direction 2 Turn your head and shoulders toward the direction that your body is turning 3 Keep your back parallel to the bed and your head up 4 After completing a half turn land in the front drop position Swivel Hips 1 Start with a seat drop 2 Turn your head...

Page 6: ...Page 6 of 23 1 Tools Required ...

Page 7: ...Page 7 of 23 2 ...

Page 8: ...ube with T connector Part A 6 x Straight leg Part B 6 x Plastic foot cap Part C 6 x Self tapping screw Part J First we will complete one of the sections of the trampoline frame Slot the narrow end of the top tube with T connector into another top tube with T connector 2 Spring Holes on Top 4 Spring Holes on Bottom ...

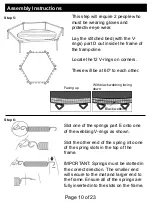
Page 9: ...Step 4 Page 9 of 23 This step will require 2 people who must be wearing gloves Slot two of the frame sections together as shown in the diagram Important Ensure all of the top tubes leg extensions and center legs are fully inserted ...

Page 10: ...s These will be at 60º to each other Slot one of the springs part E onto one of the webbing V rings as shown Slot the other end of the spring into one of the spring slots in the top of the frame IMPORTANT Springs must be slotted in the correct direction The smaller end will secure to the mat and larger end to the frame Ensure all of the springs are fully inserted into the slots on the frame Facing...

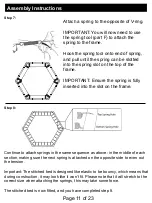
Page 11: ...e the spring is fully inserted into the slot on the frame Continue to attach springs in the same sequence as above in the middle of each section making sure the next spring is attached on the opposite side to even out the tension Important The stitched bed is designed like elastic to be bouncy which means that during construction it may look like it won t fit Please note that it will stretch to th...

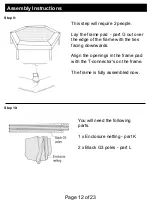
Page 12: ...e Lay the frame pad part G out over the edge of the frame with the ties facing downwards Align the openings in the frame pad with the T connector s on the frame The frame is fully assembled now You will need the following parts 1 x Enclosure netting part K 2 x Black G3 poles part L ...

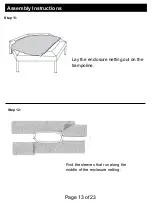
Page 13: ...Assembly Instructions Step 11 Page 13 of 23 Lay the enclosure netting out on the trampoline Find the sleeves that run along the middle of the enclosure netting Step 12 ...

Page 14: ... G3 poles through the sleeves on the middle of the enclosure netting Step 14 You will now join the two ends of the Black G3 poles together with the fitted pole connector this will require two people Both people hold two of the poles end sections and walk towards each other to bend the poles into a circle Please note the poles are Located at Middle of enclosure ...

Page 15: ... 2 and fully insert the connector Ensure the pin is protruding through the slot in the socket Use the strap on the enclosure net to cover the exposed pole connections Step 16 You will need the following parts 6 x Top enclosure tubes Part H 6 x Bottom enclosure tubes Part I 6 x Self tapping screw Part J You will also need a cross head screwdriver not supplied ...

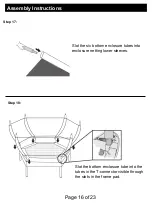
Page 16: ...ctions Step 17 Page 16 of 23 Slot the six bottom enclosure tubes into enclosure netting lower sleeves Step 18 Slot the bottom enclosure tube into the tubes in the T connector visible through the slots in the frame pad ...

Page 17: ...sure netting upper sleeves Step 20 Slot the thin end of one of the bottom enclosure tubes into the open end of one of the top enclosure tubes Align the hole in the bottom enclosure tube with the slot in the top enclosure tube Tip It is easier to slot in from the outside of the trampoline ...

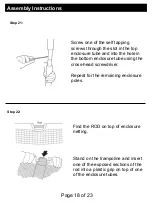
Page 18: ...closure tube and into the hole in the bottom enclosure tube using the cross head screwdriver Repeat for the remaining enclosure poles Step 22 Find the ROD on top of enclosure netting Stand on the trampoline and insert one of the exposed sections of the rod into a plastic grip on top of one of the enclosure tubes ...

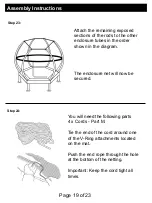
Page 19: ...ubes in the order shown in the diagram The enclosure net will now be secured Step 24 You will need the following parts 4 x Cords Part M Tie the end of the cord around one of the V Ring attachments located on the mat Push the end rope through the hole at the bottom of the netting Important Keep the cord tight all times ...

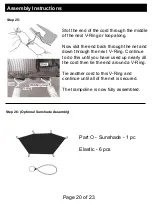
Page 20: ...nd back through the net and down through the next V Ring Continue to do this until you have used up nearly all the cord then tie the end around a V Ring Tie another cord to this V Ring and continue until all of the net is secured The trampoline is now fully assembled Step 26 Optional Sunshade Assembly Part O Sunshade 1 pc Elastic 6 pcs ...

Page 21: ...er top of trampoline enclosure mesh Position the Sunshade loops so they align with the enclosure mesh poles Tip After the elastic cord go through the loop on sunshade then fix on the enclosure pole as the image shown 2 person are required to complete the assembly ...

Page 22: ...eplace any worn defective or missing parts The following conditions could represent potential hazards and increase the danger of personal injury 1 A missing improperly positioned or insecurely attached frame pad netting enclosure tubes foam sleeves 2 Punctures frays tears or holes worn in the bed frame pad netting foam sleeves 3 Deterioration in the stitching or fabric of the bed frame pad netting...

Page 23: ...caused by the use of other than genuine parts are not covered by this warranty This warranty shall be effective from the date of purchase as shown in the purchaser receipt This warranty is valid for the original consumer purchaser only and excludes industrial commercial or business use of the product product damage due to shipment or failure which results from alteration product abuse or product m...

Reviews: