background image


87


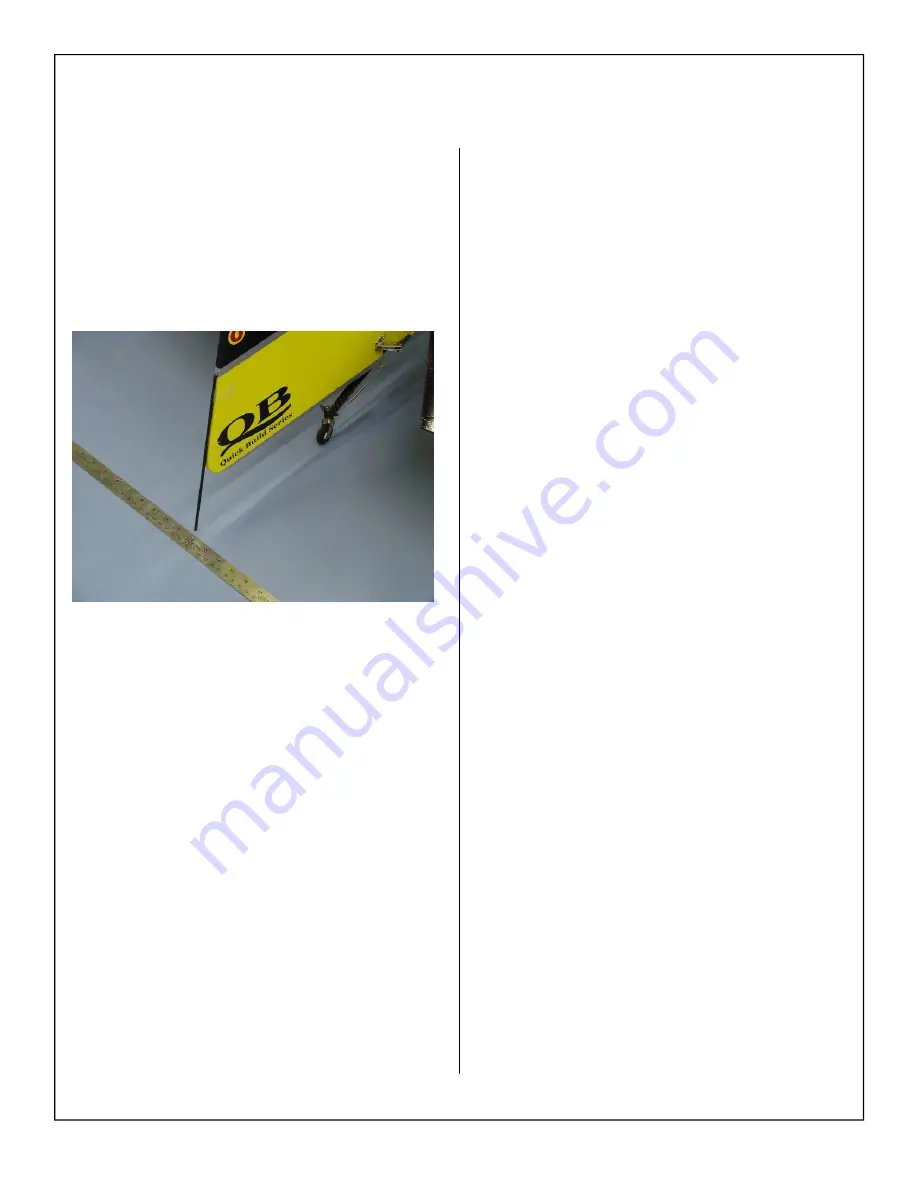
6.  Measure the rudder deflection in inches from 

bottom of the rudder 


Summary of Contents for ULTIMATE 20-300 ARF-QB

Page 1: ...1 100cc 120cc ULTIMATE 20 300 ARF QB Quick Build ASSEMBLY MANUAL AEROWORKS 4903 Nome St Denver CO 80239 www aero works net ...

Page 2: ... Tail Wheel Installation 33 Main Landing Gear and Wheel Pant Installation 36 Engine Installation 39 Throttle Servo Installation 41 Standard Muffler Installation 46 Canister Muffler Installation 47 Tuned Pipe Installation 50 Ignition Module Installation 53 Inner Cabane Installation 57 Fuel Tank Assembly and Installation 59 Receiver Battery Installation 64 Cowl Installation for Standard Mufflers 68 ...

Page 3: ...fects in both material and workmanship at the date of purchase This limited warranty does not cover any component parts damaged by use or modification In no case shall Aeroworks liability exceed the original cost of the purchased kit Further Aeroworks reserves the right to change or modify this limited warranty without notice In that Aeroworks has no control over the final assembly or materials us...

Page 4: ... of the full capabilities of this aerobatic aircraft IMPORTANT Please read through this assembly manual carefully before starting the as sembly of your new model Inventory and inspect all parts and hardware for any imperfec tions or damage Notify Aeroworks immediately if there are missing or damaged parts and do not proceed with the assembly INTENDED USE This plane should not be regarded as a toy ...

Page 5: ...at washers 1 Front Fuse bottom hatch cover with pre cut air exit slots pre installed with 4 T2 6x10mm PWA screws 1 Rear Canister fuse bottom hatch cover with pre cut air exit slots pre installed with 4 T2 6x10mm PWA screws 1 Rear Long Pipe fuse bottom hatch cover with pre cut slots for stinger exit 2 Bottom wing fillet installed Left and Right painted 1 Center Cabane assembly installed 1 Front hat...

Page 6: ...s 4 8 Bonded Washers 2 8 32 Lock Nuts OR If No center cabane fairing will be used 2 8 32x15mm bolt 2 8 32 Lock Nuts 3 2 Aluminum Main Landing Gear 1 left and 1 right painted 2 5mm dia x 48mm AL Axle 2 M8 lock nuts 4 5mm Wheel Collars with set screws 2 8mm flat washers 2 4 Dia Main Wheels 4 4 40x14mm hex style bolts for mounting wheel pants 4 3mm flat washer for mounting wheel pants 4 3mm split rin...

Page 7: ... 1 Custom Throw Meter 11 24 6 35mm aluminum engine stand offs 2 4mm flat washers for top wing mounting 4 6 32x20mm hex head bolts for bottom wing Mounting 4 3 5mm flat washers for bottom wing mounting 4 4 40x16mm hex style head bolts for stab mounting 4 6 bonded washers for stab mounting 4 3mm split ring lock washers for stab mounting 12 1 23x740mm Carbon Compound top wing tube 1 23x740mm Carbon C...

Page 8: ... Option 2 DA 100 L 1 DA 100 L 1 Ignition Module 4 1 4 20 x 2 1 4 Mounting Bolts 8 Fender Washers 4 1 4 Lock Nuts for engine mounting 3 Large Gas Fuel Line 1 26x12 28x10 2 Blade Propeller Note DA 100 L can be purchased through Aeroworks Engine Option 3 DLE 111 1 DLE 111 1 Ignition Module 4 1 4 20 x 2 1 4 Mounting Bolts 8 Fender Washers 4 1 4 Lock Nuts for engine mounting 3 Large Gas Fuel Line 1 26x...

Page 9: ...rs 2 Smoke inlets 2 Smoke inlet plugs Exhaust Option 2 Canister Mufflers 2 MTW TDH 75 Rear Exit Canisters 2 70mm Drop Headers 2 3 Teflon Couplers 2 Header Gaskets 4 Header Clamps 4 Header Mounting Bolts Exhaust Option 3 Tuned Pipes 2 MTW RE 2 Tuned Pipes 2 70mm Drop Headers 2 3 Teflon Couplers 2 Header Gaskets 4 Header Clamps 4 Header Mounting Bolts ...

Page 10: ...de the best per formance possible Note Servos available through Aeroworks 7 Hitec 7955TG Servos for flight surfaces 1 Hitec 5625MG Servo for throttle Recommended Spinner 1 4 Spinner Carbon Fiber Recommended Note Spinner available from Aeroworks Electronic Accessories Receiver A 12 or 14 channel receiver is recommended using a receiver with 12 14 channels will allow the builder to mix both the aile...

Page 11: ...any other gas engine the Aeroworks Ignition Power System is recommended 1 Fromeco 2600mah Li Ion Battery w Universal Connector 1 Smart Fly Ignition Regulator 1 MPI charge switch Recommended Extensions 22 AWG extensions are recommended through out the 100cc Ultimate The following sizes will be used 4 12 Extensions For Top and Bottom Wings 2 12 Extensions For Bottom Wing In Fuse 2 18 Extensions For ...

Page 12: ...ering sock Masking tape Modeling knife Needle nose pliers or crimping tool Paper towels Pen pencil or felt tipped marker Phillips screwdriver Rubbing alcohol Ruler and tape measure Scissors T pins Waxed paper Wire Cutters Adhesives 15 30 Minute epoxy Blue Loctite Epoxy mixing cups mixing sticks brushes CA kicker optional Thick Thin and Medium CA Rubbing alcohol Wipes WARNING Some rubbing alcohols ...

Page 13: ...ing you will be re warded with a long lasting beautifully covered model TIGHTENING AND RE SHRINKING THE COVERING 2 Using your covering iron with a soft sock gently apply pressure and rub in the covering If any bubbles occur your iron may be to hot Reduce heat and work slowly 3 If bubbles persist use a small pin to punch holes in the bubble to relieve trapped air and reheat 4 Use your heat gun with...

Page 14: ... with Ultracote covering In case of repairs the colors are Red Yellow Black Scheme Black 874 Silver 881 True Red 866 Bright Yellow 872 Ultracote Colors Yellow Silver Blue Scheme Pearl Blue 845 Silver 881 Cub Yellow 884 White 870 ...

Page 15: ...inge gaps Use covering iron to seal the clear covering snugly into the bottom of the hinge lines as shown for air tight hinge seals Note The clear covering does have a transparent protective backing This must be removed prior to applying heat and to the surface IMPORTANT It is the responsibility of the purchaser operator to check the covering seams and overlaps for security and a good seal Aerowor...

Page 16: ...il the hinges have cooled down and the glue has re hardened 3 If the elevator hinges are tight follow the same process as described for the wings Note Once these steps have been completed the hinges will throw to their full deflect tion IMPORTANT 1 If control surfaces will not throw to full deflec tion it may be necessary using a heat gun to apply heat to the knuckle of each hinge This will allow ...

Page 17: ...ibly see glue on all glue joints it is still recommended that the joints be reglued Due to changes in humidity during the life of the aircraft glue joints can separate it is always recommended that the glue joints be checked before each flying session CHECKING GLUE JOINTS 2 Use thin CA to reglue any accessible glue joint as shown below ...

Page 18: ... working on the inside of the fuse Due to high humidity levels during the building and shipping process the canopy may warp when not bolted to the airframe CANOPY FRONT HATCH WARP PREVENTION 2 The front hatch should also be bolted to the air frame whenever possible ...

Page 19: ...ional 1 Wing panel 1 Aileron servo 1 1 1 4 Servo Arm 4 Servo Mounting Screws Micro Fastener Part number STW0209 recommended 1 12 servo extension 1 Aeroworks Safety Clip WING ASSEMBLY 2 Attach the 12 servo extension to the servo wire and secure using an Aeroworks Safety Clip Minimum recommended servo 181 in oz Metal Geared Digital 3 Remove the balsa stick with the pull string from the servo well an...

Page 20: ... Side Control Horns 24 Wood Screws 1 Adjustment Wrench 3 Correct installation of ball link flat washer and brass spacer to servo arm shown below 2 Assemble pushrod and control horn assembly as shown The ball link goes between the left and right sides of the control horn sides and is secured with a nylon lock nut Improperly installed servo linkages can cause ser vos to strip and ailerons to flutter...

Page 21: ...r and turn on Ensure servo is centered and the servo arm is parallel to the aileron hinge line Adjust the length of the pushrod so that the aileron is at the neutral position when the servo arm is par allel to the aileron hinge line Ensure the servo does not fight at center or either end point at full deflection Take advantage of servo programmers and match boxes available today to achieve best re...

Page 22: ...ation 1 Gather the outer strut mounting brackets as shown below 8 Steel Mounting Strut Brackets 8 8 32 x 15mm Mounting Bolts 8 Flat Washers 3 Install mounting bracket using mounting bolt and washer as shown below 4 Wing assembly is now complete Note Check mounting bolts are tight before each flying session ...

Page 23: ...l horns 12 Wood screws 1 Adjustment wrench Elevator Control Linkage Installation Note Flat washer prevents ball link from coming off brass ball Elevator Servo Installation 1 The elevators have been pre hinged and glued to the stabs and are ready for flight No other steps are necessary for hinging Clear covering has been provided for sealing of the hinge gaps if desired Gather the following items f...

Page 24: ...n each screw prior to installing to lock screws in place Note CA glues have a fast drying time Remember to work quickly 6 Completed stab and elevator shown below Re peat steps for other stab and elevator 3 Assemble the pushrod and control horn assem bly as shown The ball link goes between the left and right sides of the control horn sides and is secured with a nylon lock nut ...

Page 25: ...s no epoxy gets into the hinge during assembly 3 Mix epoxy in mixing cup and use a tapered stick to apply the epoxy inside the pre drilled holes in the trailing edge of the fin Apply epoxy to one side of each hinge and insert the hinge completely into the hole 4 Ensure the hinge axis is vertical and parallel to the trailing edge of the fin before epoxy cures Wipe away excess epoxy with alcohol wet...

Page 26: ... wetted wipes 7 Ensure there is minimal to no gap between fin and rudder Allow epoxy to fully cure Note Ensure you have full rudder deflection before epoxy fully cures Rudder Horns Servos and Pull Pull Cable Installation 1 Gather the rudder control linkage parts shown below 2 Rudder cables 4 Ball link assemblies 2 Flat washers 2 Brass Spacers 4 4 40 Lock Nuts 4 Threaded couplers with lock nut 4 Br...

Page 27: ...o obtain full rudder deflection 4 Use thick CA on each screw prior to installing to lock screws in place Note CA glues have a fast drying time Remember to work quickly 5 Align the left and right sides of the control horns to the mounting holes and mount using six wood screws as shown 3 Align the control horns over the factory drilled holes ...

Page 28: ...y Clips 2 1 1 2 pushrod couplers 4 4 40 ball link assemblies 4 4 40 Lock Nuts 4 Flat washer 7 Attach Y harness to rudder servos as shown be low Use an Aeroworks safety clip to secure the connection 8 Install rudder servos out put shafts facing forward with servo mounting screws 9 Install the servo arms to servos as shown below Assemble rudder coupler pushrods and adjust pushrod length to fit betwe...

Page 29: ...m and 2 16mm 4 40 Bolts as shown be low 12 Install the coupler assembly onto the rudder ser vos as shown small adjustments may be neces sary to allow the coupler to fit properly 13 Feed the rudder cable through the pre installed cable exit tube in the tail of the fuse toward the front Repeat for other side 20mm 16mm ...

Page 30: ...ng into fuse 15 Pull the rudder cables from the fuse tail to the rudder servo tray Do Not cross cables 16 Insert rudder cable through the brass swage tube as shown 17 Thread cable through the threaded coupler hole and back through the brass swage tube as shown ...

Page 31: ...ack through the brass swage tube and pull tight as shown 19 Crimp the brass tube with a crimping tool or pli ers 20 Cut off excess cable as shown 21 A drop of thin CA may be applied to the swage tube to help secure the cable ...

Page 32: ...servo Y harness into the rudder channel of the receiver and power up Turn on transmitter to center rudder servos 25 Attach aft servo arm to servo and leave the front coupler disconnected until final radio program ming is done It is very important that these servo do not bind during their full range of travel 26 Using same installation steps just used attach the ball link to the rudder control horn...

Page 33: ...er the tail wheel parts shown below 1 Aluminum tail wheel assembly 3 Tail wheel mounting screws 1 Steering tiller 2 Tiller mounting screws 2 Steering springs 3 Place tail wheel steering tiller over the pre drilled holes in the bottom of the rudder 4 Apply a drop of thick CA to the mounting screws before inserting into the tiller mounting holes TAIL WHEEL INSTALLATION ...

Page 34: ...r of the fuse 7 Place a drop of thick CA on tail wheel strut mounting screws before inserting in the pre drilled mounting holes on the bottom rear of the fuse 8 Mount the tail wheel strut using three wood screws 9 Attach the steering spring to one side of the rud der tiller Center the spring between the rudder and tail wheel tillers ...

Page 35: ...at for opposite side tail wheel spring Ad just length and spring tension so that tail wheel is centered when rudder is centered 13 Tail wheel final assembly is complete 10 Use pliers to twist spring ends closed around the rudder and tail wheel tillers ...

Page 36: ...Washers Note Optional carbon fiber gear shown aluminum gear is included with the airplane MAIN LANDING GEAR AND WHEEL PANT INSTALLATION 2 The tapered edge of the landing gear goes to the front of the airplane Gear should sweep back towards lower wing when mounted to fuselage 3 Slide the gear into the fuse as shown below 4 Assemble the landing gear bolts with lock washer and flat washer Use a drop ...

Page 37: ...n lock nut Only snug tighten at this time 7 Check alignment of axle with cutout in wheel pant Check alignment of wheel pant mounting holes with mounting holes in gear Securely tighten axel to gear strut 8 Install the wheel and inner wheel collar Use blue Loctite on the wheel collar set screw before final tightening ...

Page 38: ...crew before final tighten ing 10 Slide the lock washer then the flat washer on the wheel pant mounting bolts Use blue Loctite on the bolts before final tightening 11 Final installation of wheel pant with two mount ing bolts 12 Repeat above steps for other wheel and wheel pant ...

Page 39: ...LLATION 2 6mm Machined Aluminum spacers are included to set the proper stand off distance for your en gine 3 Locate the laser cut engine mounting template for the DA 120 Note If other engines are used the templates may be modified to fit you engine selection Center your engine over the laser marked thrust lines on the template Mark and drill the engine mounting hole locations for your engine Follo...

Page 40: ... mounting holes in firewall 7 Insert the 4 bolts through the engine mount and install the engine standoffs and fender washers Required distance from front of firewall to prop hub is 7 1 16 Use correct amount of spacers and washers to achieve this distance 8 Insert the bolts through the firewall as shown ...

Page 41: ... parts 1 Throttle Servo with mounting screws 1 3 4 servo arm 1 4 40 metal rods threaded at one end 2 Ball link assemblies 1 Brass Spacers 1 4 40 threaded solder coupler Note Servo mounting trays have been supplied for your convenience However we have chosen to mount the throttle servo into the engine box floor This allows for a fast and easy installation and pro 2 If canister mufflers or tuned pip...

Page 42: ...o not interfere with the standard mufflers 4 When the final location of the throttle servo is determined use a pencil to trace the outline of the servo onto the bottom of the engine box as shown 5 Use a rotary cutting tool to cut out the throttle servo mounting hole Note Cover engine with a towel or cloth or use masking tape to protect from any debris getting into the carburetor or cylinders 6 Thr...

Page 43: ...that will be inserted into the threaded coupler as shown 8 Cut the throttle pushrod to the proper length 9 Gather the soldering tools as shown below Note For best results we recommend a high quality Silver Solder like Sta Brite silver solder 10 Solder the threaded coupler to the throttle pushrod wire Note Lightly sand end of rod for best bond ...

Page 44: ...t tle pushrod Note For improved cooling it is recommended that the pipe tunnel be left open and the exhaust holes be opened This will allow for extra venting while still maintaining the cowl structure 13 Use a drop of thick CA on the throttle servo mounting screws after they have paced through the motor box floor as shown below 14 A none soldering method of attaching throttle pushrod is shown in t...

Page 45: ... ball link and threaded rod to throt tle servo arm 16 Cut 4 40 rod and carbon rod to correct length Slip the carbon rod over the 4 40 threaded pushrod 17 Install the throttle pushrod to the engine throttle arm as shown ...

Page 46: ...ite on muffler bolts be fore installation 4 Install mufflers using the supplied gasket or high temp silicon gasket material and securely bolt to cylinder heads as shown 2 Install the smoke inlet plugs in the threaded hole on the side of each muffler If using smoke in stall the smoke inlets at this time Note Use blue loctite on the threads of either the smoke inlets or inlet plugs This will prevent...

Page 47: ...around the pre cut hot air exit holes 1 Gather the canister items shown below 2 MTW TDH 75 Rear Exit Canisters 2 70mm Drop Headers 2 3 Teflon Couplers 2 Header Gaskets 4 Header Clamps 4 Header Mounting Bolts 4 Remove covering over the precut air exit holes in both the front and rear hatch covers as shown below Note We have supplied two rear bottom hatch covers One for canisters and one for tuned p...

Page 48: ...hown below Test fit mount inside tunnel before continuing it may be necessary to lightly sand the edges of the mount for a proper fit 7 Use 30 Minute epoxy to secure the canister mount as shown 8 Install the teflon coupler and clamp onto the canister at this time Slide the canister into the tunnel and through the mounting bracket as shown Repeat step for remaining canister ...

Page 49: ...cylinder heads as shown Note Use a drop of blue Loctite on header mounting bolts before installation 11 Reinstall the tunnel hatch covers as shown be low 12 It may be necessary to install teflon extensions to the canister stingers as shown below The ex tensions should exit the fuse by at least 1 to ensure the exhaust gasses will clear the pipe tun nel ...

Page 50: ... Use a sealing iron to ensure the covering is bonded to the bottom of the fuse frame around the pre cut hot air exit holes 3 Remove covering over the precut air exit holes in both the front and rear hatch covers as shown below Note We have supplied two rear bottom hatch covers One for canisters and one for tuned pipes 4 Remove covering over the precut rear stinger exit holes as shown below ...

Page 51: ... wood 6 Gather the included tuned pipe mounting bracket and silicone tubing as shown below 7 Correct location of tuned pipe mount shown be low Test fit mount inside tunnel before continu ing it may be necessary to lightly sand the edges of the mount for a proper fit 8 Use 30 Minute epoxy to secure the tuned pipe mount as shown ...

Page 52: ...nstall headers using the supplied gasket or high temp silicon gasket material and securely bolt to cylinder heads as shown Note Use a drop of blue Loctite on header mounting bolts before installation 12 Reinstall the tunnel hatch covers as shown be low 13 It may be necessary to install teflon extensions to the pipe stingers The extensions should exit the fuse by at least 1 to ensure the exhaust ga...

Page 53: ...ion Unit 1 2600mah Fromeco Ignition Battery 1 Smart Fly Ignition Regulator 1 MPI Charge Switch 1 Rcexl Ignition Cutoff 1 Foam padding 2 Nylon Ties 3 Position the ignition module inside the engine box to allow both of the spark plug leads to exit and properly connect to the engine without ex cess tension or chafing Mark the location for the nylon tie mounting holes 4 Use a 1 4 drill bit to drill th...

Page 54: ...he ignition module and the foam pad with a nylon tie as shown 7 Use a 3 8 drill bit to drill the ignition timing lead hole in the firewall as shown 8 Thread ignition connector through firewall and connect ignition timing connectors with Aeroworks Safety Clip Ensure the connectors will not come apart from vibration or light ten sion ...

Page 55: ...nd bat tery as shown below 11 Using a small piece of hook and loop material secure the Smart Fly ignition regulator to the fuse floor 10 Using a nylon tie install the ignition battery as shown 12 Final ignition regulator installation shown be low ...

Page 56: ... Using another piece of hook and loop material install the Rcexl ignition cutoff as shown below 14 Install the MPI Ignition switch as shown below Install the Rcexl cutoff light on the fuse side at this time ...

Page 57: ...ting bolts as shown 2 Remove the 4 40 mounting bolt on the rear ca bane as shown below 3 Remove the rear cabane as shown below 4 Slide the male end of a 18 extension through the plastic insert inside the fuse hatch INNER CABANE INSTALLATION ...

Page 58: ... the extension into the fuse and reinstall the rear cabane at this time 6 Use blue loctite on the cabane mounting bolt as shown below Reinstall the mounting bolts at this time Note We recommend removing all cabane mounting bolts and reinstall using loctite ...

Page 59: ...LLATION 2 Locate the 4 supplied brass fuel barbs Two for the fuel tank and Two for the smoke tank Solder a brass fuel barb to the fuel line pick up tube This will keep the weight of the fuel clunk from pulling the fuel line off the brass tube Note No brass barbs are required for the air vent lines 3 Assemble the fuel pick up line rubber stopper and metal end caps 4 Solder a brass fuel barb to the ...

Page 60: ... and bend upward Air vent tube should rest as close to the top of fuel tank as possible Without touching the top of the tank 7 Install the fuel tubing and clunk Secure the fuel tubing with nylon ties to the pick up tube and clunk 8 Insert the rubber stopper assembly into the tank with the vent tube at the top of the tank ...

Page 61: ...ather the fuel tank parts as shown below Fuel tank fuel tubing foam rubber fuel T fuel filler dot fuel filter and nylon ties Note The fuel T fuel filter and filler dot are not supplied but are available through Aeroworks 2 Install a short piece of fuel line and the fuel T to the fuel pick up tube Note Using a heat gun and or soapy water solu tion to soften the fuel line will help with the installa...

Page 62: ... time Always secure fuel lines with nylon ties to prevent them from pulling off during flight 6 Route the vent line on top of the fuel tank and secure with small nylon ties as shown This will stop excess fuel from draining out the vent line during an extended down line or when lifting the tail 5 Thread nylon ties under tank mounting plate and center in position Install foam rubber pad for fuel tan...

Page 63: ...ing 7 Route the line to the engine carburetor out of the bottom of the engine box Use rubber grommet where the fuel line goes through the plywood to prevent fuel line chafing Secure all fuel lines with nylon sip ties 9 Install fuel filler dot as shown below Note Install the fuel dot above the tank center line this will prevent fuel siphoning out during fueling 10 Install fuel vent line as shown be...

Page 64: ...hown RECIEVER BATTERY INSTALLATION 2 Gather the radio power system as shown below 2 Fromeco Sahara Regulator Deans in 2 JR out 2 Fromeco 2600mah Li Ion Battery w Deans 2 Smart Fly Super Switch HD w Deans 3 Install the switches on either side of the fuse Final switch installation will be up to the builder 4 Install supplied Velcro straps as shown below ...

Page 65: ...ro straps secure batteries in place as shown below 7 Gather the following regulator installation items as shown below 1 Fromeco Sahara regulator w Deans 1 1 5 Plywood mounting plate Not Supplied 2 Hook and loop fasteners Not Supplied 8 Apply Thick CA to the bottom of the plywood mounting plate as shown ...

Page 66: ...ow CA to fully cure 10 Apply thick CA to the adhesive side of the hook and loop material 11 Place hook and loop material on mounting plate and allow CA to fully cure 12 Attach remaining hook and loop material to the backside of the regulator as shown ...

Page 67: ... receiver using Velcro strap and foam pad as shown below 13 Install regulator in fuse as shown below Repeat previous steps for the remaining regulator 15 Route the lower aileron extensions out of the fuse as shown below ...

Page 68: ... as shown below 3 Measure and mark a center line on bottom of fuse as shown below 4 Align centerline marks of template and fuse Use masking tape to securely hold the template to the fuse 1 Gather the following material for making a cowl cutout template Hobby Knife Ruler Tape Felt tip pen or marker Template material has been supplied COWL INSTALLATION STANDARD MUFFLER ...

Page 69: ... the mounting holes as shown 5 Use a T Pin to mark the location of the cowl mounting bolts as shown below 7 Install the bottom 4 40 cowl mounting bolts as shown below 8 Mark the template Cowl Side for easy reference when fitting to cowl ...

Page 70: ...he outline of the holes approximately 3 1 4 as shown below 13 Cut out the holes on the paper template and rein stall on the plane Test fit the template make any changes that may be needed at this time 10 Enlarge the holes to allow a 1 4 clearance around the outside edge of the exhaust stack tubes 11 Using a hobby knife cut out the exhaust stack exit holes ...

Page 71: ... exit holes Note We have found this to be adequate cooling for the DA120 Depending on your engine s operating temperature you may need to allow for more exit air cooling for your engine to run at its recommended operating temperature Always check the operating temperature of your engine to prevent any damage from occurring Aeroworks is not responsible for damages incurred from improper engine cool...

Page 72: ...m to cut the cowl louvers as needed 4 Mount cowl to the fuse using 2 4 40x16mm button style hex head bolts 2 6 32 hex head bolts 4 6 bonded washers Note We have found this to be adequate cooling for the DA120 Depending on your engine s operating temperature you may need to allow for more exit air cooling for your engine to run at its recommended operating temperature Always check the operating tem...

Page 73: ...low Measure the length of the choke pushrod required to extend out of the front of the cowl when the choke control arm is fully pushed aft Cut pushrod to correct length and make a 90º bend at the end of the pushrod as shown 2 Attach the choke pushrod and ball link to the engine choke arm as shown This will exit the bottom of the cowl for easy access MANUAL CHOKE PUSHROD INSTALLATION ...

Page 74: ...sure proper fit and will aid in the assembly of your model at the field PRE FLIGHT PREPARATION 2 Insert wing tubes as shown ensure the predrilled mounting holes are facing toward the top of the wing 3 Secure the tubes in the wing with the provided 6 32 mounting bolts and bonded washers 4 Slide the wing tubes into the fuse as shown se cure aileron extension with Aeroworks Safety Clip ...

Page 75: ... longer bolts are for the center cabane and the 8 shorter bolts are for the outer cabanes 2 8 32x15mm center cabane mounting bolts 8 8 32x10mm outer cabane mounting bolts 8 Install the top wing tube and the alignment tubes into the left top wing panel as shown below 6 Gather the outer cabanes top wing tube align ment tubes and mounting hardware as shown below ...

Page 76: ... in the fuse stab tube sleeves short tube front long tube rear Slide the stabs on the stab tube and plug in the elevator servo connectors Slide the rubber backed wash ers on the stab mounting bolts and insert bolts through the stab mounting tabs and into the fuse blind nuts Tighten snugly but do not over tighten and crack the stab mounting tabs or the fuse sides If you do not remove your stabs for...

Page 77: ...f cowl with 4 40 x 16mm button head bolts and 6 bonded washers 16 Secure top section of cowl with 6 32 x 16mm hex head bolts and 6 bonded washers 15 Gather the 2 4 40 and 2 6 32 cowl mounting bolts and 4 6 small rubber backed washers Mount the cowl using the cowl mounting bolts and rubber backed washers The rubber backed washers are to prevent the fiberglass cowl from cracking and keep bolts from ...

Page 78: ...78 18 Secure top hatch using 4 40 button head bolts and bonded washers ...

Page 79: ... 4 8 Bonded Washers Note Center cabane fairing is not structural and is for appearance purposes only If you wish to leave the faring off your Ultimate shorter 8 32 top wing mounting bolts have been provided 2 Slide cabane fairing onto center cabane as shown 3 Lower the top wing onto center cabane 4 Slide one 8 bonded washers followed by the 9mm spacer onto the 8 32 mounting bolt as shown ...

Page 80: ...ded washer followed by a lock nut and tighten as shown 8 Top view of 9mm spacer installation with wing removed shown Do not permanently glue spac ers to cabane 5 Slide bolt through cabane fairing as shown The 9mm spacer should pass through faring and sit flat against the center cabane ...

Page 81: ...rd Windex or Application fluid like Rapid Tac Also a solution of 1 drop of dish detergent to a cup of water sprayed on the model will as sist in proper positioning Note Clean surface and tighten all covering before any decals are applied DECAL INSTALLATION 2 Placement of optional decal package shown in cluded decals will differ 3 Placement of optional decal package shown in cluded decals will diff...

Page 82: ...ransfer tape until decal placement is complete Decals supplied with the kit may vary from the photos below Decal application steps will be similar 6 Remove backing from Clear transfer tape 7 Apply clear transfer tape over top of decal 4 Placement of optional decal package shown in cluded decals will differ ...

Page 83: ...ransfer tape to top of decal 9 Peel backing from decal 10 Spray model surface with application fluid Windex or soapy water solution 11 Spray back side of decal with application fluid Windex or soapy water solution ...

Page 84: ...e cal smooth and remove all excess application fluid Let decal set until dry enough to be able to remove transfer tape with out removing decal Do not leave until completely dry or transfer tape will be diffi cult to remove 14 Pull transfer tape from top of decal Take care not to pull away or damage decal 15 Let decal dry completely before handling ...

Page 85: ...comfortable adjust the CG to suit your flying style in small steps especially when shifting the CG toward the tail Move the battery or add small stick on weights to the nose or tail as necessary Note If additional nose weight is necessary we rec ommend moving the engine forward slightly by adding extra spacer or washers to move the C G forward Try this before adding an addi tional weight 4 For aer...

Page 86: ...5 Aileron throw measured in degrees at widest point of the aileron 3 Use the supplied flight control deflection meter to measure the throws in degrees It is recom mended you level the model 4 Elevator throw measured in degrees Locate throw meter at widest point of the elevator ...

Page 87: ...87 6 Measure the rudder deflection in inches from bottom of the rudder ...

Page 88: ...0 down For 3D flying use the following throws High Rate Aileron 2 3 4 or 40 up 2 3 4 or 40 down Rudder 8 left 8 right Full rudder deflection is typically recommended for all out 3D Elevator 5 or 45 up 5 or 45 down Recommend Expediential 25 expediential on low rates 45 expediential on medium rates 60 expediential on high rates Use the given rates as a starting point Then adjust rates from there to ...

Page 89: ...bolts hatch bolts servo screws control horn bolts wheel collars and clevis keepers are tight and secure Use Loctite were necessary Covering Check all seems and overlaps are se cure and have not lifted If any air gets under neath the covering it may pull the covering away form the plane and can cause the model to crash Always check before each flight A roll of clear tape in you flight box can be us...

Page 90: ...k of Here is a list of some of the more popular aerobatic and 3D maneuvers you can try Loops and rolls Knife edge flight Stall turns Snap rolls 2 4 and 8 point rolls Slow rolls Spins upright and inverted Flat Spins upright and inverted Harriers upright and inverted Water falls Torque Rolls Rolling circles Rolling harrier The sky and your imagination are you only limits FLY and ENJOY AEROWORKS Worl...

Page 91: ...l airplane at your flying field Fuel Line Installation Kit The fuel line installation kit includes everything needed to plumb your gasoline powered aircraft 3 feet of 1 8 I D Dubro tygon tubing is pro vided Simple turn fuel dot provides a nice finished look to any model Aluminum fuel T with 1 8 I D will provide superior fuel flow Rubber Grommets For more information or to order accessories visit o...

Page 92: ...de a easy and safe way to secure your servo connections Ultimate 20 300 Dash Panel The optional 3 dimensional dash panel from Aeroworks adds that finished look to any cockpit This dash panel is specifically designed to fit the 100cc Ultimate 20 300 2 5 Gallon Gas Hand Crank Fuel System The 2 5 Gallon Hand Crank fuel system is perfect for pilots venturing into gas powered airplanes for the first ti...

Page 93: ...cc Ultimate Use this to prac tice new maneuvers and learn airplane orientation before ever attempting it with the real thing For more information or to order accessories visit our website WWW AERO WORKS NET or call Aeroworks at 303 371 4222 15 40 LB Carbon Tail Wheel This Carbon Tail Wheel is designed to fit perfectly on the 100cc 120cc Ultimate The carbon leaf spring adds tremendous strength comp...

Page 94: ...____ ___________________________________________________________________________ ___________________________________________________________________________ ___________________________________________________________________________ ___________________________________________________________________________ ___________________________________________________________________________ _______________...

Reviews: