background image

AEROPRAKT-32 Pilot Operating Handbook 

A32-214-POH 

54 

8.5  Cleaning and care 

Keeping the aircraft clean is essential for its efficient and safe operation. Pilots must make 
sure  during  the  preflight  check  that  the  airplane  is  clean  and  free  of  corrosion.  Airplane 
washing should be done using cloth or soft sponge abundantly soaked in water with addition 
of mild washing agents.  

Never use gasoline, solvents or other aggressive liquids for washing the airplane and 
especially the cockpit glass! 

Cockpit glass must be finally washed with plenty of water. It is recommended to let water 
dry and not to wipe it with a cloth as dust particles stuck in the cloth may scratch the glass. 

After  airplane  washing  inspect  the  parts  that  must  be  protected  from  corrosion  (hinges, 
joints, etc.). Clean them of any remaining water and old grease and lubricate anew. 

8.6  Disassembling and assembling the airplane 

Aircraft operation and servicing in some cases may require to disassemble (and assemble 
back)  the  airplane  or  remove  some  of  its  components.  This  section  describes  how  to 
disassemble correctly the airplane by removing its main components: left and right wings, 
horizontal tail, propeller, engine. 

8.6.1  Wing removal 

NOTE: Before wing removal empty the wing tanks! 

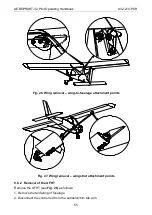
Left and right wings shall be removed in turn (in any order) according to the following 
sequence (see 

Fig. 26

 and 

Fig. 27

): 

1. Disconnect the aileron control shaft. 

2. Disconnect the electrical connectors of fuel level sender cable. 

3. Disconnect the fuel lines. 

4. Disconnect the full and static pressure lines at their joints (4, see 

Fig.14

 at page 

41

). 

5. Remove the wing strut brace by disconnecting it from the wing and fuselage while 

holding the wing. 

6. Disconnect the wing at its forward and rear attachment points. 

After disconnecting the wings it is recommended to insert all the fasteners  back and lock 
them with safety wire or pins not to  lose them. Also secure with safety  wire the spherical 
bearings in the forward and rear wing attachment fittings. 

Summary of Contents for A32-214-POH

Page 1: ...on Number N74GF Airplane Serial Number 214 Date of issue 11 01 2022 Approved by Yuriy Yakovlyev Position Chief designer Date of approval 11 01 2022 This manual must be carried in the airplane at all t...

Page 2: ...e present manual except actual weighing data must be recorded in the following table according to information from the Manufacturer New or amended text in the revised pages will be indicated by a blac...

Page 3: ...es 10 3 1 General 10 3 2 Emergency checklists 10 4 Normal Procedures 15 4 1 General 15 4 2 Preflight check 15 4 3 Fuel levels fuel valve settings and respective actions 17 4 4 Engine starting 18 4 5 T...

Page 4: ...7 13 Baggage compartment 50 7 14 Recovery system 50 8 Aircraft Ground Handling and Servicing 52 8 1 Introduction 52 8 2 Towing parking and tie down instructions 52 8 3 Servicing fuel oil and coolant...

Page 5: ...17 Standard Practice for Design and Manufacture of Reciprocating Spark Ignition Engines for Light Sport Aircraft F2506 13 Standard Specification for Design and Testing of Light Sport Aircraft Propelle...

Page 6: ...Gross weight Maximum Take Off Weight MTOW 1320 lb 600 kg Top speed at sea level ISA conditions 116 kts 215 km h Cruising speed IAS at 1000 ft ISA conditions engine RPM 3500 54 kts 100 km h 3800 67 kts...

Page 7: ...50 27 VS0 stalling speed at maximum takeoff weight with full flaps Green arc start 60 32 VS stalling speed at maximum takeoff weight with flaps up White arc 50 147 27 79 VS0 to VFE flap extended spee...

Page 8: ...d factor limits G limits Approved maneuvers include turns with bank angles up to 60 level and accelerated stalls without spinning diving at a speed below VNE of 240 km h 130 kts IAS Any aerobatics inc...

Page 9: ...C 120 F ambient temperature min 25 C 13 F oil temperature Fuel pressure max 0 5 bar 7 26 psi min 0 15 bar 2 2 psi Fuel antiknock properties min RON 95 min AKI 911 European standard EN 228 super EN 228...

Page 10: ...bandon cockpit 5 Take measures to extinguish the fire 3 2 2 Engine failure during takeoff 3 2 2 1 during takeoff roll 1 Throttle IDLE 2 Ignition OFF 3 Brakes APPLY as necessary 3 2 2 2 immediately aft...

Page 11: ...valves CLOSE 5 Landing area SELECT consider altitude and wind No place suitable for landing use recovery system 6 Emergency call TRANSMIT 121 5 MHz or nearest airfield frequency 7 Flaps EXTEND FULLY o...

Page 12: ...h 59 kts best glide 3 Oil pressure CONTROL 4 Oil pressure normal follow PRECAUTIONARY LANDING procedure see section 3 2 6 5 Oil pressure high follow EMERGENCY LANDING procedure see section 3 2 5 3 2 1...

Page 13: ...kage Signs of the blockage airspeed indicator reading either does not change with changing airspeed in level flight or reduces during a steady descent or increases during a steady climb 1 Airspeed ind...

Page 14: ...l quantity indicator 1 IGNORE powerplant instruments readings 2 Engine rpm CONTROL by engine noise 3 Follow PRECAUTIONARY LANDING procedure see section 3 2 6 3 2 16 Loss of flight controls 1 Elevator...

Page 15: ...ainwater snow frost ice and dirt 3 Rigging CHECK visually 4 External damage NONE 4 2 2 Power plant 1 Propeller and spinner CLEAN INTACT and SECURE 2 Top cowling REMOVE for engine inspection 3 Oil cool...

Page 16: ...CK 4 2 6 Empennage 1 Empennage surface CLEAN and INTACT 2 Clamps stops REMOVED 3 Horizontal stabilizer attachment fittings and bolts INTACT and SECURE 4 Rudder elevator and trim tab CLEAN and INTACT 5...

Page 17: ...rd documentation maps required for the flight AVAILABLE 7 Baggage container BAGGAGE SECURED CONTAINER CLOSED 8 Starter key REMOVED 9 All electrical switches OFF 10 Flight instruments INTACT CHECK READ...

Page 18: ...16 Engine WARM UP at 2000 2500 RPM 17 Required electric equipment instruments switch ON and ADJUST 18 Ignition TEST at 4000 RPM holding brakes 19 Oil pressure check 2 0 5 0 bar 29 73 psi at above 3500...

Page 19: ...IND 8 Rudder pedals maintain takeoff direction 9 Liftoff at 65 km h 35 kts 10 Accelerate to at least 90 km h 49 kts at 1 2 m 3 7 ft and start to climb 11 Speed SET best angle of climb speed VX 100 km...

Page 20: ...e wheel slowly Pedals set NEUTRAL before touching ground with the nose wheel in cross wind conditions 7 Flaps RETRACT 8 Brakes ENGAGE as required Avoid resonant vibrations of the main landing gear leg...

Page 21: ...g Handbook A32 214 POH 21 4 14 Balked landing 1 Throttle gradually FULL POWER 2 Descent DISCONTINUE 3 Speed accelerate to at least 100 km h 54 kts flying level 4 Climb at 100 km h 54 kts 5 Flaps RETRA...

Page 22: ...pecified below Best angle of climb speed VX 100 km h 54 kts Best rate of climb speed VY 120 km h 65 kts Maximum rate of climb at VX 2 8 m s 551 fpm Maximum rate of climb at VY 4 2 m s 827 fpm 5 4 Crui...

Page 23: ...ence lead to unsafe operation 6 1 Weight and Balance Chart This subsection contains weighing and CG location data of the aircraft in configuration as built Any permanent modification of the aircraft c...

Page 24: ...ment Total weight 67 59 Note XCG must be between 60 inch and 70 inches 19 and 37 MAC as shown in Fig 2 6 2 Installed equipment list This subsection contains a table with the list of the installed opti...

Page 25: ...AEROPRAKT 32 Pilot Operating Handbook A32 214 POH 25 No Equipment description and Part No Weight kg CG arm m...

Page 26: ...e frames are made of 6061T6 aluminum alloy sheets of 0 063 to 0 080 thickness The fuselage skin is made of 2024T3 aluminum alloy sheets of 0 02 to 0 04 thickness Engine cowling is made of composites T...

Page 27: ...t dry sump lubrication system with a separate oil tank of 3 l 0 8 US gal capacity automatic valve clearance adjustment two carburetors mechanical membrane fuel pump double electronic ignition system i...

Page 28: ...ding gear beam The fuel filter can be inspected visually through a window in the protecting cover of the aileron control cables The bottom outlet of the fuel sediment collector is connected to the dra...

Page 29: ...AEROPRAKT 32 Pilot Operating Handbook A32 214 POH 29 Fig 3 Fuel system schematic...

Page 30: ...g 4 is combined it consists of two 4 0 mm 5 32 cables passing through a block of pulleys and a fairlead rocker and pushrod Push and pull forces are applied by the pilot to the control stick 1 is passe...

Page 31: ...cables are running through the flexible sheaths 6 in the central console and a fairlead 7 located near frame No 9 The antiservo trim tab is hinged at the trailing edge of the AMHT Tension of the cabl...

Page 32: ...pulleys 9 near the frame No 9 Adjustment of the nose landing gear position is achieved with pedals set to neutral position using pushrods 4 and 5 The cable tension and adjustment of the rudder positi...

Page 33: ...he outer left and right 7 bellcranks Then the control force is passed from the outer bellcranks to the flaperons via the outer pushrods 8 The inner bellcranks hinged on the flap extension mechanism be...

Page 34: ...2 having three holes for the pin 3 on the lever Unfixing is achieved by bending the spring like lever to the right After the pin comes out of the fixer hole the lever can be set to the selected positi...

Page 35: ...bolt 7 Rearmost throttle lever position corresponds to MIN engine RPM the foremost position to MAX engine RPM Pulling the friction force adjusting lever back increases the throttle lever friction pus...

Page 36: ...AEROPRAKT 32 Pilot Operating Handbook A32 214 POH 36 Fig 10 Engine pre start mixture control...

Page 37: ...ally using the brake lever 2 installed next to the throttle lever 3 controlling the pressure supplied from the master cylinder 1 to the slave cylinders 5 in the wheels The main LG wheels have disk bra...

Page 38: ...erating Handbook A32 214 POH 38 the brake lever The brake pads will remain pressed to the brake disc To release the parking brake set its control lever to its initial position Parking brake OFF Fig 12...

Page 39: ...ent Fig 13 Instrument panel Numbers in Fig 13 denote the following 1 NO CHARGE indicator and marking 2 ALARM indicator and marking 3 Disconnect autopilot button 4 Placard with passenger warning THIS A...

Page 40: ...g 11 Right tank Fuel Low warning light and marking 12 Landing light switch and marking 13 Wing land light switch and marking 14 WIG WAG switch and marking 15 Navigation lights switch and marking 16 St...

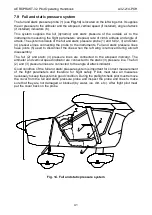
Page 41: ...joints 5 used to disconnect the lines when the left wing is removed during aircraft disassembly The full 2 and static 3 pressure lines are connected to the airspeed indicator The altimeter and vertic...

Page 42: ...m and consumers from short circuit and must be of appropriate type and size When battery is supplying power to the consumers while alternator is not generating and supplying power to the battery e g e...

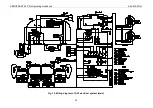
Page 43: ...AEROPRAKT 32 Pilot Operating Handbook A32 214 POH 43 Fig 15 Wiring diagram of A32 electrical system main...

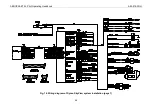
Page 44: ...AEROPRAKT 32 Pilot Operating Handbook A32 214 POH 44 Fig 16 Wiring diagram of Dynon SkyView system installation page 1...

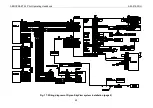
Page 45: ...AEROPRAKT 32 Pilot Operating Handbook A32 214 POH 45 Fig 17 Wiring diagram of Dynon SkyView system installation page 2...

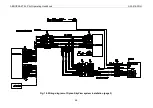
Page 46: ...AEROPRAKT 32 Pilot Operating Handbook A32 214 POH 46 Fig 18 Wiring diagram of Dynon SkyView system installation page 3...

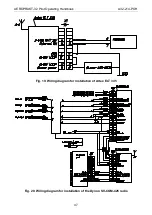
Page 47: ...AEROPRAKT 32 Pilot Operating Handbook A32 214 POH 47 Fig 19 Wiring diagram for installation of Artex ELT 345 Fig 20 Wiring diagram for installation of the Dynon SV COM 425 radio...

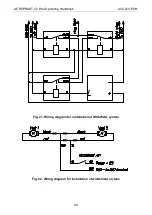
Page 48: ...AEROPRAKT 32 Pilot Operating Handbook A32 214 POH 48 Fig 21 Wiring diagram for installation of WIG WAG system Fig 22 Wiring diagram for installation of windshield air fans...

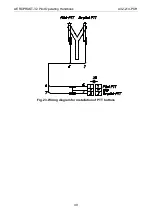
Page 49: ...AEROPRAKT 32 Pilot Operating Handbook A32 214 POH 49 Fig 23 Wiring diagram for installation of PTT buttons...

Page 50: ...the closed position with a lock Both left and right doors have air scoops for ventilation de misting of the glass and providing pilot view for landing in poor visibility conditions snow rain etc 7 13...

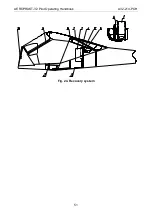
Page 51: ...AEROPRAKT 32 Pilot Operating Handbook A32 214 POH 51 Fig 24 Recovery system...

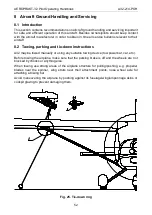
Page 52: ...8 2 Towing parking and tie down instructions A32 may be towed manually or using any suitable towing device tow powerbar car etc Before towing the airplane make sure that the parking brake is off and...

Page 53: ...2 are not fitted with a fuel filter strainer therefore fuel must be filled into the tanks using fuel pumps or and funnels with a fine mesh Fuel residue must be drained regularly from the tanks via the...

Page 54: ...ft operation and servicing in some cases may require to disassemble and assemble back the airplane or remove some of its components This section describes how to disassemble correctly the airplane by...

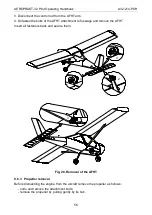
Page 55: ...Wing removal wing to fuselage attachment points Fig 27 Wing removal wing strut attachment points 8 6 2 Removal of the AFHT Remove the AFHT see Fig 28 as follows 1 Remove the tail fairing of fuselage 2...

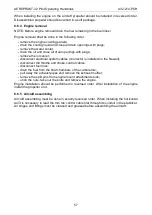
Page 56: ...f the AFHT attachment to fuselage and remove the AFHT Insert all fasteners back and secure them Fig 28 Removal of the AFHT 8 6 3 Propeller removal Before dismantling the engine from the aircraft remov...

Page 57: ...stem cables connector is installed on the firewall disconnect the throttle and choke control cables disconnect fuel lines drain the fuel from the float chambers of the carburetors pull away the exhaus...

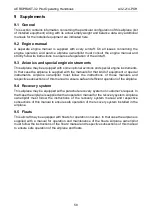
Page 58: ...ith the manuals for that kind of equipment or special instruments Airplane owner pilot must follow the instructions of those manuals and respective subsections of this manual to ensure safe and effici...

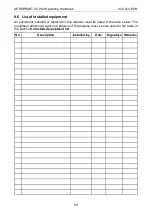
Page 59: ...pment All equipment installed or replaced in this airplane must be listed in the table below The equipment affecting weight and balance of the airplane must be also listed in the table of the section...

Page 60: ...n about the actual empty weight and respective CG position of the airplane After final assembly major repair overhaul replacement and or additional installation of any equipment the aircraft must be w...

Page 61: ...following a Level flight at various airspeeds and engine power settings Elevator trim tab shall be used for trimming the airplane in pitch b Climb at various airspeeds and full power of the engine Ele...

Page 62: ...h 54 kts and engine speed adjusted so that in the beginning of the final turn the airplane is at approximately 500 ft 9 It is recommended to make the final turn with a bank angle below 20 While making...

Page 63: ...ue to that During high speed flight the engine parameters must be monitored and exceeding its operational limits must be prevented To recover from a steep spiral the engine RPM must be reduced first a...

Page 64: ...peller thrust Special attention shall be paid to maintaining the airspeed The imitated engine failures shall be done at every leg of the airfield circuit Total time of imitated engine failure training...

Reviews: