background image

22.11 – 5167557_03

15

 STORAGE

It is possible that the units may not be immediately installed upon receipt. If they 
are stored for a medium-long period of time, the following procedures are recom-
mended:
—  The units cannot be stacked;
—  Check for any damage
—  Make sure there is no water inside the hydraulic systems;
—  Do not remove the protections from the heat exchanger;
—  Do not remove the plastic protective films;
—  Make sure that the electrical panels are closed;
—  Before using the equipment, put all the supplied items in a dry and clean loca-

tion so that they can be used in the future.

The minimum and maximum unit storage temperature depends on the 

type of refrigerant used, see the table. Above this limit, there is a risk of 

refrigerant leaks through the pressure relief valves.

Maximum storage temperature
Refrigerant

Type

Class

Min temp. (°F) Max. temp. (°F)

R134a

HFC

A1

-4.0 °F

< 122.0 °F

R410A

HFC

A1

-4.0 °F

< 122.0 °F

R513A

HFC

A1

-4.0 °F

< 122.0 °F

R32

HFC

A2L

-4.0 °F

< 122.0 °F

R1234ze

HFO

A2L

-4.0 °F

< 122.0 °F

 POSITIONING

The units must:
—  They must be installed in an area that cannot be accessed by the public and/or 

be protected against access by unauthorised persons, if necessary also install 
fences;

—  Be positioned on a levelled surface that is able to support the weight of the 

unit with the refrigerant load and complete water, in addition to the occasional 
presence of maintenance equipment;

—  In locations exposed to frost, if the unit is installed on soil, the support base 

must rest on concrete columns with a depth greater than the normal depth of 
frost of the soil. It is always advisable to build a support base separate from the 
main building to avoid the transmission of vibrations;

—  If the machine is installed in a place potentially subject to snow accumulation 

or ice formations in the base, it is recommended to install the unit with at least 
300 mm above the ground;

—  It is recommended to use suitably sized anti-vibration supports.

—  The unit must be fixed to the anti-vibration supports and these firmly fixed 

to the concrete base, see chapter weight distribution and minimum technical 
spaces. Check that the contact surfaces of the anti-vibration supports are lev-
elled at the base. If necessary, use spacers or level the base, but in any case make 
sure that the anti-vibration supports are placed flat on the surfaces of the base;

—  The use of anti-vibration supports MUST be done in combination with the in-

stallation of flexible couplings in the unit's water pipes. The anti-vibration sup-
ports must be fixed to the unit BEFORE being earthed. AERMEC is not responsi-
ble for selecting the capacity of the anti-vibration supports;

—  Each side of the unit must have space to allow all routine and extraordinary 

maintenance to be performed, the vertical air exhaust must not be obstructed.

 PLACE OF INSTALLATION

All the units in this series are designed to be installed outdoors:

 on 

roofs or on the ground in places where there are no obstacles that could 
reduce the air flow towards the finned heat exchanger coils.

The location of the unit must be defined by the system designer or a person who is 
an expert in the material and must consider both the purely technical requirements 
as well as any local laws in force.

For unit installation it is important to perform the following preliminary prepara-
tion tasks:

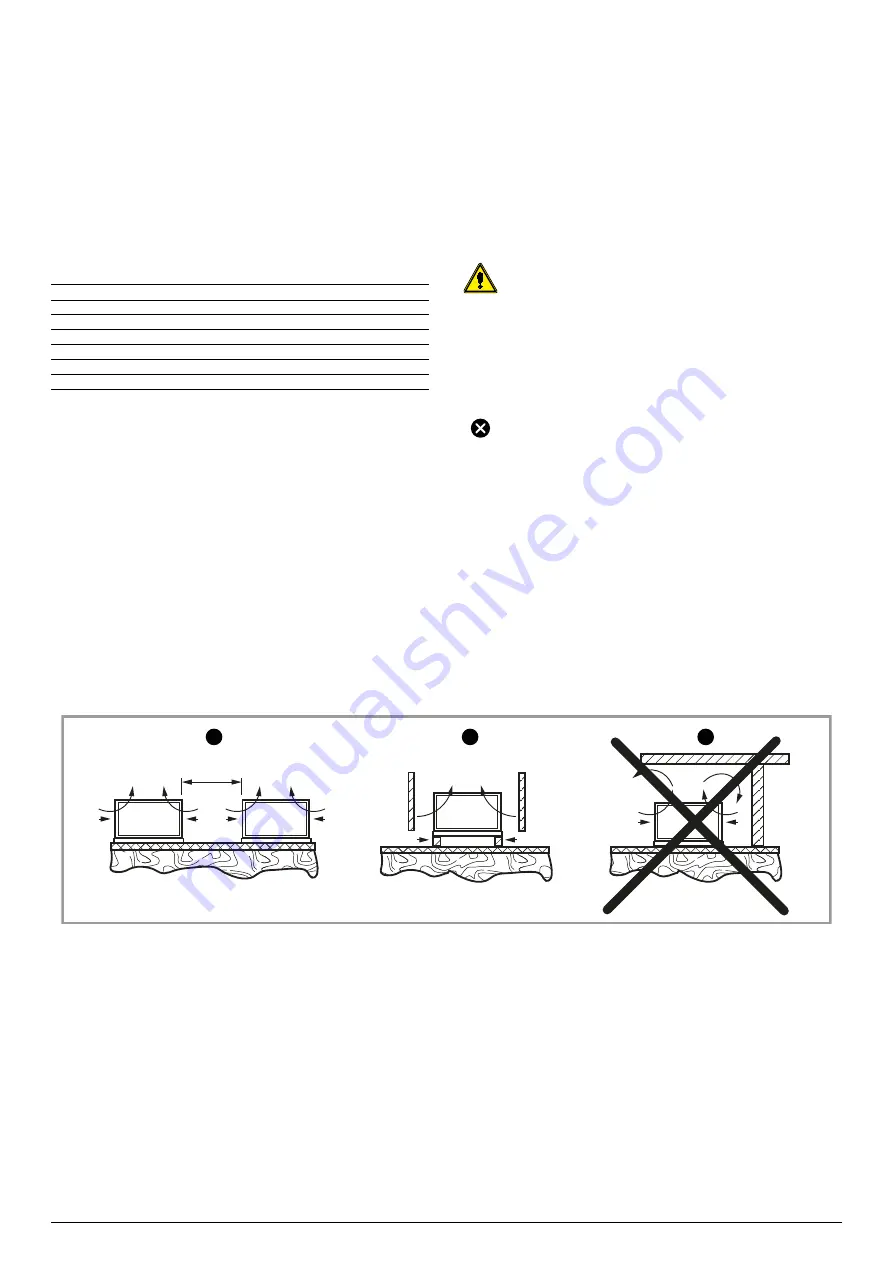
The following must be avoided

—  Positioning in air shafts, holes and/or basement windows;
—  Obstacles or barriers that cause the return of the exhaust air;
—  Locations with aggressive atmospheres;
—  Areas in which the unit's noise level could be amplified due to reverberations 

or resonance;

—  Positioning in corners where there is usually an accumulation of dust, leaves 

and anything else that could reduce the efficiency of the equipment, obstruct-
ing the passage of air;

—  That the air expulsion from the equipment can penetrate into living areas 

through doors or windows;

—  That the air expulsed by the unit is countered by adverse wind;
—  For the positioning of the air-cooled units for outdoor use, choose a place that 

is not exposed to excessive wind (install windbreaks if the wind speed exceeds 
2.2 m/s).

Side-by-side units;

Windbreak barrier 

recommended for wind above 2.2 m/s;

Installation not permitted;

3

2

1

2300 mm

Summary of Contents for NRK 0150

Page 1: ...o n o f O r i g i n a l i n s t r u c t i o n s w w w a e r m e c c o m Installation Manual EN NRK 0150 0700 REVERSIBLE AIR WATER HEAT PUMP C o o l i n g c a p a c i t y 8 8 3 9 7 t o n H e a t i n g c a p a c i t y 1 1 6 8 6 6 5 9 3 2 3 5 B T U h ...

Page 2: ......

Page 3: ...to present the product and help you select the unit that best meets the needs of your system WARNING personnelwhopossessthenecessaryskillsaccordingtostate national and local regulations in force must choose and size the machine Aermec Aermec always attentive to the continuous changes in the market and its regulations reserves the right to make all the changes deemed necessary for improving the pro...

Page 4: ... p 16 7 Dimensions p 17 8 Weight distribution and anti vibration mounts position p 18 Position of the vibration dampers p 20 9 Hydraulic connections p 21 Connections p 21 Water characteristics p 21 Discharging system p 22 Anti freeze protection p 22 10 System water content p 23 Minimum system water content p 23 Maximum system water content p 23 11 Expansion vessel setting p 24 12 Main hydraulic ci...

Page 5: ...hough every effort has been made to ensure accuracy Aermec shall not be held liable for any errors or omissions This mark indicates that the disposal of this product must strictly follow the national and local laws in force COMPANYCERTIFICATIONS SAFETYCERTIFICATIONS ...

Page 6: ...ec shall not be held liable for the failure to observe the safety and accident prevention regulations in force Personal protective equipment PPE 1 Operations Handling Installation and or maintenance Welding or brazing Safety gloves helmet goggles safety footwear protective garments Earmuffs 1 It is recommended to follow the instructions in EN 378 3 Observe the laws in force in the country of unit ...

Page 7: ...res on elec trical equipment and for lubricant oil of the compressor and the refrigerant The unit contains pressurised refrigerant gas no operation may be performed on pressurised equipment except during maintenance which must be per formed by skilled and qualified personnel Perform brazing or welding only on empty pipes and clear of any lubricating oil residues do not near flames or other heat so...

Page 8: ...l Scroll Scroll Scroll Scroll Scroll Scroll Compressorregulation Type On Off On Off On Off On Off On Off On Off On Off On Off Number no 1 2 2 2 2 4 4 4 Circuits no 1 2 2 2 2 2 2 2 Refrigerant type R410A R410A R410A R410A R410A R410A R410A R410A Refrigerantcharge 1 lbs 35 3 36 2 50 7 63 9 63 9 86 0 86 0 88 2 Refrigerantloadcircuit1 1 lbs 35 3 18 1 25 4 32 0 32 0 43 0 43 0 44 1 Refrigerantloadcircui...

Page 9: ...G Under no circumstances does the unit have to be operated outside the operating limit under penalty of the warranty expiration Aermec S p A cannot be held responsible for any malfunction of the units which are operated outside the established limits and for their consequences OPERATING COOLING MODE RANGE Key A External air temperature F B Water produced temperature F 1 Standard mode 10 10 14 30 5...

Page 10: ...sion valve 6 Economizer 7 Electronic expansion valve pressure transducer 8 Electronic expansion valve temperature probe 9 Solenoid valve 10 Thermostatic expansion valve 11 Solenoid by pass valve 12 Liquid separator 13 4 way cycle inversion valve 14 High pressure transducer 15 Scroll compressor 16 Pressure relief valve 17 Low pressure transducer 1 1 2 3 4 5 6 1 7 8 9 10 11 1 12 15 16 17 13 14 14 ...

Page 11: ... 6 Economizer 7 Electronic expansion valve pressure transducer 8 Electronic expansion valve temperature probe 9 Solenoid valve 10 Thermostatic expansion valve 11 Solenoid by pass valve 12 Liquid separator 13 4 way cycle inversion valve 14 High pressure transducer 15 Scroll compressor 16 Pressure relief valve 17 Low pressure transducer 1 1 2 3 4 5 6 1 7 8 9 10 11 1 12 13 14 14 15 16 17 ...

Page 12: ...onomizer 7 Electronic expansion valve pressure transducer 8 Electronic expansion valve temperature probe 9 Solenoid valve 10 Thermostatic expansion valve 11 Solenoid by pass valve 12 Liquid separator 13 4 way cycle inversion valve 14 High pressure transducer 15 Scroll compressor 16 Pressure relief valve 17 Low pressure transducer 1 1 2 3 4 5 5 6 1 7 8 9 10 11 1 12 13 14 14 9 9 15 15 16 17 ...

Page 13: ...onomizer 7 Electronic expansion valve pressure transducer 8 Electronic expansion valve temperature probe 9 Solenoid valve 10 Thermostatic expansion valve 11 Solenoid by pass valve 12 Liquid separator 13 4 way cycle inversion valve 14 High pressure transducer 15 Scroll compressor 16 Pressure relief valve 17 Low pressure transducer 1 1 2 3 4 5 5 6 1 7 8 9 10 11 1 12 13 14 14 9 9 15 15 16 17 ...

Page 14: ...NG HANDLING AND REMOVAL Before carrying out the packaging removal or transport operations put on personal protective equipment and use devices and instruments suitable for the dimensions and weigh of the equipment All handling operations must be performed by qualified personnel in strict compli ance with all the applicable safety procedures The handling operations must be carried out carefully to ...

Page 15: ...e concrete base see chapter weight distribution and minimum technical spaces Check that the contact surfaces of the anti vibration supports are lev elled at the base If necessary use spacers or level the base but in any case make sure that the anti vibration supports are placed flat on the surfaces of the base The use of anti vibration supports MUST be done in combination with the in stallation of...

Page 16: ... 118 1 118 1 118 1 118 1 118 1 118 1 118 1 118 1 B1 A in 31 5 31 5 31 5 31 5 31 5 31 5 31 5 31 5 B2 A in 43 3 43 3 43 3 43 3 43 3 43 3 43 3 43 3 C1 A in 31 5 31 5 31 5 31 5 31 5 31 5 31 5 31 5 C2 A in 31 5 31 5 31 5 31 5 31 5 31 5 31 5 31 5 MULTIPLE INSTALLATION The minimum distances indicated above guarantee unit operation in the majority of applications There are however specific situations that...

Page 17: ...0600 0650 0700 Dimensionsandweights A in 57 1 63 2 73 8 73 8 73 8 73 8 73 8 73 8 B in 29 7 43 3 43 3 43 3 43 3 43 3 43 3 43 3 C in 57 1 63 2 73 8 73 8 73 8 73 8 73 8 73 8 Dimensionsandweightsfortransport A in 62 2 70 0 79 8 79 8 79 8 79 4 79 4 79 4 B in 34 3 45 7 46 1 46 1 46 1 46 1 46 1 46 1 C in 72 8 128 3 133 7 133 7 133 7 172 7 172 7 172 7 ...

Page 18: ... A 8 8 8 INTEGRATED HYDRONIC KIT 01 03 Dimensionsandweights Emptyweight A lbs 979 2 097 2 247 2 339 2 357 2 948 2 948 3 000 Weightfunctioning A lbs 1 213 2 793 3 389 3 483 3 501 4 098 4 098 4 154 Centreofgravity empty X A in 13 9 21 9 21 9 21 9 21 9 21 7 21 7 21 7 Y A in 36 8 50 9 61 1 61 8 61 9 69 9 69 9 69 6 Centreofgravity duringoperation X A in 13 9 21 8 21 8 21 8 21 8 21 7 21 7 21 7 Y A in 36...

Page 19: ... 21 7 21 7 Y A in 36 7 48 9 58 5 59 4 59 5 68 7 68 7 68 3 Weightdistributionin onthesupports empty 1 A 25 30 28 27 27 11 11 11 2 A 22 32 28 28 28 11 11 11 3 A 28 18 22 22 22 31 31 31 4 A 25 20 22 23 23 31 31 31 5 A 8 8 8 6 A 8 8 8 INTEGRATED HYDRONIC KIT P2 P4 Dimensionsandweights Emptyweight A lbs 1 892 2 008 2 101 2 119 2 712 2 712 2 765 Weightfunctioning A lbs 1 927 2 048 2 143 2 161 2 760 2 76...

Page 20: ...s to an anti vibration hole 62 9 in 0 8 in 0 8 in 0 8 in 0 8 in 8 1 in 85 0 in 56 7 in 20 7 in 7 9 in 51 5 in 51 5 in 20 6 in 3 0 in 110 3 in 7 9 in 7 9 in 3 0 in 27 9 in 41 8 in 41 8 in NRK 0150 NRK 0300 NRK 0350 0330 0550 NRK 0600 0650 0700 X Y X Y X Y X Y A A B B C C D D A B C D A B C D F E ...

Page 21: ...connections are indicated in the dimensions table in this manual or are available online at www aermec com It is important to follow the recommendations not complete below The water pipes must not transmit radial or axial forces or vibrations to the ex changers use flexible hoses to reduce the transmitted vibrations It is necessary to install manual or automatic vent valves in the highest points o...

Page 22: ... drain make sure that the drain valves have been installed in the lowest points of the circuit and that they are open ANTI FREEZE PROTECTION The addition of glycol is the only effective protection against freezing the glycol water solution must be sufficiently concentrated to ensure proper protection and prevent ice forming at minimum temperature provided for a given installation Take the necessar...

Page 23: ... depends on the capacity of the expansion vessel and on the calibration of the pressure relief valve Size 0150 0300 0330 0350 0550 0600 0650 0700 INTEGRATED HYDRONIC KIT 01 Hydronickit Expansionvesselnumber no 1 Expansionvesselcapacity gal 2 6 6 6 6 6 6 6 Storagetanknumber no 1 Storagetankcapacity gal 26 79 132 132 132 132 132 132 Size 0150 0300 0330 0350 0550 0600 0650 0700 INTEGRATED HYDRONIC KI...

Page 24: ...um gal 258 4 314 4 370 9 426 9 457 5 The data in the table refer to units with a 6 3 gal expansion vessel EXPANSION VESSEL SETTING The expansion tank volume is 6 3 gal The standard value of the expansion tank pre charge pressure is 21 8 psi but this can be calibrated up to a maximum of 87 0 psi The expansion tank pressure setting has to be adjusted based on the difference in height H of the instal...

Page 25: ...en content 0 1 ppm Max glycol amount 50 Phosphates PO 2ppm Manganese Mn 0 05 ppm Iron Fe 0 3 ppm Alkalinity HCO 70 300 ppm Chloride ions Cl 50 ppm Sulphate ions SO 50 ppm Sulphide ion S None Ammonium ions NH None Silica SiO 30 ppm NOTICE under no circumstances does the unit have to be operated with water circulating on the heat exchanger whose characteristics are different from those indicated in ...

Page 26: ...ent 0 1 ppm Max glycol amount 50 Phosphates PO 2ppm Manganese Mn 0 05 ppm Iron Fe 0 3 ppm Alkalinity HCO 70 300 ppm Chloride ions Cl 50 ppm Sulphate ions SO 50 ppm Sulphide ion S None Ammonium ions NH None Silica SiO 30 ppm NOTICE under no circumstances does the unit have to be operated with water circulating on the heat exchanger whose characteristics are different from those indicated in the tab...

Page 27: ... 0 1 ppm Max glycol amount 50 Phosphates PO 2ppm Manganese Mn 0 05 ppm Iron Fe 0 3 ppm Alkalinity HCO 70 300 ppm Chloride ions Cl 50 ppm Sulphate ions SO 50 ppm Sulphide ion S None Ammonium ions NH None Silica SiO 30 ppm NOTICE under no circumstances does the unit have to be operated with water circulating on the heat exchanger whose characteristics are different from those indicated in the table ...

Page 28: ... content 0 1 ppm Max glycol amount 50 Phosphates PO 2ppm Manganese Mn 0 05 ppm Iron Fe 0 3 ppm Alkalinity HCO 70 300 ppm Chloride ions Cl 50 ppm Sulphate ions SO 50 ppm Sulphide ion S None Ammonium ions NH None Silica SiO 30 ppm NOTICE under no circumstances does the unit have to be operated with water circulating on the heat exchanger whose characteristics are different from those indicated in th...

Page 29: ...5 9 Total hardness 4 5 8 5 dH Temperature 65 C Oxygen content 0 1 ppm Max glycol amount 50 Phosphates PO 2ppm Manganese Mn 0 05 ppm Iron Fe 0 3 ppm Alkalinity HCO 70 300 ppm Chloride ions Cl 50 ppm Sulphate ions SO 50 ppm Sulphide ion S None Ammonium ions NH None Silica SiO 30 ppm NOTICE under no circumstances does the unit have to be operated with water circulating on the heat exchanger whose cha...

Page 30: ...9 Total hardness 4 5 8 5 dH Temperature 65 C Oxygen content 0 1 ppm Max glycol amount 50 Phosphates PO 2ppm Manganese Mn 0 05 ppm Iron Fe 0 3 ppm Alkalinity HCO 70 300 ppm Chloride ions Cl 50 ppm Sulphate ions SO 50 ppm Sulphide ion S None Ammonium ions NH None Silica SiO 30 ppm NOTICE under no circumstances does the unit have to be operated with water circulating on the heat exchanger whose chara...

Page 31: ... 6 in IN Water 1 1 4 OUT Water 1 1 4 5 5 in 29 6 in 43 3 in 43 3 in 43 3 in 21 7 in 43 3 in 43 3 in 9 7 in 9 7 in 9 7 in 9 7 in 9 7 in 43 3 in 9 7 in 4 0 in 13 6 in 13 6 in 13 6 in 13 6 in 16 8 in 28 0 in 22 9 in 13 6 in 16 9 in 27 8 in 13 6 in 22 8 in 20 4 in ...

Page 32: ...1 5167557_03 COMPONENTS AS STANDARD FOR SIZES 0300 0330 0350 0550 0600 0650 0700 0 1 in 0 1 in 0 3 in 0 3 in 0 6 in 0 6 in 3 9 in Grooved joints EU Reduction adapter EU USA Grooved joint USA Grooved nipple USA ...

Page 33: ...rds contact opening at least 3 mm with suitable cut off power and differential protection on the basis of the electric data table shown below installed as near as possible to the appliance To make an effective earth connection The manufacturer cannot be considered responsible for any damage caused by the lack of or ineffective appliance earth connection For units with three phase power supply chec...

Page 34: ... N 3 N 3 N 3 N 3 N E no 3 N Cablesperphases A no 1 1 1 1 1 1 E no 1 1 1 1 1 1 1 1 1 1 Crosssection A mm 25 0 50 0 50 0 70 0 70 0 70 0 E mm 10 0 16 0 16 0 25 0 25 0 50 0 50 0 70 0 70 0 70 0 Neutralsection A mm 16 0 25 0 25 0 25 0 35 0 35 0 E mm 10 0 16 0 16 0 16 0 16 0 25 0 25 0 25 0 35 0 35 0 Totalcables A no 4 4 4 4 4 4 E no 4 4 4 4 4 4 4 4 4 4 Controlandsafetiesconnection Crosssection A mm 1 5 1...

Page 35: ...e complied with and that a mechanical filter has been installed in each inlet heat exchanger Mandatory component for warranty to be valid Check that the circulation pump s are working and that the wa ter flow rate is sufficient to close the flow switch contact if installed We recommend installing one always upstream of every heat exchanger Check the water flow rate measuring the pressure differenc...

Page 36: ...ements are correctly in place before restarting the unit It is not permitted to walk on the machine or to place other items on it Fans motors and belt drives may be in motion always wait for them to stop and take appropriate precautions to prevent their activation before accessing them If the unit has components such as integrated inverters disconnect the power supply and wait at least 15 minutes ...

Page 37: ...ss its cooling circuit Connect the necessary instruments pressure gauges connected with suitable extensions to the pressure sockets on the compressor inputs and outputs ther mometers connected to thermocouple probes that are fastened to the pipes at the compressor inputs and outputs Do not use metratasts as they require the operator to approach the machine s cooling circuit Turn on the machine and...

Page 38: ...erformanceandcanpromotetheformationofrust INTERVENTIONS ON THE CIRCUIT DESCRIPTION FREQUENCY Note 3Mths 6Mths 12Mths INTERVENTIONSONTHECOOLINGCIRCUITOPERATINGWITHFULLLOAD Measurementoftheoverheatingtemperature Measurementoftheundercoolingtemperature Measurementoftheexhaustgastemperature Measurementoffaninput Measurementofcompressorinput COMPRESSORCONTROLS Oillevelcontrol Oilaciditycontrol Controlo...

Page 39: ...22 11 5167557_03 39 ...

Page 40: ...A V i a R o m a 9 9 6 3 7 0 4 0 B e v i l a c q u a V R I t a l y P h o n e 3 9 0 4 4 2 6 3 3 1 1 1 F a x 3 9 0 4 4 2 9 3 5 7 7 s a l e s a e r m e c c o m w w w a e r m e c c o m 2 2 1 1 5 1 6 7 5 5 7 _ 0 3 5167557_03 ...

Reviews: