4
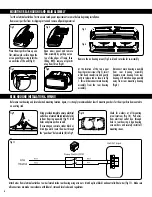
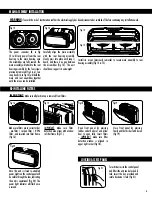
Place the air purifier face up on a
flat, stable work surface. Open the
access panel by pressing in latches
on each side of the unit (Fig 3).
Disconnect main housing assembly
from rear housing assembly.
Separate main housing from rear
housing. Lift main housing assembly
away from rear mounting housing
(Fig 8).
Open access panel and remove
filter assembly by pulling out on
top of side edges of frame, then
lifting. NOTE: remove all plastic
wrap from filters (Fig 4).
Remove the six housing screws (Fig 5 & 6) and set aside for re-assembly.
At the location of the two upper
housing corner screws (Fig 5), insert
a flat head screwdriver and gently
twist to release tab as shown in Fig
7. This will disconnect main housing
assembly from the rear housing
assembly.
MOUNTING REAR HOUSING AND MAIN ASSEMBLY
REAR HOUSING INSTALLATION & WIRING
Test the electrical outlet box first to ensure rated power requirements are met before beginning installation.
Remove air purifier from its shipping carton and remove all packing material.
Reference rear housing and locate desired mounting location. Again, it is strongly recommended at least 2 mounting anchors for the air purifier be mounted to
an existing stud.
Fig 3
Fig 7
Fig 4
Fig 8
Fig 5
Fig 6
Fig 10
Fig 11
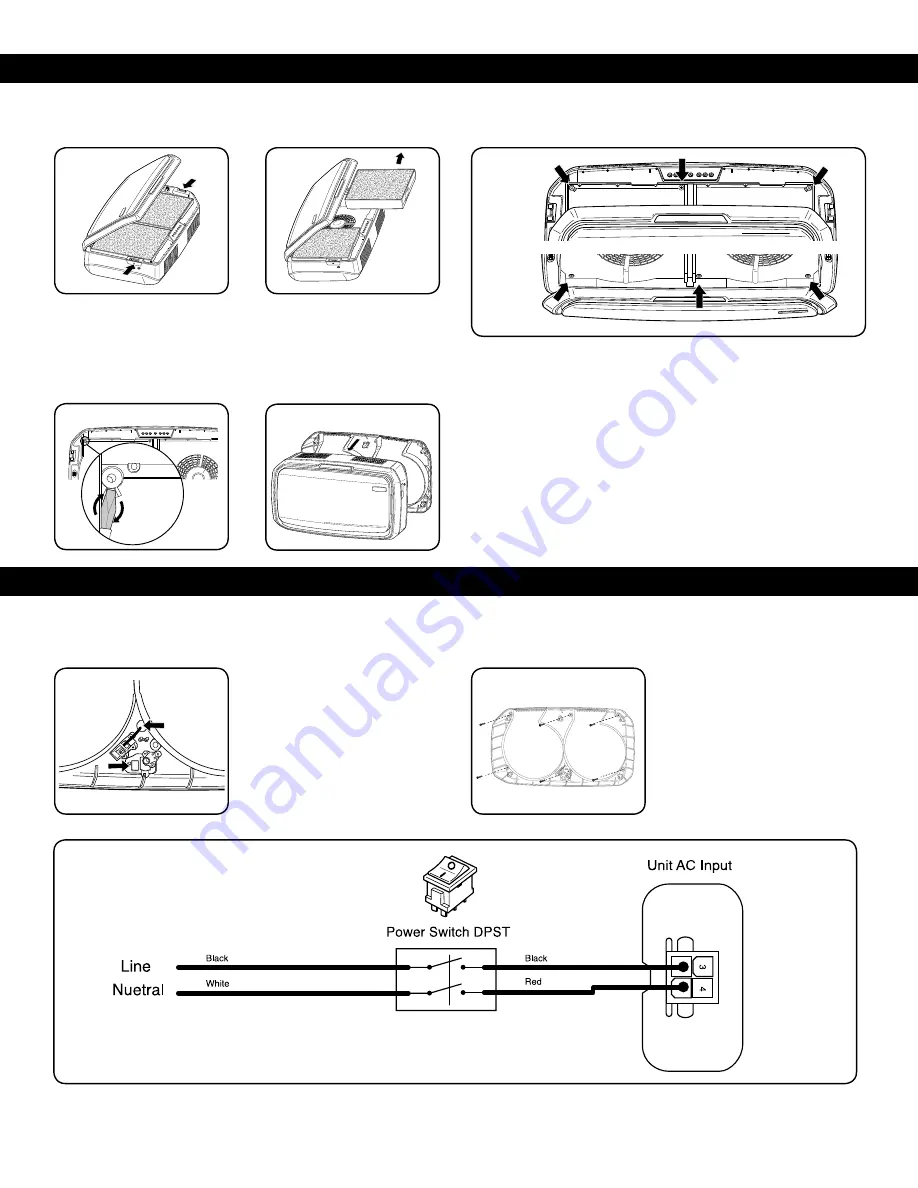
Using provided template ensure electrical
outlet box is located behind cable hole (A)
in Rear Housing assembly (Fig 9). Drill
holes and place anchors in wall.
If mounting on concrete, cinder block or
brick type walls route the wires through
the “punch-out” hole marked (B) in Fig 9.
Check for washers at all mounting
screw locations (Fig 10). Pull wires
from electrical outlet box through
hole in rear housing. Align housing
over anchors and securely install all
mounting screws.
Attach wires from electrical outlet box to wires located inside rear housing using wire nuts. Match up line (black) and neutral (white) wires (Fig 11). Make sure
all connections are made in accordance with federal, state and local codes and regulations.
A
B
A
B
Fig 9

