background image


COMMAND_CL ASS_FIRMWARE_UPDATE_MD V2 

COMMAND_CL ASS_POWERLEVEL V1 

COMMAND_CL ASS_BARRIER_OPERATOR 

COMMAND_CL ASS_APPLICATION_STATUS 

COMMAND_CL ASS_NOTIFICATION_V4


2. Technical Specifications 
Operating Distance:

 Up to 980 feet/300 metres outdoors.


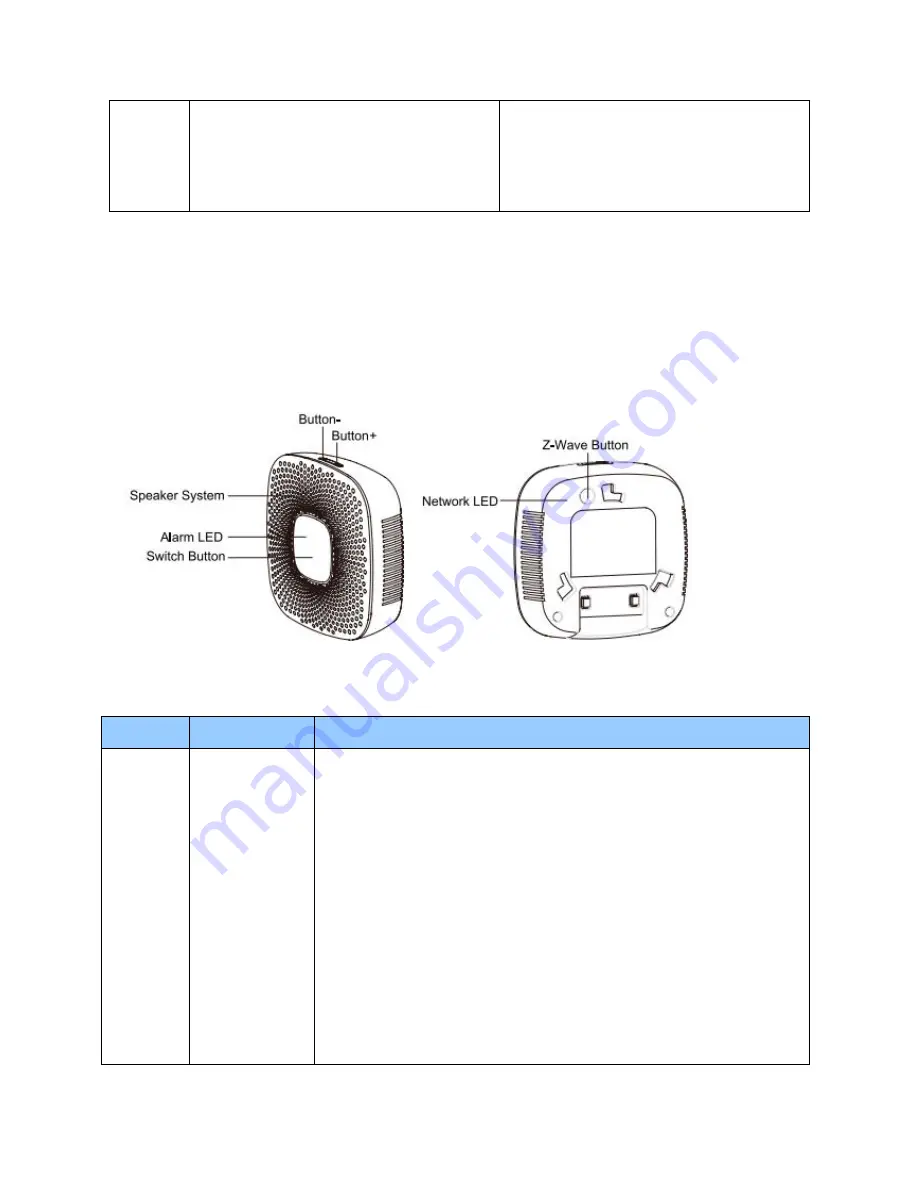
3. Familiarize Yourself with Your Garage Door Controller


3.1 Interface 


4. All functions of each trigger   
4.1 Functions of Action Button 

Button 

Trigger 

Description 

Z-Wave 
Button 

Click one time 

Let Garage Door Controller into inclusion/exclusion Mode. 
Add Garage Door Controller into Z-Wave Network: 

1. Install Garage Door Controller, and connect it to the 5V DC Adapter. 
2.  Let  the  primary  controller  into  inclusion  mode  (If  you  don’t  know 
how to do this, please refer to its manual). 
3. Press the Z-Wave Button. 
4. If the inclusion is failed, please repeat the process from step 2. 
 

Remove Garage Door Controller from Z-Wave Network: 

1. Install Garage Door Controller, and connect it to the 5V DC Adapter. 
2.  Let  the  primary  controller  into  exclusion  mode  (If  you  don’t  know 
how to do this, refer to its manual). 
3. Press the Z-Wave Button. 
4. If the remove is failed, please repeat the process from step 2. 

Note

:  If  Garage  Door  Controller  is  removed  from  Z-wave  network,  it 

will be reset to factory default. 
 

Summary of Contents for ZW062

Page 1: ...Z Wave Button on the Garage Door Controller 6 If Garage Door Controller has been successfully linked to your Z Wave network its Network LED will no longer blink If the linking was unsuccessful and the Network LED continues to blink repeat the steps above 7 Press the Action Button on the Z Stick to take it out of inclusion mode If you re using a Minimote The Garage Door Controller must be installed...

Page 2: ...eon Labs will ship the repaired or replacement products to Customer freight prepaid Customer shall indemnify defend and hold Aeon Labs and Aeon Labs affiliates shareholders directors officers employees contractors agents and other representatives harmless from all demands claims actions causes of action proceedings suits assessments losses damages liabilities settlements judgments fines penalties ...

Page 3: ... Over The Air OTA feature for the product s firmware upgrade 1 Library and Command Classes 1 1 SDK 6 51 06 1 2 Library Basic Device Class BASIC_TYPE_ROUTING_SLAVE Generic Device class GENERIC_TYPE_ENTRY_CONTROL Specific Device Class SPECIFIC_TYPE_SECURE_DOOR 1 3 Commands Class Included Non Secure Network Included Secure Network Node Info Frame COMMAND_CLASS_ZWAVEPLUS_INFO V2 COMMAND_CLASS_SWITCH_B...

Page 4: ...troller into Z Wave Network 1 Install Garage Door Controller and connect it to the 5V DC Adapter 2 Let the primary controller into inclusion mode If you don t know how to do this please refer to its manual 3 Press the Z Wave Button 4 If the inclusion is failed please repeat the process from step 2 Remove Garage Door Controller from Z Wave Network 1 Install Garage Door Controller and connect it to ...

Page 5: ... to Open close stop Button Click one time Switch the alarm sound to the next sound Press and hold Increase or decrease the volume 5 Special Rule of Each Command 5 1 Z Wave Plus Info Report Command Class Parameter Value Z Wave Plus Version 1 Role Type 5 ZWAVEPLUS_INFO_REPORT_ROLE_TYPE_SLAVE_ALWAYS_ON Node Type 0 ZWAVEPLUS_INFO_REPORT_NODE_TYPE_ZWAVEPLUS_NODE Installer Icon Type 0x1E00 ICON_TYPE_GEN...

Page 6: ...e 2 Configuration Value n LSB Configuration CC Parameter Number Paramete r Description Default Length 0x20 32 Configure the default startup ringtone Value 0 disable the Startup ringtone Value others Enable and select a startup ringtone for the Garage Door Controller 1 1 0x22 34 Sensor Calibration Calibration Steps 1 Let the garage door move to full close position 2 Send this parameter 0x22 with va...

Page 7: ... Value4 0 disable the alarm prompt Value4 1 enable the alarm prompt Value1 6 Value2 2 Value3 8 4 0x27 39 Configuration alarm mode when the garage door is in Unknown state 1 Value1 configure the frequency of blinking for the Alarm LED there are 10 levels that 1 to10 level the minimum frequency is level 1 and the max frequency is level 10 2 Value2 configure the alarm sound there are 4 types sound sa...

Page 8: ...ton will be used to adjust the volume of sound Long pressing the Button will be used to switch the sound to the next Value 1 short pressing the Button will be used to switch the sound to the next Long pressing the Button will be used to adjust the volume of sound 0 1 0x50 80 It will send the Hail CC configuration report CC when the state of garage door is changed 1 Value 0 reserved 2 Value 1 send ...

Page 9: ...nfiguration locked 1 Value 0 Enable 2 Value 1 Disable 0 1 0xFF 255 1 Value 0x55555555 Default 1 Size 4 Reset to factory default setting and removed from the z wave network 0 4 2 Reset to factory default setting 0 1 Note When you send Configuration get CC to product that will not get the report CC from product if the parameter has no default value ...

Reviews: