background image

29-9-2020

manual.zwave.eu/backend/make.php?lang=en&sku=AEOEZW164

manual.zwave.eu/backend/make.php?lang=en&sku=AEOEZW164

2/10

Installation

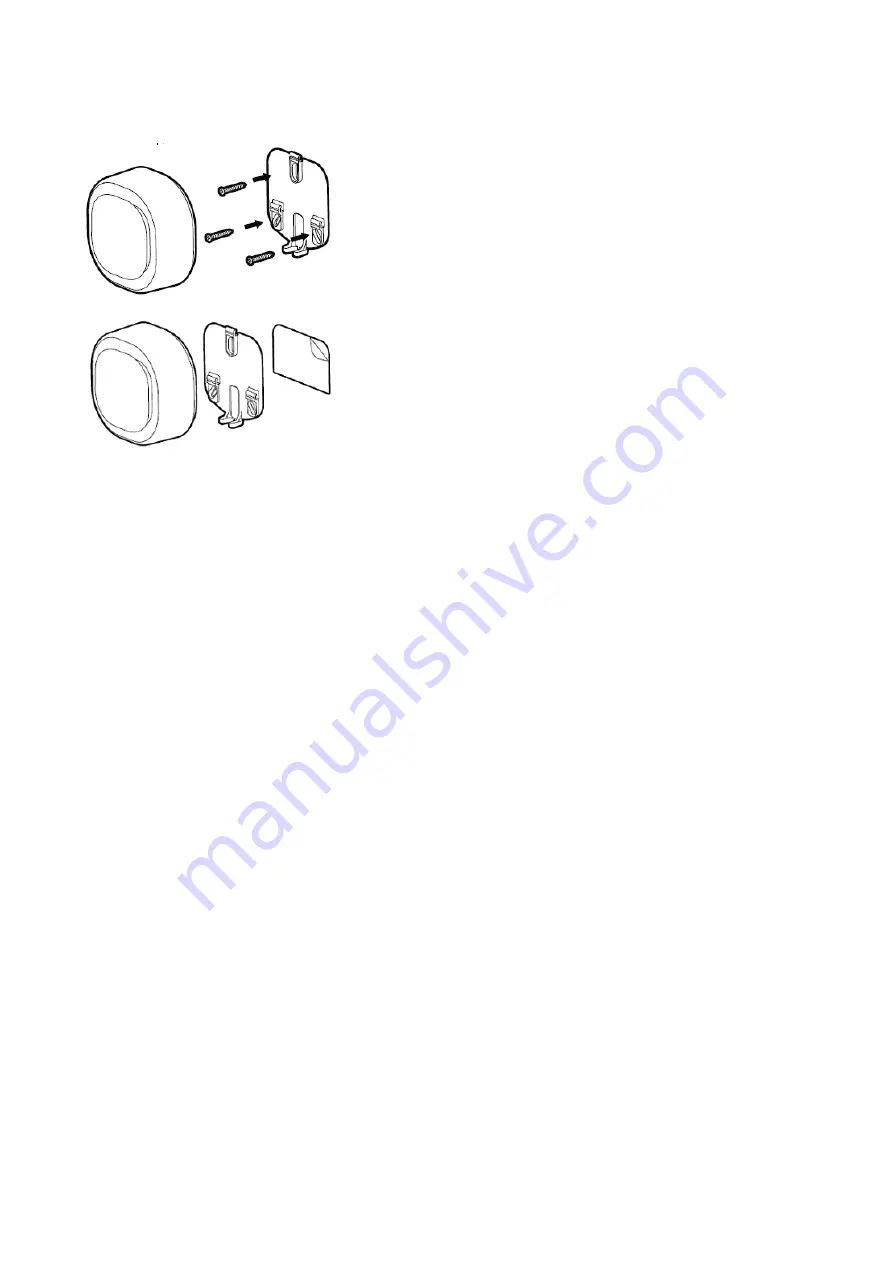
Install Mounting plate in the location of your choice.
 
1. Affix Siren 6 Wall Mount Plate in any desired location near an outlet.
a. Use 3x 20mm screws or double-sided tape.

b. Lock the Siren 6 into place where the mount is installed

Inclusion/Exclusion

On factory default the device does not belong to any Z-Wave network. The device needs to be added to an existing wireless network to communicate with the
devices of this network. This process is called Inclusion.

Devices can also be removed from a network. This process is called Exclusion. Both processes are initiated by the primary controller of the Z-Wave network. This
controller is turned into exclusion respective inclusion mode. Inclusion and Exclusion is then performed doing a special manual action right on the device.

Inclusion

1. Install the device according to the instructions.
2. Press the button on the back once.

Exclusion

1. Press the button on the back of the device 6 times quickly.

Product Usage

How to pair Button

There are two way to trigger pairing Button:

- Manually quick click Siren Action Button. Can be done both in and out of the network. 
- With Configuration Set. Can only be done in the network. Refer to Configuration Parameter 49/50/51 for details.

Below is mainly about manually quick click Siren Action Button to trigger pairing Button. 

1. Different click times will trigger different Pairing Button Mode. Please action as shown below.

- Click Action Button 3 times quickly will trigger Pairing #1 Button Mode. 
- Click Action Button 4 times quickly will trigger Pairing #2 Button Mode. 
- Click Action Button 5 times quickly will trigger Pairing #3 Button Mode.

2. Observe Siren Indicator Light to make sure which Button is waiting for pairing.

- When Pairing #1 Button Mode is triggered, Siren Indicator Light will bright 1 time ON 0.5s OFF 1s, and then become constantly bright white light,
indicating that Pairing #1 Button Mode has  already triggered. Pairing time is up to 10 seconds. In this time period, user MUST manually click Ring
Button 3 times quickly. Otherwise it cannot be paired successfully. 
- When Pairing #2 Button Mode is triggered, Siren Indicator Light will bright 2 times ON 0.5s OFF 1s, and then become constantly bright white light,
indicating that Pairing #2 Button Mode has already triggered. Pairing time is up to 10 seconds. In this time period, user MUST manually click Ring Button
3 times quickly. Otherwise it cannot be paired successfully.
- When Pairing #3 Button Mode is triggered, Siren Indicator Light will bright 3 times ON 0.5s OFF 1s, and then become constantly bright white light,
indicating that Pairing #3 Button Mode has already triggered. Pairing time is up to 10 seconds. In this time period, user MUST manually click Ring Button
3 times quickly. Otherwise it cannot be paired successfully.

3. Determine pairing results.

- If pairing Button succeeds, Siren Indicator Light will quickly flash white light 3 times and play the corresponding tone of paired Button, and then
become breathing white light (when Siren is out of the Z-Wave network) or off (when Siren is in the Z-Wave network)
- If pairing Button fairs, Chime Indicator Light will slowly flash white light 3 times and then become breathing white light (when Siren is out of the Z-
Wave network) or off (when Siren is in the Z-Wave network).

Note: 

- Only one Button can be paired at one time. 
- Each successful pairing will overwrite the previous paired Button which has the same Button Number. 
- This manually quick click Action Button operation can only be used to trigger pairing, not unpairing. 
- If you want to exit Pairing Button Mode, what you need to do is that click the Action Button once.

Summary of Contents for AEOEZW164

Page 1: ...e Quickstart section Z Wave ensures a reliable communication by reconfirming every message two way communication and every mains powered node can act as a repeater for other nodes meshed network in case the receiver is not in direct wireless range of the transmitter This device and every other certified Z Wave device can be used together with any other certified Z Wave device regardless of brand and ...

Page 2: ...erPairing 2ButtonMode ClickActionButton5timesquicklywilltriggerPairing 3ButtonMode 2 ObserveSirenIndicatorLighttomakesurewhichButtoniswaitingforpairing WhenPairing 1ButtonModeistriggered SirenIndicatorLightwillbright1timeON0 5sOFF1s andthenbecomeconstantlybrightwhitelight indicatingthatPairing 1ButtonModehas alreadytriggered Pairingtimeisupto10seconds Inthistimeperiod userMUSTmanuallyclickRing But...

Page 3: ...aying tone or stops playing tone Nodes associated are controlled and will receive a Basic Set CC 3 5 When Endpoint 2 starts playing tone or stops playing tone Nodes associated are controlled and will receive a Basic Set CC 4 5 When Endpoint 3 starts playing tone or stops playing tone Nodes associated are controlled and will receive a Basic Set CC 5 5 When Endpoint 4 starts playing tone or stops pl...

Page 4: ...figure the Light Effect and Tone Effect for Endpoint 6 Environment Parameter 7 Configure the Light Effect and Tone Effect for Endpoint 7 Security Please refer to the Product Manual for more details Size 4 Byte Default Value 67108864 Setting Description 16777216 2147483647 Configure the Light Effect and Tone Effect for Endpoint 7 Security Parameter 8 Configure the Light Effect and Tone Effect for Endpo...

Page 5: ...t Effect will be displayed in a loop until stop playing tone Parameter 22 Configure 7 Light Effect Please refer to the Product Manual for more details Size 4 Byte Default Value 553648129 Setting Description 0 2147483647 The Light Effect is displayed cyclically and the maximum display duration is equal to the total duration of the tone playback In other words the Light Effect will be displayed in a ...

Page 6: ...0x00 4 When Endpoint 4 starts playing tone send Basic Set 0x00 When Endpoint 4 stops playing tone send Basic Set 0xFF Parameter 36 Configure how to send Basic Set to nodes in Group 6 Size 1 Byte Default Value 3 Setting Description 0 Dont send Basic Set 1 When Endpoint 5 starts playing tone send Basic Set 0xFF When Endpoint 5 stops playing tone dont send Basic Set 2 When Endpoint 5 starts playing to...

Page 7: ...ly 1 Can trigger unpairing multiple Buttons at one time 2 User does not need to do anything to Button 3 Indicator Light will quickly flash white light 3 times when Unpairing Button Mode finishes Size 1 Byte Default Value 0 Setting Description 1 Tigger Unpairing 1 Button Mode 2 Tigger Unpairing 2 Button Mode 3 Tigger Unpairing 2 and 1 Button Mode 4 Tigger Unpairing 3 Button Mode 5 Tigger Unpairing 3 ...

Page 8: ...ftware version Parameter 53 Get the information of 2 Button Read Only This parameter does not restore to the default value when Siren is removed from the network or reset the factory settings Size 4 Byte Default Value 0 Setting Description 0 2 Button is unpaired 1 134217727 Information about 2 Button including battery voltage unit is mV and software version Parameter 54 Get the information of 3 Bu...

Page 9: ... Supported Command Classes Association Grp Info Association V2 Basic Configuration Device Reset Locally Firmware Update Md V4 Manufacturer Specific V2 Multi Channel Association V3 Multi Channel V4 Notification V8 Powerlevel Security Security 2 Sound Switch Supervision Transport Service V2 Version V2 Zwaveplus Info V2 Controlled Command Classes Basic Explanation of Z Wave specific terms Controller is a...

Page 10: ...rolled device Wakeup Notification is a special wireless message issued by a Z Wave device to announces that is able to communicate Node Information Frame is a special wireless message issued by a Z Wave device to announce its capabilities and functions c 2020 Z Wave Europe GmbH Antonstr 3 09337 Hohenstein Ernstthal Germany All rights reserved www zwave eu The template is maintained by Z Wave Europe...

Reviews: