background image


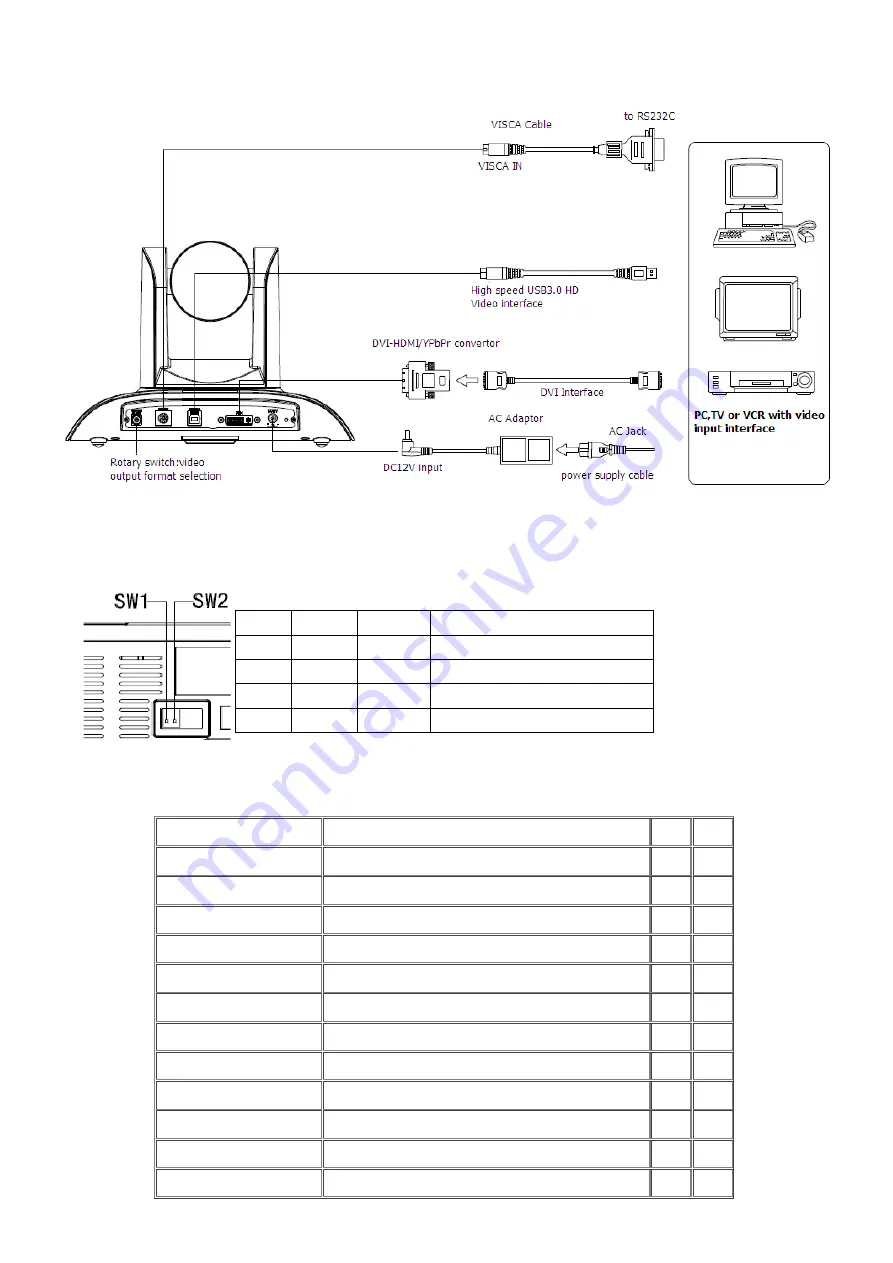
4. Please check the connection before camera power on.   


5. Dial switch setting at the bottom 
When two DIP switch is set to ON, camera is in normal work mode. 


6. Rotary switch setting 
The choice of 16 rotary switch video formats 


SW2-2  SW2-1 

Instruction 

ON 

OFF 

Undefined   

OFF 

OFF 

Updating mode   

OFF 

ON 

Debugging mode   

ON 

ON 

Working mode 

Dial-up 


 0 

  1080P60 


 1 

  1080P50 


 2 

  1080P30 


 3 

  1080P25 


 4 

  720P60 


 5 

  720P50 


 6 

  720P30 


 7 

  720P25 


 8 

 -------- 


 9 

 -------- 


 A 

 -------- 


 B 

 -------- 


Aegis Electronic Group 

www.aegiselect.com

For More Information Please Call Aegis Electronic Group, Inc. * (888) 687-6877 Phone * [email protected] * http://www.aegis-elec.com

Aegis Electronic Group 

www.aegiselect.com

Summary of Contents for AVP-USB3-PTZ

Page 1: ...s E l e c t r o n i c G r o u p w w w a e g i s e l e c t c o m For More Information Please Call Aegis Electronic Group Inc 888 687 6877 Phone aegis g2 aegiselect com http www aegis elec com A e g i s...

Page 2: ...r servicing to qualified personnel Never operate the camera under unqualified temperature humidity and power supply Please use the soft cloth to clean the camera Use neutral cleanser if badly smeared...

Page 3: ...8 Usage of IR Remote Controller 7 9 RS 232C Interface Pin Specs 9 10 COM Control 10 11 Menu Setting 16 A e g i s E l e c t r o n i c G r o u p w w w a e g i s e l e c t c o m For More Information Plea...

Page 4: ...rotation range Never power on before installation is not completed Don t dispatch discretionarily We are not responsible for any unauthorized modification or dismantling Accessories When you open the...

Page 5: ...ON OFF Undefined 2 OFF OFF Updating mode 3 OFF ON Debugging mode 4 ON ON Working mode Dial up 0 1080P60 1 1080P50 2 1080P30 3 1080P25 4 720P60 5 720P50 6 720P30 7 720P25 8 9 A B A e g i s E l e c t r...

Page 6: ...Intel R _USB_3 0_extensible_Host_Controller_Driver 10 When testing the local video software e CAMView is available 11 Test PC PTZ control with AMCAP_PTZ software to realize the dual function of video...

Page 7: ...ideo Output Interface USB3 0 DVI I including the HDMI and YPbPr signal 3 Image Sensor 1 2 8 inch 2 Megapixels high quality HD CMOS Sensor 4 Lens 3 92mm 47 3 mm F1 8 2 8 angle of view 72 5 6 3 5 Rotati...

Page 8: ...ntrol interface 9 USB3 0 B Male interface 10 DVI I Video output 11 12VDC Input Power Supply Jack 12 Power light indicator Dimension A e g i s E l e c t r o n i c G r o u p w w w a e g i s e l e c t c...

Page 9: ...nction is unavailable 5 Focus control key Focus focus length far from near Focus focus length near from far Auto focus the camera focus mode is auto Manual focus the camera focus mode is manual 6 Came...

Page 10: ...red 2 When a key combination is required do it in sequence For example F1 means press first and then press and press F1 at last 1 Pan Tilt Control Up press Down press Left press Right press Back to mi...

Page 11: ...set position the users should press the SET PRESET key first and then press the number key 0 9 to set a relative position 10 preset positions in total are available 2 Preset clearing to clear a preset...

Page 12: ...o 2 F3 Camera Address No 3 F4 Camera Address No 4 RS 232C Interface Pin Specs Camera Windows DB 9 1 DTR 1 CD 2 DSR 2 RXD 3 TXD1 3 TXD 4 GND 4 DTR 5 RXD1 5 GND 6 RS485 A 6 DSR 7 IR OUT 7 RTS 8 RS485 B...

Page 13: ...op bit 1bit Code None Connected to power the camera runs to the down left then back to middle with the farthest zoom rate in the auto focus and auto iris mode After initialization the camera runs to t...

Page 14: ...01 04 00 03 FF CAM_Zoom Stop 8x 01 04 07 00 FF Tele Standard 8x 01 04 07 02 FF Wide Standard 8x 01 04 07 03 FF Tele Variable 8x 01 04 07 2p FF p 0 low 7 high Wide Variable 8x 01 04 07 3p FF Direct 8x...

Page 15: ...x 01 04 0C 00 00 0p 0q FF pq Gain Positon CAM_Bright Direct 8x 01 04 4D 00 00 0p 0q FF pq Bright l Positon CAM_Exp Comp On 8x 01 04 3E 02 FF Exposure Compensation ON OFF Off 8x 01 04 3E 03 FF Reset 8x...

Page 16: ...V WW 01 03 FF Right 8x 01 06 01 VV WW 02 03 FF Up left 8x 01 06 01 VV WW 01 01 FF Upright 8x 01 06 01 VV WW 02 01 FF Down Left 8x 01 06 01 VV WW 01 02 FF Down Right 8x 01 06 01 VV WW 02 02 FF Stop 8x...

Page 17: ...M_GainPosiInq 8x 09 04 4C FF y0 50 00 00 0p 0q FF pq Gain Position CAM_ BrightPosiInq 8x 09 04 4D FF y0 50 00 00 0p 0q FF pq Bright Position CAM_ExpCompModeInq 8x 09 04 3E FF y0 50 02 FF On y0 50 03 F...

Page 18: ...Left 0xFF Address 0x00 0x14 Pan Speed Tilt Speed SUM Up left 0xFF Address 0x00 0x0C Pan Speed Tilt Speed SUM Zoom In 0xFF Address 0x00 0x20 0x00 0x00 SUM Zoom Out 0xFF Address 0x00 0x40 0x00 0x00 SUM...

Page 19: ...reset 0xA0 Address 0x00 0x07 0x00 Preset ID 0xAF XOR Query Pan Position 0xA0 Address 0x00 0x51 0x00 0x00 0xAF XOR Query Pan Position Response 0xA0 Address 0x00 0x59 Value High Byte Value Low Byte 0xAF...

Page 20: ...information it will upgrade synchronously with the software Machine Model Machine internal identified code UH M 3 CAMERA OPTION Move the pointer to the CAMERA SET in the Main Menu click the HOME and...

Page 21: ...lable 0 15 only available in Manual mode EV MODE Reset Condition off Available On Off only available in non manual model LEVEL Reset Condition Default Available Setting 3 3 WDR Reset Condition off Ava...

Page 22: ...ng 0 9 CONTRAST Reset Condition 3 CONTRAST setting 0 9 3 3 LENS SETTING Move the pointer to the LEN SET in the Main Menu click the HOME and enter the LEN SET as follows FOCUS Auto Manual One Push 4 PA...

Page 23: ...OME and enter the SET as follow SYS RESET System reset Protocol VISCA Address 1 baud rate 9600 S485 Off CAM RESET Camera parameter reset PT RESET Power action Off speed by zone On mount mode Up IR mov...

Page 24: ...vironment otherwise image will twinkle No operating in radio wave with great power environment such as TV station or Wireless Launcher etc Image effective will not be good when the light is not accord...

Page 25: ...Maximum Zoom 1 Check whether camera is fixed correctly 2 If there is vibrating mechanical object Remote Controller 1 Change the battery 2 Check the camera operation mode is right Terminal 1 Check the...

Page 26: ...re Information Please Call Aegis Electronic Group Inc 888 687 6877 Phone aegis g2 aegiselect com http www aegis elec com AVP WM Product Features Wall Surface Mount Maximum Bearing Weight 10Kg Indoor U...

Page 27: ...a e g i s e l e c t c o m For More Information Please Call Aegis Electronic Group Inc 888 687 6877 Phone aegis g2 aegiselect com http www aegis elec com AVP CM Product Features Indoor Suspended Mount...

Reviews: