background image

11. 

TROUBLESHOOTING

Problem 

1)

Possible cause

Remedy

The tumble dry-
er does not op-
erate.

The tumble dryer is not connected
to the mains supply.

Connect it to the mains socket.
Check the fuse in the fuse box (do-
mestic installation).

The door is open.

Close the door.

The Aan/Uit button was not push-
ed.

Push the Aan/Uit button.

The Start/Pauze button was not
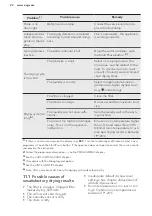
touched.

Touch the Start/Pauze button.

The appliance is in standby mode. Push the Aan/Uit button.

Unsatisfactory
drying result.

Incorrect programme selection.

Select a suitable programme. 

2)

The filter is clogged.

Clean the filter. 

3)

Droogtegraad option was set to


strijkdroog.

4)

Change Droogtegraad option to a
higher level.

The load was too large.

Do not exceed the maximum load
size.

The airflow slots are clogged.

Clean the airflow slots at the bot-
tom of the appliance.

There is some dirt on the humidity
sensor in the drum.

Clean the front surface of the
drum.

The dryness level was not set to
the desired level.

Adjust the dryness level. 

5)

The condenser is clogged.

Clean the condenser. 

3)

The loading
door does not
close

The filter is not locked into posi-
tion.

Put the filter in the correct posi-
tion.

Laundry is trapped between the
door and the seal.

Remove trapped items and close
the door.

It is not possible
to change the
programme or
option.

After a cycle starts it is not possible
to change the programme or op-
tion.

Turn the tumble dryer off and on.
Change the programme or option
as required.

It is not possible
to select an op-
tion. An acoustic
signal is emit-
ted.

The option you tried to select is
not available for the selected pro-
gramme.

Turn the tumble dryer off and on.
Change the programme or option
as required.

ENGLISH

21

Summary of Contents for T8DE86ES

Page 1: ...USER MANUAL EN User Manual Tumble Dryer T8DE86ES ...

Page 2: ...er features you might not find on ordinary appliances Please spend a few minutes reading to get the very best from it Visit our website for Get usage advice brochures trouble shooter service information www aeg com webselfservice Register your product for better service www registeraeg com Buy Accessories Consumables and Original spare parts for your appliance www aeg com shop CUSTOMER CARE AND SE...

Page 3: ...and knowledge if they have been given supervision or instruction concerning the use of the appliance in a safe way and understand the hazards involved Children between 3 and 8 years of age and persons with very extensive and complex disabilities shall be kept away from the appliance unless continuously supervised Children of less than 3 years of age should be kept away from the appliance unless co...

Page 4: ...ed by a carpet mat or any floor covering CAUTION The appliance must not be supplied through an external switching device such as a timer or connected to a circuit that is regularly switched on and off by a utility Connect the mains plug to the mains socket only at the end of the installation process Make sure that the mains plug is accessible after installation If the mains power supply cable is d...

Page 5: ...he packaging Do not install or use a damaged appliance Follow the installation instructions supplied with the appliance Always take care when moving the appliance as it is heavy Always use safety gloves and enclosed footwear Do not install or use the appliance where the temperature can be lower than 5 C or higher than 35 C The floor area on which the appliance is to be installed must be flat stabl...

Page 6: ... be reused for other lighting purposes To replace the internal lighting contact the Authorised Service Centre 2 5 Care and cleaning WARNING Risk of injury or damage to the appliance Do not use water spray and steam to clean the appliance Clean the appliance with a moist soft cloth Use only neutral detergents Do not use abrasive products abrasive cleaning pads solvents or metal objects Be careful w...

Page 7: ...ainer 2 Control panel 3 Internal lighting 4 Appliance door 5 Filter 6 Rating plate 7 Airflow slots 8 Condenser lid 9 Condenser cover 10 Adjustable feet For ease of loading laundry or ease of installation the door is reversible see separate leaflet ENGLISH 7 ...

Page 8: ...3 Start Pauze button 4 Options 5 Aan Uit button with Auto Off function 6 Programs 4 1 Display Symbol on the display Symbol description laundry maximum load delay start option on delay start selection 30min 20h cycle time indication buzzer off www aeg com 8 ...

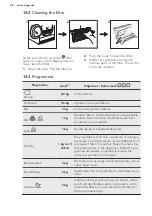
Page 9: ...ator clean the filter indicator check the condenser time dry option on time programme selection 10min 2h indicator drying phase indicator crease guard phase indicator cooling phase 5 PROGRAMMA Programma Load 1 Properties Fabric mark 2 3 Katoen 8 0 kg Cotton fabrics Synthetica 3 5 kg Synthetic and mixed fabrics Mix 3 kg Cotton and synthetic fabrics ENGLISH 9 ...

Page 10: ...rk in many countries Zijde 1 kg Gentle drying of hand washable silks Strijkvrij 1 kg or 5 shirts Easy care fabrics for which a minimum of ironing is necessary The drying results can be different from one type of fabric to another Shake the items before putting them in the appliance When the programme has ended immediately remove the items and put them on a hanger Beddengoed 3 kg Bed linen such as ...

Page 11: ...on Regulation EU No 392 2012 It is suitable for drying normal wet cotton laundry and it is the most efficient programme in terms of energy consump tion for drying wet cotton laundry 5 1 Programs and options selection Options Programs 1 Droogte graad Stil Anti kreuk Opfrissen Tijd Katoen Synthetica Mix Wol 2 Zijde Strijkvrij Beddengoed Sportkleding Outdoor Dekbed 1 Together with the program you can...

Page 12: ...dryness Possible selections ready to iron iron dry level ready to store cupboard dry level default selection which is related to the programme ready to store cupboard dry level ready to store extra dry level 6 2 Stil The appliance operates with low noise without effect on the drying quality The appliance operates slowly with longer cycle time 6 3 ECO This option is on by default with all programs ...

Page 13: ...e first time Possible to hear some noise To unlock the rear drum locks 1 Switch on the appliance 2 Set any programme 3 Press the Start Pause button Drum starts to rotate Rear drum locks are automatically deactivated Before you use the appliance to dry items Clean the tumble dryer drum with a moist cloth Start a 1 hour programme with moist laundry At the beginning of the drying cycle first 3 5 min ...

Page 14: ...s with the internal layer made of cotton inside out Cotton layer must be faced outwards Always set the programme suitable for the type of laundry Do not put light and dark colours together Use suitable programme for cottons jersey and knitwear to reduce shrinkage Do not exceed the maximum load stated in the programmes chapter or shown on the display Dry only the laundry that is suitable for tumble...

Page 15: ...tors appear on the display 8 4 Auto Off function To decrease the energy consumption the Auto Off function turns the appliance off automatically if the Start Pauze touch button is not touched within 5 minutes 5 minutes after a cycle ends Push the Aan Uit button to turn on the appliance If the appliance is on some indications appear on the display 8 5 Setting a programme Use the programme dial to se...

Page 16: ...gain until the symbol disappears 8 8 Starting a program To start the program Touch the Start Pauze button The appliance starts and the LED above the button stops flashing and stays on 8 9 Program change To change a program 1 Push the Aan Uit button to turn the appliance off 2 Push the Aan Uit button again to turn on the appliance 3 Set a new program 8 10 Programme end Clean the filter and drain th...

Page 17: ...raad and Anti kreuk buttons at the same time One of the symbols appears on the display Maximum dryness Extra dryness Standard dryness 5 Touch the Start Pauze button repeatedly until you reach the desired dryness level Dryness lev el Display symbol Maximum dryness Dryness lev el Display symbol Extra dry ness Standard dryness 6 To memorise the setting touch and hold down the Droogtegraad and Anti kr...

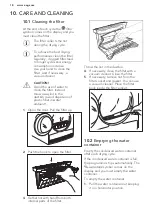
Page 18: ...ent 1 Open the door Pull the filter up 2 Push the hook to open the filter 3 Gather lint with hand from both internal parts of the filter Throw the lint in the dustbin 4 If necessary clean the filter with a vacuum cleaner Close the filter 5 If necessary remove lint from the filter socket and gasket You can use a vacuum cleaner Place the filter back inside the filter socket 10 2 Emptying the water c...

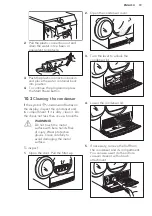
Page 19: ...ser and its compartment If it is dirty clean it Do the check not less than once a 6 months WARNING Do not touch the metal surface with bare hands Risk of injury Wear protective gloves Clean carefully to avoid damaging the metal surface To inspect 1 Open the door Pull the filter up 2 Open the condenser cover 3 Turn the lever to unlock the condenser lid 4 Lower the condenser lid 5 If necessary remov...

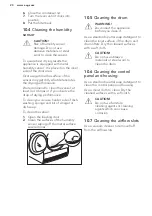
Page 20: ...t of vinegar or dish soap To clean the sensor 1 Open the loading door 2 Clean the surfaces of the humidity sensor wiping off the metal surface several times 10 5 Cleaning the drum WARNING Disconnect the appliance before you clean it Use a standard neutral soap detergent to clean the inner surface of the drum and drum lifters Dry the cleaned surfaces with a soft cloth CAUTION Do not use abrasive ma...

Page 21: ...low slots are clogged Clean the airflow slots at the bot tom of the appliance There is some dirt on the humidity sensor in the drum Clean the front surface of the drum The dryness level was not set to the desired level Adjust the dryness level 5 The condenser is clogged Clean the condenser 3 The loading door does not close The filter is not locked into posi tion Put the filter in the correct posi ...

Page 22: ...l in the wash ing machine Too low or too high room temper ature this is not the appliance malfunction Ensure a room temperature higher than 5 C and lower than 35 C Optimal room temperature to ach ieve best drying results is between 19 24 C 1 If there is an error message on the display e g E51 Turn the tumble dryer off and on Select a new programme Touch the Start Pause button If the appliance does...

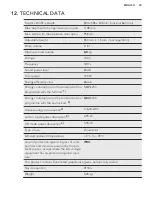
Page 23: ...n programme with the full load 1 1 47 kWh Energy consumption on the standard cotton programme with the partial load 2 0 83 kWh Annual energy consumption3 176 50 kWh Left on mode power absorption 4 0 05 W Off mode power absorption 4 0 05 W Type of use Household Allowed ambient temperature 5 C to 35 C Level of protection against ingress of solid particles and moisture ensured by the pro tective cove...

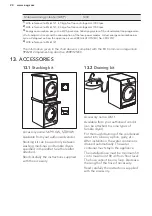
Page 24: ...ESSORIES 13 1 Stacking kit Accessory name SKP11GW STA9GW Available from your authorised vendor Stacking kit can be used only between washing machines and tumble dryers specified in the leaflet See the leaflet attached Read carefully the instructions supplied with the accessory 13 2 Draining kit Accessory name DK11 Available from your authorised vendor can be attached to some types of tumble dryer ...

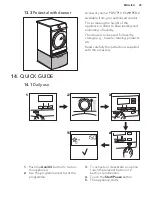
Page 25: ...or laundry storage e g towels cleaning products etc Read carefully the instructions supplied with the accessory 14 QUICK GUIDE 14 1 Daily use 1 2 3 5 4 4 1 2 3 5 4 1 Push the Aan Uit button to turn on the appliance 2 Use the programme dial to set the programme 3 To activate or deactivate an option touch the relevant button or 2 buttons combination 4 Touch the Start Pauze button 5 The appliance sta...

Page 26: ...iately when the programme is completed Zijde 1 kg Gentle drying of hand washable silks Strijkvrij 1 kg or 5 shirts Easy care fabrics for which a minimum of ironing is necessary The drying results can be different from one type of fabric to another Shake the items be fore putting them in the appliance When the pro gramme has ended immediately remove the items and put them on a hanger Beddengoed 3 k...

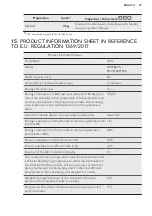
Page 27: ...sed 176 50 Automatic tumble drier or non automatic tumble drier Automatic Energy consumption of the standard cotton programme at full load in kWh 1 47 Energy consumption of the standard cotton programme at partial load in kWh 0 83 Power consumption of the off mode in W 0 05 Power consumption in left on mode in W 0 05 Duration of the left on mode in minutes 10 The standard cotton programme used at ...

Page 28: ...n programme at full and partial load 86 Sound power level in dB 65 Built in appliance Y N No The information given in the chart above is compliant with the EU Commission regulation 392 2012 implementing directive 2009 125 EC 16 ENVIRONMENTAL CONCERNS Recycle materials with the symbol Put the packaging in relevant containers to recycle it Help protect the environment and human health by recycling w...

Page 29: ...ENGLISH 29 ...

Page 30: ...www aeg com 30 ...

Page 31: ...ENGLISH 31 ...

Page 32: ...www aeg com shop 136943683 A 502019 ...

Reviews: