32
GB
f) Do not reach behind the fence with either hand closer
than 100 mm from either side of the saw blade, to remove
wood scraps, or for any other reason while the blade is
spinning.
The proximity of the spinning saw blade to your hand
may not be obvious and you may be seriously injured.
g) Inspect your workpiece before cutting. If the workpiece
is bowed or warped, clamp it with the outside bowed face
toward the fence. Always make certain that there is no gap
between the workpiece, fence and table along the line of
the cut.
Bent or warped workpieces can twist or shift and may
cause binding on the spinning saw blade while cutting. There
should be no nails or foreign objects in the workpiece.
h) Do not use the saw until the table is clear of all tools,
wood scraps, etc., except for the workpiece.
Small debris or
loose pieces of wood or other objects that contact the revolving
blade can be thrown with high speed.
i) Cut only one workpiece at a time.
Stacked multiple workpi-
eces cannot be adequately clamped or braced and may bind on the
blade or shift during cutting.
j) Ensure the mitre saw is mounted or placed on a level,
firm work surface before use.
A level and firm work surface
reduces the risk of the mitre saw becoming unstable.
k) Plan your work. Every time you change the bevel or
mitre angle setting, make sure the adjustable fence is set
correctly to support the workpiece and will not interfere
with the blade or the guarding system.
Without turning
the tool “ON” and with no workpiece on the table, move the saw
blade through a complete simulated cut to assure there will be no
interference or danger of cutting the fence.
l) Provide adequate support such as table extensions, saw
horses, etc. for a workpiece that is wider or longer than the
table top.
Workpieces longer or wider than the mitre saw table
can tip if not securely supported. If the cut-off piece or workpiece
tips, it can lift the lower guard or be thrown by the spinning blade.
m) Do not use another person as a substitute for a table
extension or as additional support.
Unstable support for the
workpiece can cause the blade to bind or the workpiece to shift
during the cutting operation pulling you and the helper into the
spinning blade.
n) The cut-off piece must not be jammed or pressed by any
means against the spinning saw blade.
If confined, i.e. using
length stops, the cut-off piece could get wedged against the blade
and thrown violently.
o) Always use a clamp or a fixture designed to properly
support round material such as rods or tubing.
Rods have a
tendency to roll while being cut, causing the blade to “bite” and
pull the work with your hand into the blade.
p) Let the blade reach full speed before contacting the
workpiece.
This will reduce the risk of the workpiece being
thrown.
q) If the workpiece or blade becomes jammed, turn
the mitre saw off. Wait for all moving parts to stop and
disconnect the plug from the power source and/or remove
the battery pack. Then work to free the jammed material.
Continued sawing with a jammed workpiece could cause loss of
control or damage to the mitre saw.
r) After finishing the cut, release the switch, hold the saw
head down and wait for the blade to stop before removing
the cut-off piece.
Reaching with your hand near the coasting
blade is dangerous.
s) Hold the handle firmly when making an incomplete
cut or when releasing the switch before the saw head is
completely in the down position.
The braking action of the saw
may cause the saw head to be suddenly pulled downward, causing
a risk of injury.
WOOD CUTTING BLADE SAFETY WARNINGS
Please read the manual and instructions carefully before using the
saw blade and the machine.
The machine must be in good condition, the spindle without
deformation and vibration.
Do not use the saw without the guards in position, keep guards in
good working order and properly maintained.
Ensure the operator is adequately trained in safety precautions,
adjustment, and operation of the machine.
Always wear goggles and ear protection when using the machine.
It is recommended to wear gloves, sturdy non-slip shoes and apron.
Before using any accessory, consult the instruction manual. The
improper use of an accessory can cause damage and increase the
potential for injury.
Use only blades specified in this manual, complying with EN 847-1.
Observe the maximum speed marked on the saw blade. Ensure
the speed marked on the saw blade is at least equal to the speed
marked on the saw.
Always use blades with correct size and shape of arbour holes.
Blades that do not match the mounting hardware of the saw will
run eccentrically, causing loss of control.
Do not use blades of larger or smaller diameter other than
recommended. Do not use any spacers to make the blade fit onto
the spindle.
Check the tips of the saw blade for damage or abnormal appearance
before each use. Tips that are damaged or loose can become flying
objects in use and increase the chance of personal injury.
Do not use cracked or distorted saw blades. Do not use saw blades
which are damaged or deformed
Scrap the saw blade if damaged, deformed, distorted or cracked,
repairing is not permitted.
Do not use HSS blades.
Ensure the saw blade is mounted correctly, tighten the arbor nut
securely before use (tightening torque approx. 12 Nm).
Fastening screw and nuts shall be tightened using the appropriate
spanner, etc.
Extension of the spanner or tightening using hammer blows is not
permitted.
Make sure the blade and flanges are clean and the recessed sides of
the collar are against the blade.
Make sure the blade rotates in the correct direction.
Before work, make a dummy cut without the motor turned on so
the position of the blade, operation of the guards with respect to
other machine parts and workpiece may be checked.
Never leave the machine unattended.
Do not apply lubricants on the blade when it is running.
Never perform any cleaning or maintenance work when the
machine is still running and the head is not in the rest position.
English
Summary of Contents for PS216L3
Page 2: ...A 13 10 11 12 14 15 16 17 19 20 21 9 8 7 6 5 4 3 2 1 26 28 27 24 25 22 23 18 ...
Page 6: ...2 I 1 ...
Page 7: ...3 I 2 3 ...
Page 9: ...5 III 1 3 4 2 ...
Page 10: ...6 IV 1 2 2 2 3 3 1 1 ...
Page 11: ...7 IV 4 5 EN 847 1 ...
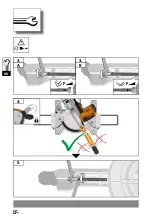
Page 12: ...8 IV 6 7 2 1 ...
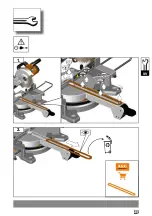
Page 14: ...10 VI 1 2 3 2 ...
Page 15: ...11 VII 2 1 45 30 15 0 max 45 max 0 22 5 33 9 2 1 ...
Page 16: ...12 VIII 2 1 3 1 2 4 3 2 1 ...
Page 17: ...13 IX AP2 200 4931 4472 95 No 4931447295 No 4931447293 No 4931447294 Ø 36 Ø 32 1 1 2 ...
Page 18: ...14 IX 1 2 2 1 1 2 1 2 ...
Page 19: ...15 X 3 1 2 4 5 ...
Page 20: ...16 2 XI 1 ...
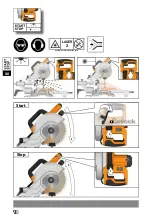
Page 22: ...18 XII Stop Start LASE R 2 m m 2 2 4 3 2 1 2 1 ...
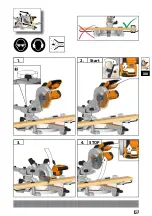
Page 23: ...19 X XIII 1 3 2 4 STOP Start 1 2 1 2 ...
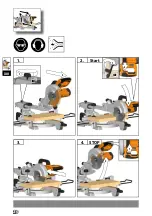
Page 24: ...20 XIII 1 3 2 4 1 Start STOP 2 2 3 2 1 1 ...
Page 27: ...23 2 1 XV ...
Page 28: ...24 3 A B 3 F F 4 5 XV ...
Page 29: ...25 1 2 XV ...
Page 30: ...26 XV ...
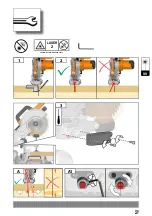
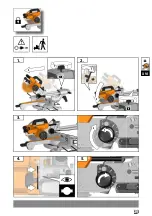
Page 31: ...27 XV 1 2 3 A1 A LASE R 2 m m 2 2 4 ...
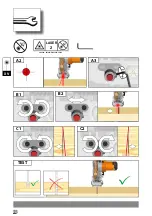
Page 32: ...28 B1 B2 XV TEST A2 A3 C1 C2 LASE R 2 m m 2 2 4 ...
Page 33: ...29 XVI 1 2 2 3 4 5 1 1 3 2 1 2 2 ...
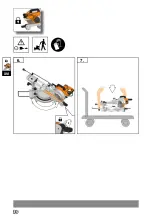
Page 34: ...30 XVI 7 6 2 1 ...

