


90
Protect C with 2 battery extensions
Fig.: Protect C.1000 und Protect C.1000 BP
1.
Check the correct fit of the UPS and the battery unit
(the casings e.g. have to have the same dimension).
2.
Now connect the corresponding battery connectors using the
supplied battery connection cables as shown in the figure
above. When connecting, make sure that you push the plug
quickly and firmly in the battery connectors.
Fix the connector parts concluding with the screws on the
side.
3.
Change the menu item “Settings” under “External Battery
Modules” to the number <2> (see 105).
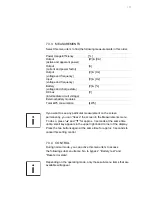
6.3 POWER
SUPPLY
Check the compatibility of the UPS nominal input voltage with the rated
voltage applicable in your country. The UPS automatically adjusted
output voltage depends on the level of the applied nominal input voltage.
Changes to 200 VAC, 208 VAC, 220 VAC, 230 VAC or 240 VAC can
always be done manually via the control panel.
Summary of Contents for Protect C.1000
Page 2: ...2 ...
Page 20: ...20 3 3 CE ZERTIFIKAT ...
Page 24: ...24 5 2 RÜCKSEITIGE ANSICHT ANSCHLÜSSE Protect C 1000 Protect C 2000 Protect C 3000 ...
Page 62: ...62 NOTIZEN ...
Page 63: ...63 NOTIZEN ...
Page 64: ...64 ...
Page 82: ...82 3 3 CE CERTIFICATE ...
Page 86: ...86 5 2 REAR VIEW CONNECTIONS Protect C 1000 Protect C 2000 Protect C 3000 ...
Page 124: ...124 NOTES NOTES ...
Page 125: ...125 NOTES ...
Page 126: ...126 NOTES ...
Page 127: ...127 ...