background image

• Always take care when moving the

appliance as it is heavy. Always use

safety gloves and enclosed footwear.

• Do not pull the appliance by the handle.

• Install the appliance in a safe and suitable

place that meets installation requirements.

• Keep the minimum distance from other

appliances and units.

• Before mounting the appliance, check if

the appliance door opens without

restraint.

• The appliance is equipped with an electric

cooling system. It must be operated with

the electric power supply.

• The built-in unit must meet the stability

requirements of DIN 68930.

Cabinet minimum height

(Cabinet under the worktop

minimum height)

444 (460) mm

Cabinet width

560 mm

Cabinet depth

550 (550) mm

Height of the front of the

appliance

455 mm

Height of the back of the

appliance

440 mm

Width of the front of the ap‐

pliance

595 mm

Width of the back of the

appliance

559 mm

Depth of the appliance

567 mm

Built in depth of the appli‐

ance

546 mm

Depth with open door

882 mm

Ventilation opening mini‐

mum size. Opening placed

on the bottom rear side

560x20 mm

Mains supply cable length.

Cable is placed in the right

corner of the back side

1500 mm

Mounting screws

3.5x25 mm

2.2 Electrical connection

WARNING!

Risk of fire and electric shock.

• All electrical connections should be made

by a qualified electrician.

• The appliance must be earthed.

• Make sure that the parameters on the

rating plate are compatible with the

electrical ratings of the mains power

supply.

• Always use a correctly installed

shockproof socket.

• Do not use multi-plug adapters and

extension cables.

• Make sure not to cause damage to the

mains plug and to the mains cable.

Should the mains cable need to be

replaced, this must be carried out by our

Authorised Service Centre.

• Do not let mains cables touch or come

near the appliance door or the niche

below the appliance, especially when it

operates or the door is hot.

• The shock protection of live and insulated

parts must be fastened in such a way that

it cannot be removed without tools.

• Connect the mains plug to the mains

socket only at the end of the installation.

Make sure that there is access to the

mains plug after the installation.

• If the mains socket is loose, do not

connect the mains plug.

• Do not pull the mains cable to disconnect

the appliance. Always pull the mains plug.

• Use only correct isolation devices: line

protecting cut-outs, fuses (screw type

fuses removed from the holder), earth

leakage trips and contactors.

• The electrical installation must have an

isolation device which lets you disconnect

the appliance from the mains at all poles.

The isolation device must have a contact

opening width of minimum 3 mm.

• This appliance is supplied only with a

main cable.

2.3 Use

WARNING!

Risk of injury, burns and electric

shock or explosion.

• Do not change the specification of this

appliance.

• Make sure that the ventilation openings

are not blocked.

• Do not let the appliance stay unattended

during operation.

• Deactivate the appliance after each use.

6

ENGLISH

Summary of Contents for KMK721000M

Page 1: ...USER MANUAL EN User Manual Microwave Oven KMK721000M ...

Page 2: ...ppliance www aeg com shop CUSTOMER CARE AND SERVICE Always use original spare parts When contacting our Authorised Service Centre ensure that you have the following data available Model PNC Serial Number The information can be found on the rating plate Warning Caution Safety information General information and tips Environmental information Subject to change without notice CONTENTS 1 SAFETY INFORM...

Page 3: ... than 8 years of age and persons with very extensive and complex disabilities shall be kept away from the appliance unless continuously supervised Children should be supervised to ensure that they do not play with the appliance Keep all packaging away from children and dispose of it appropriately WARNING The appliance and its accessible parts become hot during use Keep children and pets away from ...

Page 4: ...ements or the surface of the appliance cavity Always use oven gloves to remove or insert accessories or ovenware Do not activate the microwave function when the appliance is empty Metal parts inside the cavity can create electric arcing Metallic containers for food and beverages are not allowed during microwave cooking This requirement is not applicable if the manufacturer specifies size and shape...

Page 5: ...iance since they may explode even after microwave heating has ended To remove the shelf supports first pull the front of the shelf support and then the rear end away from the side walls Install the shelf supports in the opposite sequence The appliance should be cleaned regularly and any food deposits removed Do not use a steam cleaner to clean the appliance Do not use harsh abrasive cleaners or sh...

Page 6: ...patible with the electrical ratings of the mains power supply Always use a correctly installed shockproof socket Do not use multi plug adapters and extension cables Make sure not to cause damage to the mains plug and to the mains cable Should the mains cable need to be replaced this must be carried out by our Authorised Service Centre Do not let mains cables touch or come near the appliance door o...

Page 7: ...r Do not close the furniture panel until the appliance has cooled down completely after use 2 4 Care and cleaning WARNING Risk of injury fire or damage to the appliance Before maintenance deactivate the appliance and disconnect the mains plug from the mains socket Make sure the appliance is cold There is the risk that the glass panels can break Replace immediately the door glass panels when they a...

Page 8: ...pliance from the mains supply Cut off the mains electrical cable close to the appliance and dispose of it Remove the door catch to prevent children or pets from becoming trapped in the appliance 3 PRODUCT DESCRIPTION 3 1 General overview 1 2 7 4 3 1 2 6 3 4 5 1 Control panel 2 Electronic programmer 3 Heating element 4 Microwave generator 5 Lamp 6 Shelf support removable 7 Shelf positions 3 2 Acces...

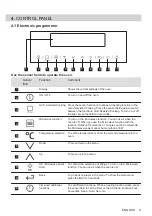
Page 9: ... when the oven is off When you use the Microwave function with the function Duration for more than 7 minutes and in Combi mode the Microwave power cannot be more than 600 W 5 Temperature selection To set the temperature or show the current temperature in the oven 6 Down To move down in the menu 7 Up To move up in the menu 8 OK Microwave Quick Start To confirm the selection or settings To turn on t...

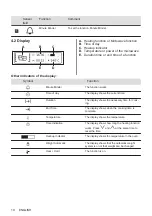
Page 10: ...rks Time of day The display shows the current time Duration The display shows the necessary time for cook ing End Time The display shows when the cooking time is complete Temperature The display shows the temperature Time Indication The display shows how long the heating function works Press and at the same time to reset the time Heat up Indicator The display shows the temperature in the oven Weig...

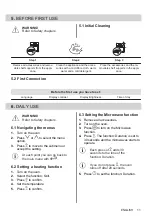
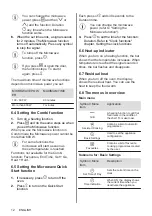
Page 11: ...1 Navigating the menus 1 Turn on the oven 2 Press or to select the menu option 3 Press to move to the submenu or accept the setting At each point you can go back to the main menu with 6 2 Setting a heating function 1 Turn on the oven 2 Select the function Grill 3 Press to confirm 4 Set the temperature 5 Press to confirm 6 3 Setting the Microwave function 1 Remove all accessories 2 Turn on the oven...

Page 12: ...ary press to turn off the oven 2 Press to turn on the Quick Start function Each press of adds 30 seconds to the Duration time You can change the microwave power refer to Setting the Microwave function 3 Press to set the time for the function Duration Refer to Clock functions chapter Setting the clock functions 6 6 Heat up indicator When you turn on a heating function the bar shows that the tempera...

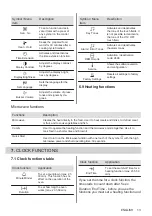
Page 13: ...tory Settings Resets all settings to factory settings 6 9 Heating functions Microwave functions Functions Description Microwave Creates the heat directly in the food Use it to heat meals and drinks to defrost meat or fruit and to cook vegetables and fish Combi Use it to operate the heating function and the microwave mode together Use it to cook food in a shorter time and brown it Quick Start Use i...

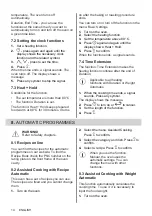
Page 14: ...ignal sounds 7 4 Time Extension The function Time Extension makes the heating function continue after the end of Duration Applicable to all heating functions with Duration or Weight Automatic 1 When the cooking time ends a signal sounds Press any symbol The display shows the message 2 Press to turn on or to cancel 3 Set the length of the function 4 Press 8 AUTOMATIC PROGRAMMES WARNING Refer to Saf...

Page 15: ... the shelf Wireshelf Push the shelf between the guide bars of the shelf support and make sure that the feet point down 10 ADDITIONAL FUNCTIONS 10 1 Favourites You can save your favourite settings such as duration temperature or heating function They are available in the menu Favourites You can save 20 programmes You cannot save Microwave and microwave combi functions as favourite programmes Saving...

Page 16: ...f the function press The display shows a message Press again and then to confirm When you turn off the oven the function also turns off 10 4 Set Go The function lets you set a heating function or a programme and use it later with one press of any symbol 1 Turn on the oven 2 Set a heating function 3 Press again and again until the display shows Duration 4 Set the time 5 Press again and again until ...

Page 17: ... you cannot find the settings for a special recipe look for the similar one 11 2 Microwave recommendations Let s cook Place the food on a plate on the bottom of the cavity Turn or stir the food halfway through the defrosting and cooking time Stir liquid dishes from time to time Stir the food before serving Cover the food for cooking and reheating Put the spoon to the bottle or glass when heating d...

Page 18: ...glass Non ovenproof glass and porcelain without any silver gold platinum or other metal decorations X X Glass and glass ceramic made of ovenproof frost proof material Ceramic and earthenware without any quartz or metal components and glazes which contain metal X Ceramic porcelain and earthenware with un glazed bottom or with small holes e g on han dles X X X Heat resistant plastic up to 200 C X Ca...

Page 19: ...ld or un derdone after cooking time ends Cooking time was too short Set longer cooking time Do not in crease microwave power The food is overheated at the edges but underdone in the middle Microwave power was too high Set lower power and longer cooking time DEFROSTING Place the food container at the bottom of the cavity MEAT FISH Set power for 100 W unless specified other wise kg min Standing time...

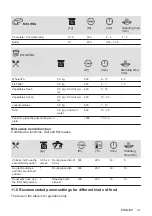
Page 20: ...y cake 1 piece 2 4 15 20 Bread 1 kg 15 18 5 10 Sliced bread 0 2 kg 3 5 5 10 Bread rolls 4 pieces 2 4 2 5 FRUIT kg W min Standing time min Fruit 0 25 100 5 10 10 15 REHEATING W min Standing time min Baby food in jars 0 2 kg 300 1 2 Baby milk put a spoon into the bottle 180 ml 600 0 20 0 40 Milk 200 ml 1000 1 1 30 Water 200 ml 1000 1 30 2 Sauce 200 ml 600 1 3 Soup 300 ml 600 3 5 Ready frozen meals 0...

Page 21: ...l of water 600 15 18 Popcorn place the popcorn bag on a plate 1000 1 30 3 Microwave Combi function Combine the functions Grill and Microwave kg W C min Standing time min Chicken half use the second shelf position 0 55 x 2 pieces Round glass dish Ø 26 cm 300 220 40 5 Au gratin potatoes use the second shelf position 1 Round glass dish 300 200 40 10 Roast pork neck use the first shelf position 1 Glas...

Page 22: ...and cakes Defrosting cheese cream butter Defrosting meat fish 11 7 Information for test institutes Tests according to IEC 60705 Use wire shelf unless otherwise specified MICROWAVE FUNCTION W kg min Sponge cake 600 0 475 Bottom 8 9 Turn container around by 1 4 halfway through the cooking time Meatloaf 400 0 9 1 25 27 Turn container around by 1 4 halfway through the cooking time Egg custard 300 1 2 ...

Page 23: ...t Everyday Use Clean the cavity after each use Fat accumulation or other residue may cause fire Clean the appliance ceiling carefully from residue and fat Do not store the food in the appliance for longer than 20 minutes Dry the cavity with a mi crofibre cloth after each use Accessories Clean all accessories after each use and let them dry Use a microfibre cloth with warm wa ter and a mild deterge...

Page 24: ...ep 2 Step 3 Turn off the oven Wait until the oven is cold Disconnect the oven from the mains Put a cloth on the bottom of the cav ity Top lamp Step 1 Turn the glass cover to remove it Step 2 Clean the glass cover Step 3 Replace the lamp with a suitable 300 C heat resistant lamp Step 4 Install the glass cover 13 TROUBLESHOOTING WARNING Refer to Safety chapters 13 1 What to do if Problem Possible ca...

Page 25: ...r Care Department Steam and condensation settle on the food and in the cavity of the oven You left the dish in the oven for too long Do not leave the dishes in the oven for longer than 15 20 minutes after the cooking process ends The appliance is activated and does not heat up The fan does not oper ate The display shows Demo The demo mode is activated 1 Deactivate the appliance 2 Touch and hold un...

Page 26: ...ooking Keep breaks between baking as short as possible when you prepare a few dishes at one time Cooking with the lamp off Turn off the lamp during cooking Turn it on only when you need it 15 ENVIRONMENTAL CONCERNS Recycle materials with the symbol Put the packaging in relevant containers to recycle it Help protect the environment and human health by recycling waste of electrical and electronic ap...

Page 27: ...27 ...
Page 28: ...www aeg com shop 867336723 B 132021 ...

Reviews: