Water Hardness Settings:
When calling service functions, generally no rinsing program may be selected!
General Information
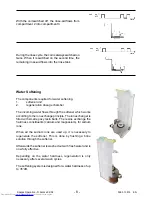
Calling / Modifying / Storing the Hardness Range Value
w
Setting and adjusting the water hardness range is identical
Calling the function "Water hardness settings"
with all designs and/or key arrangements.
1.
Press keys S1 and S2 simultaneously and ...
2.
... Keep them pressed until the machine is switched on
w
Always use the keys S0, S1 and S2, independently
with the ON/OFF key S0. For acquittal, the respective key LED's
of their model-related program assignment.
LD1 and LD2* are flashing (LD2* is only flashing if rinsing agent stop has been
programmed - see explanation opposite)
3.
Press the key S1 in order to call the water hardness function.
4.
The acquittal LED LD1 lights up for 5 seconds.
5.
Now the hardness range setting is displayed by
the key LED LD3 flashing:
(In the example left, WH3 is displayed by 3 times flashing)
6. / 7.
This LED will then go dark for about 5 seconds ...
The operation is repeated on display for a maximum of 60 seconds.
(3x flashing – 5 sec pause – 3x flashing – 5 sec pause – etc.)
Generally applicable:
Changing the preset hardness
w
Key S1 is ALWAYS the "Water hardness range key"
A
Press the key S1 to modify the
w
In the works, hardness range value WH3 has been preset.
hardness range. The value is increased in
w
With setting „WH1“ no regeneration is usually carried out.
rotating manner.
No adding of salt is required.
B
After pressing the key, the key LED LD1 will
Any salt LED available will not be activated.
go dark for about 3 seconds.
w
Table of hardness range values:
C
The new value is then displayed by coded
flashing of LED LD1.
Further sequence as described under 6./ 7.
Any pressing of the key S1
will increase the hardness range rotatively.
(WH1, WH2 ... WH5, WH1, WH2, ...)
Storage of the water hardness settings
General explications to key LED LD2* :
The hardness range selection is stored immediately upon each single input.
w
This key LED goes on or flashes only if
the function "Rinsing agent stop" is programmed
on a certain machine model.
Exiting the function
If the backlit function is not available on a certain
After 60 seconds after the last pushbutton operation on key
model, the respective LED is switched off in the mode Service Functions.
S1 or by switching the machine off by use of the ON/OFF key
S0, you automatically leave the special program.
S1
S2
S1
S2
LD1
LD2
S0
LD0
LD1
LD1
3 x b l i n k e n
1 .
2 .
5 .
6 .
5 s e k . A u s
LD1
3 x b l i n k e n
7 .
S0
LD0
... AUS nac h 6 0 s e k . a u t o m a t i s c h
W i e d e r h o l u n g d e r b l i n k e n d e n
Wasserhärte-Anzeige bis ...
. . . A U S d u r c h m a n u e l l e B e t ä t i g u n g ü b e r E i n / A u s
LD1
LD0
3.
LD0
LD0
LD0
LD0
S1
LD1
LD1
X+1x blinken
A .
C.
LD1
B .
p r o T a s t e n d r u c k
5 s e k . l e u c h t e n
LD1
LD0
4 .
5 s e k . l e u c h t e n
LD2
S1
b l i n k e n
H.Höning - WPD/DW/E - a) 03.09.01
Seite B 8
file: 28420 engEDW1001Bedienung.xls
Summary of Contents for Favorit CE
Page 1: ...Favorit CE Dishwasher Instruction book Aus Erfahrung Gut ...
Page 28: ...822 61 10 33 ...
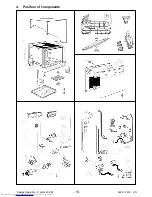
Page 38: ... 10 Spares Operation R Kurzke 02 02 599 513 616 EN 4 Position of components ...
Page 39: ... 11 Spares Operation R Kurzke 02 02 599 513 616 EN 5 Water Course Scheme ...
Page 57: ... 29 Spares Operation R Kurzke 02 02 599 513 616 EN ...
Page 58: ... 30 Spares Operation R Kurzke 02 02 599 513 616 EN ...
Page 60: ...N9113380102_1 ...
Page 61: ...N9113380102_2 ...
Page 76: ...Explosionszeichnungs Nr N 8731 A06 Number of picture ...
Page 77: ...Explosionszeichnungs Nr N 8731 A07 Number of picture ...
Page 78: ...Explosionszeichnungs Nr N 8731 A08 Number of picture ...
Page 79: ...Explosionszeichnungs Nr N 8731 A09 Number of picture ...
Page 80: ...Explosionszeichnungs Nr N 59112003232 Number of picture ...


