background image

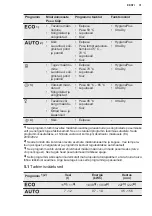
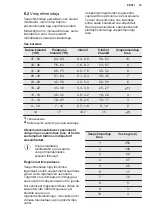
Programm

Määrdumisaste

Pesu tüüp

Programmi tsüklid

Funktsioonid

 1)

• Tavaline määr‐

dumine.

• Köögiriistad ja

söögiriistad

• Eelpesu

• Pesu 50 °C

• Loputused

• Kuiv

• HygienePlus

• XtraDry

 2) • Kõik

• Lauanõud, söö‐

giriistad, potid

ja pannid

• Eelpesu

• Pesu tempreatuuriva‐

hemikus 45 °C –

70 °C

• Loputused

• Kuiv

• HygienePlus

• XtraDry

• Tugev määrdu‐

mine

• Lauanõud, söö‐

giriistad, potid

ja pannid

• Eelpesu

• Pesu 70 °C

• Loputused

• Kuiv

• HygienePlus

• XtraDry

 3)

• Värskelt määr‐

dunud

• Köögiriistad ja

söögiriistad

• Pesu 60 °C – 65 °C

• Loputused

• HygienePlus

• XtraDry

• Tavaline või

kerge määrdu‐

mine

• Õrnad laua- ja

klaasnõud

• Pesu 45 °C

• Loputused

• Kuiv

• XtraDry

 4)

• Kõik

• Eelpesu

-

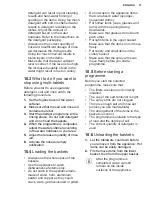
1) See programm tarbib tavalise määrdumisastmega lauanõude ja söögiriistade pesemiseks

vett ja energiat kõige efektiivsemalt. See on standardprogramm testimisasutustele. Seda

programmi kasutatakse, et hinnata vastavust komisjoni ökodisaini määrusele (EL)

2019/2022.

2) Seade tunneb ära korvides olevate esemete määrdumisastme ja koguse. Vee tempera‐

tuuri ja kogust, energiatarvet ja programmi kestust reguleeritakse automaatselt.

3) See programm sobib värskelt või vähesel määral määrdunud nõude pesemiseks (terve

või pool kogust). See tagab head pesutulemused lühikese ajaga.

4) Selle programmi abil saate nõudelt kiirelt maha loputada toidujäätmed, et ära hoida halva

lõhna tekkimist seadmes. Ärge kasutage koos selle programmiga pesuaineid.

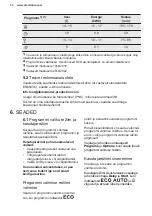
5.1 Tarbimisväärtused

Programm 1) 2)

Vesi

(l)

Energia

(kWh)

Kestus

(min)

113) / 114)

1.0393) / 1.0364)

2273) / 2274)

7 - 12

0.7 - 1.4

45 - 156

EESTI

31

Summary of Contents for ESF5512LOW

Page 1: ...ESF5512LOW EN Dishwasher User Manual 2 ET Nõudepesumasin Kasutusjuhend 25 ...

Page 2: ...o Electrolux Visit our website to Get usage advice brochures trouble shooter service and repair information www electrolux com support Register your product for better service www registerelectrolux com Buy Accessories Consumables and Original spare parts for your appliance www electrolux com shop CUSTOMER CARE AND SERVICE Always use original spare parts When contacting our Authorised Service Cent...

Page 3: ...ppliance unless continuously supervised Children of less than 3 years of age should be kept away from the appliance unless continuously supervised Do not let children play with the appliance Keep detergents away from children Keep children and pets away from the appliance when the door is open Children shall not carry out cleaning and user maintenance of the appliance without supervision 1 2 Gener...

Page 4: ... the installation instructions supplied with the appliance Always take care when moving the appliance as it is heavy Always use safety gloves and enclosed footwear Do not install or use the appliance where the temperature is less than 0 C Install the appliance in a safe and suitable place that meets installation requirements 2 2 Electrical connection WARNING Risk of fire and electric shock The app...

Page 5: ...G Risk of injury Concerning the lamp s inside this product and spare part lamps sold separately These lamps are intended to withstand extreme physical conditions in household appliances such as temperature vibration humidity or are intended to signal information about the operational status of the appliance They are not intended to be used in other applications and are not suitable for household r...

Page 6: ...n and pets to get closed in the appliance 3 PRODUCT DESCRIPTION The graphics below is just a general product overview For more detailed information refer to other chapters and or documents provided with the appliance 5 4 8 10 9 11 6 7 12 2 3 1 1 Worktop 2 Upper spray arm 3 Lower spray arm 4 Filters 5 Rating plate 6 Salt container 7 Air vent 8 Rinse aid dispenser 9 Detergent dispenser 10 Cutlery ba...

Page 7: ... Washing phase It comes on when the washing phase operates Drying phase It comes on when the drying phase operates XtraDry indicator Rinse aid indicator It is always off while the programme operates Salt indicator It is always off while the programme operates HygienePlus indicator 5 PROGRAMMES The order of the programmes in the table may not reflect their sequence on the control panel ENGLISH 7 ...

Page 8: ...lery with normal soil This is the standard programme for test institutes This pro gramme is used to assess compliance with the Ecodesign Comission Regulation EU 2019 2022 2 The appliance senses the degree of soil and the quantity of items in the baskets It auto matically adjusts the temperature and the quantity of water the energy consumption and the programme duration 3 This programme is suitable...

Page 9: ... to set a programme and to enter the user mode Settings available in the user mode The level of water softener according to the water hardness Activation or deactivation of the rinse aid empty notification Activation or deactivation of AirDry As the appliance stores the saved settings there is no need to configure it before every cycle How to set the programme selection mode The appliance is in pr...

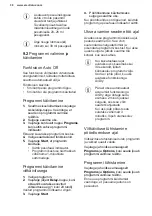
Page 10: ... 2 4 7 0 7 5 1 2 1 Factory setting 2 Do not use salt at this level Regardless of the type of detergent used set the proper water hardness level to keep the salt refill indicator active Multi tabs containing salt are not effective enough to soften hard water Regeneration process For the correct water softener operation the resin of the softener device needs to be regenerated regularly This process ...

Page 11: ...el Make sure the appliance is in user mode 1 Press Programs The indicators and and are off The indicator still flashes The display shows the current setting e g level 5 2 Press Programs repeatedly to change the setting 3 Press the on off button to confirm the setting 6 3 The rinse aid empty notification The rinse aid helps to dry the dishes without streaks and stains The rinse aid is automatically...

Page 12: ...ing AirDry deactivated 3 Press on off to confirm the setting 7 OPTIONS Desired options must be activated every time before you start a programme It is not possible to activate or deactivate options while a programme is running The Options button toggles between the available options and their possible combinations Not all options are compatible with each other If you select non compatible options ...

Page 13: ...he water tap 5 Start a programme to remove any processing residuals that can still be inside the appliance Do not use detergent and do not put dishes in the baskets After starting the programme the appliance recharges the resin in the water softener for up to 5 minutes The washing phase starts only after this procedure is complete The procedure is repeated periodically 8 1 The salt container CAUTI...

Page 14: ...ion You can turn the selector of the released quantity B between position 1 lowest quantity and position 4 or 6 highest quantity 9 DAILY USE 1 Open the water tap 2 Press the on off button to activate the appliance Make sure that the appliance is in programme selection mode If the salt indicator is on fill the salt container If the rinse aid indicator is on fill the rinse aid dispenser 3 Load the b...

Page 15: ...g a programme with delay start 1 Set a programme 2 Press Delay again and again until the display shows the delay time you want to set from 1 to 24 hours The indicator of the selected programme flashes 3 Press Start 4 Close the appliance door to start the countdown When the countdown is completed the programme starts and the washing phase indicator comes on Opening the door while the appliance oper...

Page 16: ...okware with firmly cooked on or baked on food before washing it in the appliance Make sure that items in the baskets do not touch or cover each other Only then can the water completely reach and wash the dishes You can use dishwasher detergent rinse aid and salt separately or you can use the multi tablets e g All in 1 Follow the instructions on the packaging Select a programme according to the typ...

Page 17: ... the baskets Always use the whole space of the baskets Use the appliance to wash dishwasher safe items only Do not wash in the appliance items made of wood horn aluminium pewter and copper as they could crack warp get discoloured or pitted Do not wash in the appliance items that can absorb water sponges household cloths Put hollow items cups glasses and pans with the opening facing downwards Make ...

Page 18: ...em is made of 3 parts C B A 1 Turn the filter B counterclockwise and remove it 2 Remove the filter C out of filter B 3 Remove the flat filter A 4 Wash the filters 5 Make sure that there are no residues of food or soil in or around the edge of the sump 6 Put back in place the flat filter A Make sure that it is correctly positioned under the 2 guides 7 Reassemble the filters B and C 8 Put back the f...

Page 19: ...t we recommend to use monthly a specific cleaning product for dishwashers Follow carefully the instructions on the packaging of the product 11 5 Removal of foreign objects Check the filters and the sump after each use of the dishwasher Foreign objects e g pieces of glass plastic bones or toothpicks etc decrease the cleaning performance and can cause damage to the drain pump 1 Disassemble the filte...

Page 20: ...s no kinks or bends The appliance does not drain the water The display shows i20 Make sure that the sink spigot is not clogged Make sure that the interior filter system is not clog ged Make sure that the drain hose has no kinks or bends The anti flood device is on The display shows i30 Close the water tap Make sure that the appliance is correctly installed Make sure the baskets are loaded as instr...

Page 21: ...cable The appliance door is not centred on the tub Adjust the rear foot if applicable The appliance door is diffi cult to close The appliance is not levelled Loosen or tighten the adjustable feet if applicable Parts of the tableware are protruding from the bas kets The appliance door opens during the wash cycle The AirDry function is activated You can deactivate the function Refer to Settings Ratt...

Page 22: ...elease quantity of rinse aid is too much Ad just the rinse aid level to a lower level The quantity of detergent is too high There are stains and dry wa ter drops on glasses and dishes The released quantity of rinse aid is not sufficient Adjust the rinse aid level to a higher level The quality of the rinse aid can be the cause The dishes are wet For the best drying performance activate the option X...

Page 23: ... The level of salt is low check the refill indicator The cap of the salt container is loose Your tap water is hard Refer to The water soft ener Even using multi functional tabs use salt and set regeneration of the water softener Refer to The water softener If lime scale deposits still remain clean the appli ance with appliance cleaners which are particularly suitable for this purpose Try different...

Page 24: ...d with this appliance It is possible to find information related to the performance of the product in the EU EPREL database using the link https eprel ec europa eu and the model name and product number that you can find on the rating plate of the appliance Refer to the chapter Product description For more detailed information about the energy label visit www theenergylabel eu 14 ENVIRONMENTAL CONC...

Page 25: ...tes võite Te alati alati kindel olla Teretulemast Electroluxi Külastage meie veebisaiti Nõuandeid brošüüre veaotsingu teavet teeninduse ja parandusvõimaluste kohta www electrolux com support Registreerige oma toode parema teeninduse saamiseks www registerelectrolux com Ostke lisaseadmeid tarvikuid ja originaalvaruosi www electrolux com shop KLIENDITEENINDUS Soovitame alati kasutada originaalvaruos...

Page 26: ...leks seadmest eemal hoida kui täiskasvanu nende tegevust ei jälgi Ärge lubage lastel seadmega mängida Hoidke pesuained lastele kättesaamatuna Hoidke lapsed ja väikesed koduloomad seadmest eemal kui selle uks on lahti Ilma järelvalveta ei tohi lapset seadet puhastada ega hooldustoiminguid läbi viia 1 2 Üldine ohutus See seade on mõeldud kasutamiseks koduses majapidamises või muudes sarnastes kohtad...

Page 27: ...age seade ohutusse ja sobivasse kohta mis vastab paigaldusnõuetele 2 2 Elektriühendus HOIATUS Tulekahju ja elektrilöögioht Seade peab olema maandatud Kontrollige kas andmeplaadil olevad elektriandmed vastavad teie kohaliku vooluvõrgu näitajatele Kasutage alati nõuetekohaselt paigaldatud elektriohutut pistikupesa Ärge kasutage mitmikpistikuid ega pikenduskaableid Veenduge et te ei vigastaks toitepi...

Page 28: ...stuse vahetamiseks võtke ühendust teeninduskeskusega 2 6 Teenindus Seadme parandamiseks võtke ühendust volitatud teeninduskeskusega Kasutage ainult originaalvaruosi Pidage meeles et kui olete parandanud seadet ise või lasknud seda teha ebapädeval isikul võib see kahjustada seadme ohutust ja muuta garantii kehtetuks Pärast mudeli tootmise lõpetamist on 7 aasta jooksul saadaval järgmised tagavaraosa...

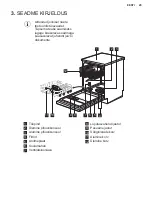
Page 29: ...soleva seadmega kaasasolevat juhendit ja või dokumente 5 4 8 10 9 11 6 7 12 2 3 1 1 Tööpind 2 Ülemine pihustikonsool 3 Alumine pihustikonsool 4 Filtrid 5 Andmeplaat 6 Soolamahuti 7 Ventilatsiooniava 8 Loputusvahendi jaotur 9 Pesuaine jaotur 10 Söögiriistade korv 11 Alumine korv 12 Ülemine korv EESTI 29 ...

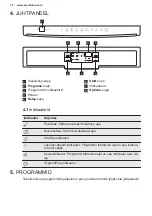
Page 30: ...esufaas Süttib pesufaasi töötamise ajal Kuivatusfaas Süttib kuivatusfaasi ajal XtraDry indikaator Loputusvahendi indikaator Programmi töötamise ajal on see indikaa tor alati väljas Soolaindikaator Programmi töötamise ajal on see indikaator alati väl jas HygienePlus indikaator 5 PROGRAMMID Tabelis olevate programmide järjestus ei pruugi näidata nende järjekorda juhtpaneelil www electrolux com 30 ...

Page 31: ... tavalise määrdumisastmega lauanõude ja söögiriistade pesemiseks vett ja energiat kõige efektiivsemalt See on standardprogramm testimisasutustele Seda programmi kasutatakse et hinnata vastavust komisjoni ökodisaini määrusele EL 2019 2022 2 Seade tunneb ära korvides olevate esemete määrdumisastme ja koguse Vee tempera tuuri ja kogust energiatarvet ja programmi kestust reguleeritakse automaatselt 3 ...

Page 32: ... seade on programmi valimise režiimis saab valida sobiva programmi ja sisestada kasutajarežiimi Kasutajarežiimi puhul saadaolevad valikud Veepehmendaja taset vastavalt vee karedusele Tühja loputusvahendi jaoturi märguande sisse või väljalülitamist Valiku AirDry sisse või väljalülitamist Kuna seaded salvestatakse ei pea neid enne tsüklit iga kord eraldi konfigureerima Programmi valimise režiimi val...

Page 33: ... 5 0 28 35 6 19 22 33 39 3 3 3 9 23 27 5 1 15 18 26 32 2 6 3 2 18 22 4 11 14 19 25 1 9 2 5 13 17 3 4 10 7 18 0 7 1 8 5 12 2 4 7 0 7 5 1 2 1 Tehaseseade 2 Selle taseme puhul ärge soola kasutage Olenemata kasutatavast pesuainest valige õige veekareduse tase et hoida soolamahuti täitmise indikaatorit sisselülitatult Soola sisaldavad multitabletid ei ole kareda vee pehmendamiseks piisavalt tõhusad Reg...

Page 34: ...n kasutajarežiimis 1 Vajutage Programs Indikaatorid ja on väljas Indikaator jätkab vilkumist Ekraanil kuvatakse olemasolev seade nt tase 5 2 Seade muutmiseks vajutage järjest Programs 3 Seade kinnitamiseks vajutage sisse välja nuppu 6 3 Loputusvahendi puudumise märguanne Loputusvahend võimaldab nõusid kuivatada ilma triipude ja plekkideta Loputusvahendit eraldatakse automaatselt kuuma loputusfaasi...

Page 35: ... olemasolev seade AirDry sisse lülitatud 2 Seade muutmiseks vajutage Delay AirDry välja lülitatud 3 Seade kinnitamiseks vajutage sisse välja nuppu 7 VALIKUD Sobivad valikud tuleb sisse lülitada iga kord kui te programmi käivitate Programmi töösoleku ajal valikuid sisse ega välja lülitada ei saa Nupuga Options saab liikuda läbi saadaolevate valikute ja nende võimalike kombinatsioonide Kõik valikud ...

Page 36: ...aset 2 Täitke soolamahuti 3 Täitke loputusvahendi jaotur 4 keerake veekraan lahti 5 Käivitage programm et eemaldada kõik seadmes leiduda võivad tootmisjäägid Ärge kasutage pesuainet ega pange korvidesse nõusid Pärast programmi käivitamist aktiveerib seade kuni 5 minutiks veepehmendajas oleva vaigu Pesutsükkel käivitub alles pärast selle toimingu lõppemist Toimingut viiakse läbi regulaarselt 8 1 So...

Page 37: ...ustunud oma asendisse Eraldatava koguse reguleerimiseks keerake valikunuppu B asendite 1 väikseim kogus ja 4 või 6 suurim kogus vahel 9 IGAPÄEVANE KASUTAMINE 1 Keerake veekraan lahti 2 Vajutage sisse välja nuppu et seade käivitada Veenduge et seade on programmi valimise režiimis Kui soolaindikaator põleb täitke soolamahuti Kui loputusvahendi indikaator põleb täitke loputusvahendi jaotur 3 Pange nõ...

Page 38: ...tuse aeg 1 kuni 24 tundi Valitud programmi indikaator vilgub 3 Vajutage Start 4 Pöördloenduse käivitamiseks sulgege seadme uks Kui pöördloendus on lõppenud käivitub programm ja pesufaasi indikaator süttib Ukse avamine seadme töö ajal Avades ukse programmi töösoleku ajal peatub seadme töö See võib suurendada energiatarbimist ja pikendada programmi kestust Kui ukse uuesti sulgete jätkub seadme töö k...

Page 39: ...net loputusvahendit ja soola või ka multitablette nt All in 1 Järgige pakendil olevaid juhiseid Valige nõude tüübile ja määrdumisastmele vastav programm tarbib vett ja energiat kõige efektiivsemalt Et vältida katlakivi tekkimist seadmes Täitke vajadusel soolamahuti Kasutage soovitatud koguses pesuainet ja loputusvahendit Kontrollige kas veepehmendaja on reguleeritud vastavalt teie piirkonna vee ka...

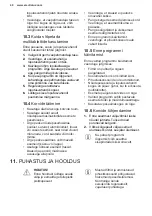
Page 40: ...ja pannid masinasse avausega allapoole Veenduge et klaasid ei puutuks omavahel kokku Pange kerged esemed ülemisse korvi Veenduge et esemed liikuma ei pääseks Pange söögiriistad ja väiksemad esemed söögiriistade korvi Enne programmi käivitamist veenduge et pihustikonsool saab vabalt liikuda 10 5 Enne programmi käivitamist Enne valitud programmi käivitamist veenduge järgmises Filtrid on puhtad ja õi...

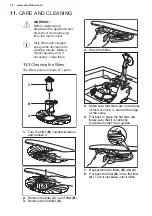
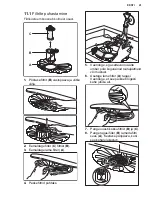
Page 41: ...t B 3 Eemaldage lame filter A 4 Peske filtrid puhtaks 5 Veenduge ega settevanni äärte ümber pole kogunenud toidujäätmeid või mustust 6 Asetage lame filter A tagasi Veenduge et see paikneb õigesti kahe juhiku all 7 Pange uuesti kokku filtrid B ja C 8 Pange tagasi filter B lameda filtri sees A Keerake päripäeva kuni see kohale lukustub EESTI 41 ...

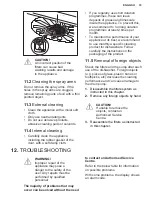
Page 42: ...akendil olevat juhendit 11 5 Lahtiste detailide eemaldamine Pärast iga kasutamist kontrollige nõudepesumasina filtreid ja äravooluosa Lahtised detailid nt klaasi plast luutükid hambaorgid jms halvendavad pesutulemusi ja võivad seadme tühjenduspumpa kahjustada 1 Võtke filtrisüsteem lahti nii nagu käesolevas jaotises näidatud 2 Eemaldage lahtised detailid käsitsi ETTEVAATUST Kui te ei saa neid kätte...

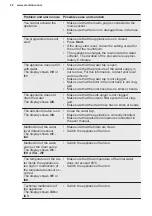
Page 43: ...e ummistu nud Veenduge et tühjendusvoolikul pole väändeid ega kõverusi Üleujutusvastane seade on sees Ekraanil kuvatakse i30 Sulge veekraan Veenduge et seade on õigesti paigaldatud Veenduge et nõud asetsevad korvides nii nagu ka sutusjuhendis näidatud Veetaseme tuvastusanduri rike Ekraanil kuvatakse i41 i44 Veenduge et filtrid on puhtad Lülitage seade välja ja sisse Vee või tühjenduspumba rike Ekr...

Page 44: ...aneb pe sutsükli ajal Funktsioon AirDry on aktiveeritud Saate funktsiooni välja lülitada Vt jaotist Seaded Seadmest kostab klirinat koputusi Nõud ei ole korvidesse paigutatud õigesti Vaadake korvide täitmise infolehte Veenduge et pihustikonsool saab vabalt pöörelda Seade põhjustab kaitsme väljalülitumise Voolutugevus ei võimalda kõigi kasutatavate sead mete üheaegset kasutamist Kontrollige pistiku...

Page 45: ...l Eraldatava loputusvahendi kogus pole piisavalt suur Seadke loputusvahendi tase kõrgemaks Põhjuseks võib olla loputusvahendi kvaliteet Nõud on märjad Parimate kuivatustulemuste saamiseks lülitage sis se funktsioon XtraDry ja seadke AirDry Programmil ei ole kuivatustsüklit või on madala temperatuuriga kuivatustsükkel Loputusvahendi jaotur on tühi Põhjuseks võib olla loputusvahendi kvaliteet Põhjus...

Page 46: ...ettidega ja määrake veepehmendi vajaduse järgi Vt jaotist Veepeh mendi Kui hoolimata sellest näete lubjasetet puhastage seadet kasutades selleks otstarbeks mõeldud pu hastusvahendeid Proovige teist pesuainet Pöörduge pesuaine tootja poole Tuhmid värvi muutnud või pragunenud nõud Veenduge et peseksite masinas ainult nõudepesu masinakindlaid nõusid Täitke ja tühjendage korv ettevaatlikult Vaadake ko...

Page 47: ...mentidega alles Toote jõudlusega seotud teavet on võimalik leida EL EPREL i andmebaasist kasutades linki https eprel ec europa eu ja toote mudelinime ja tootenumbrit mille leiate seadme andmesildilt Vt jaotist Toote kirjeldus Täpsema teabe saamiseks energiamärgise kohta külastage www theenergylabel eu 14 JÄÄTMEKÄITLUS Sümboliga tähistatud materjalid võib ringlusse suunata Selleks viige pakendid va...

Page 48: ...www electrolux com shop 156800010 A 352020 ...

Reviews: