INSTALLATION
17
INSTALLATION
Drilling the Support surface and Fitting the Hood
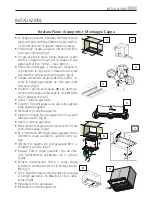
• The Hood can be fitted directly on the lower sur-
face of the Wall Units (650 mm min. above the
Cooker Top) using the snap-on Side Supports.
• Make an opening on the lower surface of the
Wall Unit, as indicated. (fig.1)
• If the cabinet is without bottom, fix the two
brackets at a distance B of minimum 30mm and
maximum 60mm. (fig.2)
• Before carrying out the installation, the wooden
transportation protections screwed on the vi-
sor and on the canopy body must be removed.
(fig.3)
• Choose the correct flange measure basing on the
air outlet diameter and insert it to the upper air
outlet opening. (fig.4)
• Screw the closing profile
20
onto the rear part
of the hood, using the screws
12f
(2.9 x 9.5) pro-
vided. (fig.5)
• Open the sliding suction panel.
• Remove the metal grease filters one by one after
having disconnected the relative fas-tening ele-
ments.
• Close the sliding suction panel again.
• Insert the Hood until the snap-on side sup-ports
click into place. (fig.6)
• Open the sliding suction panel.
• Lock in position by tightening the screws Vf from
underneath the Hood. (fig.6)
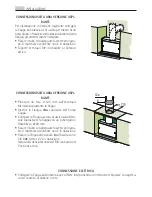
• If necessary, adjust the whole filter holder unit
and proceed as follows:
• Loosen the four adjustment screws Vr and close
the sliding panel again. (fig.7)
• Move the entire filter holder unit until it is prop-
erly aligned with the wall unit. (fig.8)
• Keeping the hood canopy still, remove the slid-
ing panel and lock the adjustment screws again.
(fig.7)
• The hood can now be fastened to the wall unit
using the four screws
12a
(3.5 x 16) provided.
(fig.9)
• Replace the metal grease filters.
• Close the sliding suction panel again.
���
���
3
DE
1
10
MONTAGE
Bohren der Trägerplatte und Montage der Dunstabzugshaube
• Die Haube kann direkt an der Unterseite der
Hängeschränke (mindestens 650 mm von der
Kochmulde entfernt) mit seitlichen Schnapphal-
terungen fixiert werden.
• An der Unterseite des Hängeschranks, wie in
der Abbildung gezeigt, eine Öffnung anbringen.
(Abb.1)
• Sofern ein Schrank ohne Unterboden benutzt
werden soll, sind die verzinkten Haltewinkel mit
einem Abstand B von 30 bis 60 mm anzubrin-
gen. (Abb.2)
• Vor dem Einbau müssen die als Transportsiche-
rung auf dem Schirm geschraubten Holzleisten
abgenommen werden. (Abb.3)
• Je nach Durchmesser des gewählten Luftaus-
tritts den passenden Flansch in die obere Ab-
luftöffnung einsetzen. (Abb.4)
• Das Abschlussprofil 20 an der Rückseite der
Haube mit den beiliegenden Schrauben 12f
(2,9x9,5) fixieren. (Abb.5)
• Den herausziehbaren Wrasenleitschirm öffnen.
• Die Fettfilter nacheinander entnehmen, indem
die entsprechenden Haltevorrichtungen gelöst
werden.
• Den herausziehbaren Wrasenleitschirm wieder
schließen.
• Die Haube einschieben, bis die seitlichen Halte-
rungen einschnappen. (Abb.6)
• Den herausziehbaren Wrasenleitschirm öffnen.
• Die Haube von unten her mit den Schrauben Vf
fixieren. (Abb.6)
• Falls erforderlichk, das unter Teil wie nachste-
hend beschrieben ausrichten:
• Die vier Einstellschrauben Vr lockern und
den Wrasenleitschirm wieder schließen.
(Abb.7)
• Den gesamten unteren Korpus verschieben,
bis er auf den Oberschrank ausgerichtet ist.
(Abb.8)
• Den Haubenkörper festhalten, den Wrasen-
leitschirms öffnen und die Einstellschrauben
festziehen. (Abb.7)
• Nun kann die Haube am Oberschrank mit den
vier beiliegenden Schrauben 12a (3,5 x 16)
fixiert werden. (Abb.9)
• Die Fettfilter wieder montieren.
• Den herausziehbaren Wrasenleitschirm wieder schließen
1
2
3
4
6
Vr
7
8
9
5
5
6
9
10a
10a
10b
2
4
7
12a
8
9
B
Summary of Contents for DF7190-M
Page 2: ......
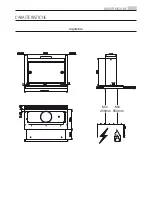
Page 6: ...CARATTERISTICHE 6 CARATTERISTICHE Ingombro ...
Page 15: ...CHARACTERISTICS 15 CHARACTERISTICS Dimensions ...
Page 24: ...CHARAKTERISTIKEN 24 CHARAKTERISTIKEN Platzbedarf ...
Page 33: ...EIGENSCHAPPEN 33 EIGENSCHAPPEN Buitenafmetingen ...
Page 39: ......
Page 40: ...www aeg electrolux com shop 436005018_03 111010 ...

