12
12
EQUALISER FUNCTION
To adjust the bass and/or treble settings:
1. Press
to enter Equaliser setting.
2. Press or to adjust the Bass level. (Adjustment range: 0 - 5)
3. Press
to enter the Treble setting.
4. Press or to adjust the Treble level. (Adjustment range: 0 - 5)
5. Press
to exit Equaliser setting.
SETTING THE CLOCK
To set the clock:
1.
Press and hold
to enter clock setting.
2. The hour time blinks. Press or , or rotate volume/tuning
control to adjust the hour.
3. Briefly
press
or on/off button. The minute time blinks. Press
or , or rotate volume/tuning control to adjust the minute.
4. Briefly
press
or on/off button again to confirm the time. The
clock is now set.
NOTE:
If AAA batteries are removed or lose charge for more than 15
seconds, clock settings will be lost. Settings are not affected by the
removal of the 18V battery.
AUXILIARY MODE
The product can be used as an amplifier for MP3 players, CD players,
smartphones, tablets, and other music devices. There are two auxiliary
modes, AUX 1 and AUX 2.
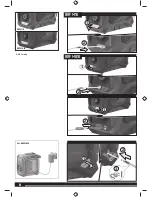
To use AUX 1:
See page 6.
1. Press
until
is displayed.
2. Connect auxiliary cable to the device.
3. Open the AUX 1 input jack cover. Connect the other end of the
auxiliary cable to the AUX 1 input jack.
NOTE:
–
The external device must be on and in play mode for sound
to be heard through the speakers.
–
All external device controls can be used normally while
connected to radio.
–
Volume for any device connected through the auxiliary cable
can be adjusted using the volume control for that device or by
using volume/frequency control knob of the product.
–
Switching the product off will not switch the external device
off.
–
The auxiliary cable does not provide charging function.
4. For complete operating instructions for the connected device,
always refer to the manual that was included with your device.
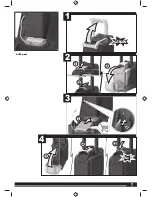
To use AUX 2:
See page 7.
1. Press
until
is displayed.
2. Connect auxiliary cable to the device.
3. Open the battery pack cover. Connect the other end of the
auxiliary cable to the AUX 2 input jack.
NOTE:
–
The external device must be on and in play mode for sound
to be heard through the speakers.
–
All external device controls can be used normally while
connected to radio.
–
Volume for any device connected through the auxiliary cable
can be adjusted using the volume control for that device or by
using volume/frequency control knob of the product.
–
Switching the product off will not switch the external device
off.
–
The auxiliary cable does not provide charging function.
4. For complete operating instructions for the connected device,
always refer to the manual that was included with your device.
The device storage may be used to store your external device.
NOTE:
In AUX1 and AUX2 modes, if there is no audio input for 10
minutes, the radio will turn off automatically to save power.
USING A BLUETOOTH® ENABLED DEVICE WITH THE PRODUCT
(BRFMB18 ONLY)
1. Press
until is displayed. Alternatively, press to enter
Bluetooth® mode directly.
NOTE:
–
When the product is switched to Bluetooth® mode, the
product will attempt to pair to a Bluetooth® enabled device.
The volume/tuning control ring light and in the LCD display
will flash.
–
The product will automatically attempt to connect to the last
device it was paired to. If a connection cannot be established
within five seconds, the product will make itself available to
other Bluetooth® enabled devices.
–
Bluetooth® enabled devices must be within 10 m (30 ft) of
the product and set to search/scan in order to pair with the
product.
–
If the radio is not paired with any device, or is paired
without playing songs for 10 minutes, the radio will turn off
automatically.
2. Select “AEG JOBSITE BT5 RADIO” from your device’s list of
available Bluetooth® signals to pair the device and the product.
No password or PIN is required for connection.
NOTE:
–
When the device has successfully paired with the radio, the
volume/tuning control ring light and in the LCD display will
stop flashing. A beep sound will play.
–
When a device is paired to the product, information for
connecting to the device is saved in the radio’s memory.
–
If the radio does not pair with your device, turn off the radio .
Wait 5 seconds, then turn the power on and start the pairing
process again.
3. Press and to go to the previous or next track when streaming
audio from a Bluetooth® enabled device.
4. Press and release
to cycle between pausing and
playing the audio.
NOTE:
–
These controls may not be supported by the Bluetooth®
device and application.
–
All Bluetooth® enabled device controls can be used normally
while paired to the product.
–
Volume for any device paired to the product can be adjusted
using the volume control for that device or by using volume/
frequency control knob of the product.
5. Press and hold for about 2 seconds to disconnect all Bluetooth®
enabled device.
NOTE:
When the device is disconnected, the volume/tuning
control ring light and in the LCD display will begin flashing and
the product will begin searching for another device.
Summary of Contents for BRFM18
Page 1: ...BRFM18 BRFMB18 Original instructions ...
Page 3: ...3 3 1 1 2 3 4 click 1 1 2 2 3 2 3 ...
Page 4: ...4 4 1 2 1 click 2 ...
Page 5: ...5 5 78 100 33 54 55 77 10 32 10 ...
Page 6: ...6 6 2 1 1 1 2 BRFM18 BRFMB18 2 BRFM18 BRFMB18 1 2 3 AUX1 mode For BRFMB18 ...
Page 7: ...7 7 AUX2 mode click 3 4 1 1 2 2 3 1 1 2 2 3 click AUX2 mode ...

