11
11
The backlight of the LCD display will dim after 15 seconds of no user
operation.
NOTE:
The illustrations of the LCD display shown in the manual are
only examples of the frequencies you may see on your radio and are
not the exact frequencies that you may choose to listen to.
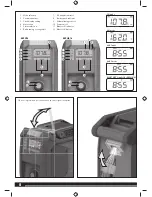
MENU NAVIGATION BUTTONS
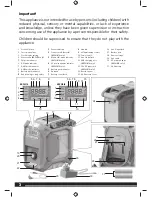
See page 8.
Use the menu navigation buttons to turn the product on and off,
control the volume, change frequencies, toggle between modes and
set the time.
Buttons and LCD display backlight will turn off after 15 seconds of
no operation.
SWITCHING THE PRODUCT ON AND OFF
Press the on/off button to switch the product on and off.
NOTE:
You may need to keep the button pressed for up to 3 seconds
before the product will turn on or off.
NOTE:
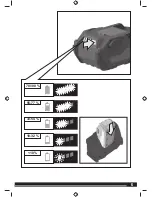
When the product is on and a battery pack is installed,
will be shown in the LCD display. If the battery charge is low,
will
be shown.
To help preserve battery power, the product will automatically enter
sleep mode approximately 1 hour after it is turned off. To exit sleep
mode and restart the product, you must press the on/off button.
MODE SELECTION
Ŷ
Press
to cycle through available modes.
There are four (BRFM18)/five (BRFMB18) modes to choose from:
Ŷ
FM mode
Ŷ
AM mode
Ŷ
AUX mode 1
Ŷ
AUX mode 2
Ŷ
BLUETOOH mode (BRFMB18 only)
ADJUSTING THE VOLUME
When the product is switched on, the product will return to the last
volume setting.
Ŷ
To increase the volume, turn the volume/tuning control clockwise.
Maximum volume value is 25.
Ŷ
To decrease the volume, turn the volume/tuning control
counterclockwise.
Ŷ
To mute the sound, press
. (BRFM18 only)
CAUTION
Do not use the product at maximum volume for an extended
period of time with the bass and treble at maximum levels. It could
cause damage to the speakers and/or amplifiers in the product.
FM TUNING
Use and , or the volume/tuning control to tune to the desired radio
frequency. The selected frequency is displayed on the LCD display.
To tune frequency automatically:
1. Briefly
press . The radio will seek station to lower frequencies
automatically.
2. Briefly
press . The radio will seek station to higher frequencies
automatically.
To tune frequency manually:
1. Briefly press the on/off button to enter frequency tuning. FM
indicator will flash.
2. Turn the volume/frequency control knob clockwise to increase
the frequency.
3. Turn the volume/frequency control knob counterclockwise to
decrease the frequency.
4. Briefly press the on/off button to exit frequency tuning. FM
indicator will stop flashing.
The radio will exit manual tuning after 5 seconds of no operation.
To decrease interference or electrical noise, adjust the position of the
antenna or move the product to a higher elevation.
NOTE
: Signal reception may drop due to electronic discharge. Tune
the radio or restart to improve signal reception.
AM TUNING
Use and , or the volume/frequency control knob to tune to the
desired radio frequency. The selected frequency is displayed on the
LCD display.
To tune frequency automatically:
1. Briefly
press . The radio will seek station to lower frequencies
automatically.
2. Briefly
press . The radio will seek station to higher frequencies
automatically.
To tune frequency manually:
1. Briefly press the on/off button to enter frequency tuning. AM
indicator will flash.
2. Turn the volume/frequency control knob clockwise to increase
the frequency.
3. Turn the volume/frequency control knob counterclockwise to
decrease the frequency.
4. Briefly press the on/off button to exit frequency tuning. AM
indicator will stop flashing.
The radio will exit manual tuning after 5 seconds of no operation.
To decrease interference or electrical noise, adjust the position of the
antenna or move the product to a higher elevation.
NOTE
: Signal reception may drop due to electronic discharge. Tune
the radio or restart to improve signal reception.
STORING A PRESET IN MEMORY
The memory feature saves up to 10 frequencies as presets in the
product’s memory. You can save up to 5 frequencies each for FM and
AM modes.
To store a frequency in memory:
1.
Tune to the desired FM or AM frequency.
2. Press and hold
until the preset position number flashes
on the screen.
3. Press or to choose a preset position number.
NOTE:
There are 5 preset positions for FM and 5 for AM. Only one
station can be saved in each preset position.
4. Press
again to store the frequency.
To tune to presets (FM or AM):
Ŷ
Press and release
to cycle through each preset position
number and its associated frequency.
Summary of Contents for BRFM18
Page 1: ...BRFM18 BRFMB18 Original instructions ...
Page 3: ...3 3 1 1 2 3 4 click 1 1 2 2 3 2 3 ...
Page 4: ...4 4 1 2 1 click 2 ...
Page 5: ...5 5 78 100 33 54 55 77 10 32 10 ...
Page 6: ...6 6 2 1 1 1 2 BRFM18 BRFMB18 2 BRFM18 BRFMB18 1 2 3 AUX1 mode For BRFMB18 ...
Page 7: ...7 7 AUX2 mode click 3 4 1 1 2 2 3 1 1 2 2 3 click AUX2 mode ...

