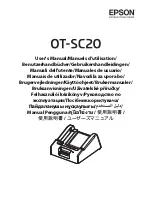
background image

FR

41

Phases de charge 

Tension « V »

charge de maintien

14.2

14.7

13.5

12

10.5

5.0 - 5.4A

3.4 - 4A

Chargeur automatique AG 1208 

1.5 - 2.0A

1.2 - 1.4A

<1A

13.7(v)

14.2 - 14.7(v)

13.5- 14.2(v)

13.0- 13.5(v)

10.5- 12.5(v)

Temps 

"

t

"

Courant de charge « A »

Tension « V »

charge de maintien

14.2

14.7

13.5

12

10.5

6.7 - 7A

4.5 - 5.7A

Chargeur automatique AG 1210 

3.2 - 4.0A

1.4 - 1.7A

<1A

13.7(v)

14.2 - 14.7(v)

13.5- 14.2(v)

13.0- 13.5(v)

10.5- 12.5(v)

Temps 

"

t

"

Courant de charge « A »

Summary of Contents for AG 1208

Page 1: ...17 FR 31 IT 47 CZ 61 SK 75 BEDIENUNGSANLEITUNG INSTRUCTIONS FOR USE MODE D EMPLOI MANUALE D ISTRUZIONI NÁVOD K OBSLUZE NÁVOD NA OBSLUHU AUTOMATIK LADEGERÄT AUTOMATIC CHARGING DEVICE CHARGEUR AUTOMATIQUE CARICABATTERIE AUTOMATICO AutomAtická nAbíječkA AutomAtická nAbíjAčkA ...

Page 2: ...17 FR 31 IT 47 CZ 61 SK 75 BEDIENUNGSANLEITUNG INSTRUCTIONS FOR USE MODE D EMPLOI MANUALE D ISTRUZIONI NÁVOD K OBSLUZE NÁVOD NA OBSLUHU AUTOMATIK LADEGERÄT AUTOMATIC CHARGING DEVICE CHARGEUR AUTOMATIQUE CARICABATTERIE AUTOMATICO AutomAtická nAbíječkA AutomAtická nAbíjAčkA ...

Page 3: ...présentes instructions avant toute utilisation de l appareil et suivre les conseils mentionnés ici IT Pagina 47 Leggere attentamente le istruzione i seguire tutti i consigli e gli avvisi prima di utilizzare il prodotto CZ Strana 61 Před použitim nabiječky si přečtěte tento navod Dodržujte všechny pokyny a doporučeni SK Strana 75 Pred použitim nabijačky si prečitajte tento navod Dodržujte všetky po...

Page 4: ...ische Daten 5 Sicherheit 6 Allgemeine Sicherheitshinweise 6 Sicherheitshinweise für Ladegeräte 7 Betrieb 10 Vor dem Aufladen einer Batterie 10 Batterie anschließen 10 Produktübersicht AG 1208 AG 1210 AG 1212 11 Betrieb 11 Ladephasen 12 Ladevorgang beenden 14 Reinigung Pflege und Wartung 14 Service 14 Entsorgung 15 Garantie und Service 15 DE ...

Page 5: ...n einge baut sind vorgesehen Das beinhaltet verschiedene Arten von Blei Säure Batterien wie Nassbatterien geschlossene Bleibatterien Flüssigelektrolyt Wartungsfreie Batterien und VRLA Batterien Blei Säure Batterien mit Überdruck ventil Gel Batterien geleeartiges Elektrolyt Das Ladegerät kann mit den Klemmen direkt an die Batterie angeschlossen werden Das Ladegerät ist nicht dafür vorgesehen andere...

Page 6: ...itte ebenfalls aus Lieferumfang Kontrollieren Sie unmittelbar nach dem Auspacken den Lieferumfang Prüfen Sie das Gerät sowie alle Teile auf Beschädigungen Nehmen Sie ein defektes Gerät oder Teile nicht in Betrieb 1 Automatik Ladegerät AG 1208 oder AG 1210 oder AG 1212 1 Bedienungsanleitung Technische Daten Modell AG 1208 AG 1210 AG 1212 Artikelnummer 97003 97004 97005 Max Ladestrom 8 A effektiv 10...

Page 7: ...ischen sensorischen oder geistigen Fähigkeiten oder mangels Erfahrung und oder mangels Wissen benutzt zu werden es sei denn sie werden durch eine für ihre Sicherheit zuständige Person beaufsichtigt oder erhielten von ihr Anweisungen wie das Gerät zu benutzen ist Kinder sollten beaufsichtigt werden um sicherzustellen dass sie nicht mit dem Gerät spielen Der Hersteller ist nicht verantwortlich für S...

Page 8: ...zu fahren Trennen Sie das Gerät immer vom Wechselstrom wenn Sie es nicht benutzen Trennen Sie das Gerät immer indem Sie den Netzstecker heraus ziehen aber niemals durch Abklemmen eines Anschlusskabels Wenn die Kabel durch scharfkantige Wände z B Metallwände geleitet wer den müssen verwenden Sie leere Schläuche oder Kabelkanäle um eine Beschä digung der Kabel zu vermeiden Legen Sie elektrische Kabe...

Page 9: ...ann die Funktion des Gerätes beeinträchtigt werden Vergewissern Sie sich immer dass das Gerät nicht an Wechselstrom ange schlossen ist wenn Sie es an eine Batterie anschließen und wenn Sie es von einer Batterie trennen Schließen Sie immer zuerst die positive Ladeklemme rot an den positiven Pol der Batterie an nicht mit der Karosserie des Autos verbunden markiert mit P oder Schließen Sie dann die n...

Page 10: ...it ätzender Batteriesäure Wenn Ihr Gesicht mit Batteriesäure in Kontakt kommt waschen Sie es gründlich unter fließendem Wasser und setzen Sie sich mit Ihrem Arzt in Verbindung Sollten Ihre Augen in Kontakt mit Batteriesäure kommen spülen Sie sie mindestens 5 Minuten lang mit fließendem Wasser und setzen Sie sich mit Ihrem Arzt in Verbindung Achten Sie immer auf die richtige Polarität wenn Sie das ...

Page 11: ...en des Herstellers in Bezug auf das Aufladen und die Ladegeschwindigkeit Batterie anschließen Stromschlaggefahr Vergewissern Sie sich immer dass das Ladegerät nicht an die 230 V Wechselstromsteckdose angeschlossen ist wenn Sie es an eine Batterie anschließen Stellen Sie sicher dass der Bereich um die Batterie herum während des Ladevor gangs gut belüftet ist 1 Schließen Sie die positive Ladeklemme ...

Page 12: ...hl Linke Position Blei Säure Batterien Rechte Position GEL Batterien Betrieb Ladevorgang starten Blei Säure Batterien Bevor die Batterie angeschlossen wird muss darauf geachtet werden dass sich der Schalter Batterieauswahl 9 in der Stellung Normal befindet Wählen Sie danach die Geschwindigkeit der Ladung mit dem Schalter Ladegeschwindigkeit 1 aus Wenn das Ladegerät richtig angeschlossen ist starte...

Page 13: ...dung mit dem Schalter Ladegeschwindigkeit 1 aus Wenn das Ladegerät richtig angeschlossen ist startet der Ladevorgang automatisch Dieser Vorgang wird durch die grüne Power LED 3 und die gelbe Charging LED 4 angezeigt Der Ladevorgang verläuft vollständig automatisch und ist abgeschlossen wenn die grüne LED Full 5 aufleuchtet Die Batterie ist nun zu 100 aufgeladen und kann vom Ladegerät getrennt werd...

Page 14: ...t AG 1210 3 2 4 0A 1 4 1 7A 1A 13 7 v 14 2 14 7 v 13 5 14 2 v 13 0 13 5 v 10 5 12 5 v Zeit t Ladestrom A Spannung V Laderhaltungsphase 14 2 14 7 13 5 12 10 5 7 4 8A 6 3 7A Automatik Ladegerät AG 1212 4 3 5 2A 1 8 2 7A 1A 13 7 v 14 2 14 7 v 13 5 14 2 v 13 0 13 5 v 10 5 12 5 v Zeit t Ladestrom A ...

Page 15: ...t Rollen Sie die Kabel ordentlich auf wenn Sie das Ladegerät lagern Das hilft versehentliche Beschädigungen der Kabel und des Ladegerätes zu vermeiden Gelegentliche Reinigung des Ladegerätes mit einem weichen Tuch erhält die Oberfläche glänzend und hilft dabei Korrosion zu verhindern Lagern Sie das Ladegerät an einem sauberen und trockenen Ort Service Lassen Sie das Gerät nur von qualifiziertem Fa...

Page 16: ...r verwendbares Produkt umweltgerecht entsprechend den örtlich geltenden Regelungen Garantie und Service Die allgemeinen Garantiebedingungen beziehen sich auf Produktions und Materi alfehler Bringen Sie ein fehlerhaftes Produkt zur Verkaufsstelle zurück Für eine zügige Bearbeitung Ihrer Reklamation benötigen Sie außerdem Kopie des Kassenzettels mit dem Kaufdatum Grund für die Reklamation Fehlerbesc...

Page 17: ...16 ...

Page 18: ...ntents 19 Technical data 19 Safety 20 General safety guidelines 20 Safety notices for chargers 21 Operation 23 Before charging batteries 23 Connecting the battery 24 Product overview AG 1208 AG 1210 AG 1212 24 Operating 25 Charging phases 26 End charging process 27 Cleaning care and service 28 Service 28 Warranty and Service 28 GB ...

Page 19: ...ies as installed in cars boats lorries and other vehicles This includes different types of lead acid batteries such as Wet batteries closed lead batteries liquid electrolyte Maintenance free batteries and VRLA batteries valve regulated lead acid batteries Gel batteries gelatinous electrolyte The charging device can be directly connected to the batteries using the clamps The charging devices is not...

Page 20: ...e all documentation Contents Please check the contents immediately after opening the package Check the device and all parts for damage Do not operate a defective device or parts 1 Automatic charging device AG 1208 or AG 1210 or AG 1212 1 Operating instructions Technical data Model AG 1208 AG 1210 AG 1212 Item number 97003 97004 97005 Max charging current 8 A effective 10 A effective 12 A effective...

Page 21: ...physical sensory or mental abilities or who lack experience and or knowledge unless they are supervised by a person who is responsible for their safety or unless they receive instructions from this person on how the equipment is to be used Child ren must be supervised in order to ensure that they do not play with the device The manufacturer is not responsible for damages caused by Improper connect...

Page 22: ... plug never by unclam ping a connecting cable If the cables need to be run through walls with sharp edges for example metal sheets use tubes or cable ducts to prevent damage to the cables Lay electrical cables in such a way that it is not possible to stumble over them thereby preven ting damage Never place the device over or close to the battery to be charged Gases from the battery make the charge...

Page 23: ...assis and then the battery connection Do not look at the battery when connecting the charger to the power supply Warning Never try to charge damaged non rechargeable or frozen batteries This charger is only suitable for the listed batteries maintenance free sealed lead acid batteries SLA or gel batteries and may not be used to charge non rechargeable NiCd or other types of batteries Do not use it ...

Page 24: ...hen the charger is disconnected from the mains OPERATION Before charging batteries If the battery must be removed from the vehicle before charging always discon nect the earthed connector from the battery first Also ensure all other loads in the vehicle are off Ensure adequate ventilation to allow any toxic vapours or gasses to disperse Ensure the battery poles are clean If the battery has a remov...

Page 25: ...ing clamp red to the positive battery terminal marked P or 2 Connect the negative charging clamp black to the body of the vehicle or in exceptions to the negative battery terminal marked N or 3 Verify both terminal clamps make good contact with the respective terminals 4 Plug the power plug into a suitable AC mains outlet In the event of reverse polarity the Polarity LED will light up red Charging...

Page 26: ...will automatically start charging this process is indicated by the Power LED green 3 and the charging LED yellow 4 The charging process is completely automatic and completed when the green FULL LED 5 lights up The battery is now charged to 100 and can be disconnected from the charging device Start charging GEL batteries Before connecting the battery be sure the battery selector switch 9 is set to ...

Page 27: ... AG 1208 1 5 2 0A 1 2 1 4A 1A 13 7 v 14 2 14 7 v 13 5 14 2 v 13 0 13 5 v 10 5 12 5 v Time t Charging current A Voltage V maintenance charge 14 2 14 7 13 5 12 10 5 6 7 7A 4 5 5 7A Automatic Charging Device AG 1210 3 2 4 0A 1 4 1 7A 1A 13 7 v 14 2 14 7 v 13 5 14 2 v 13 0 13 5 v 10 5 12 5 v Time t Charging current A ...

Page 28: ...m the negative battery terminal marked N or 3 Disconnect the positive charging clamp red from the positive battery terminal marked P or Voltage V maintenancecharge 14 2 14 7 13 5 12 10 5 7 4 8A 6 3 7A Automatic Charging Device AG 1212 4 3 5 2A 1 8 2 7A 1A 13 7 v 14 2 14 7 v 13 5 14 2 v 13 0 13 5 v 10 5 12 5 v Time t Charging current A ...

Page 29: ...lified technical personnel should change the plug or the connecting cables This will guarantee the safety of the device is maintained If the product is no longer suitable for use dispose of it in an environmentally friendly manner in accordance with your local ordinances Disposal Do not dispose of packaging or the product through your household waste The product and packaging are made from recycla...

Page 30: ...GB 29 ...

Page 31: ...30 ...

Page 32: ...ÉCURITÉ 34 Consignes generales de sécurité 34 Consignes de sécurité spécifiques aux chargeurs 35 Fonctionnement 38 Avant la charge d une batterie 38 Brancher la batterie 38 Aperçu du produit AG 1208 AG 1210 AG 1212 39 Fonctionnement 40 Phases de charge 41 Terminer le processus de charge 42 Nettoyage entretien et maintenance 43 Service 43 Traitement des déchets 43 Garantie et service 44 FR ...

Page 33: ...ue celles des voitures des bateaux des poids lourds et autres véhicules Cela comprend différents types de batteries plomb acide tels que Batteries humides batteries plomb fermées électrolyte liquide Batteries sans maintenance et batteries VRLA batteries plomb acide avec clapet de décharge Batterie Gel électrolyte sous forme de gel L appareil peut être branché avec des pinces directement à la batte...

Page 34: ...rôlez immédiatement le contenu de l emballage après avoir déballé l appareil Contrôlez l appareil ainsi que toutes les pièces du point de vue d éventuels dom mages Ne mettez pas en marche un appareil ou des pièces défectueux 1 chargeur automatique AG 1208 ou AG 1210 ou AG 1212 1 notice d utilisation Caractéristiques techniques Modèle AG 1208 AG 1210 AG 1212 Référence 97003 97004 97005 Max Courant ...

Page 35: ... à être utilisé par des personnes notamment des enfants dont les capacités physiques sensorielles ou mentales sont limitées ou qui ne possèdent pas d expérience et ou de connaissances dans le domaine à moins qu elles soient surveillées par une personne responsable de leur sécurité ou qu elles reçoivent des instructions quant à la manière d utiliser cet appareil Il faut surveiller les enfants afin ...

Page 36: ...e le véhicule en marche Débranchez toujours l appareil du courant alternatif en cas de non utilisation Déconnectez toujours l appareil en le débranchant de la prise de courant mais jamais en déconnectant un câble de connexion Si les câbles doivent passer sur des murs présentant des arrêtes vives par exemple des cloisons en métal il est impératif d utiliser des tuyaux flexibles vides ou des conduit...

Page 37: ...z qu elle concorde avec la tension du réseau Dans le cas contraire le fonctionnement de l appareil pour rait être compromis Veillez toujours à ce que l appareil ne soit pas connecté au réseau électrique au moment où vous connectez la batterie et lorsque vous la déconnectez Branchez toujours la pince positive du chargeur rouge en premier au pôle positif de la batterie non relié à la carrosserie du ...

Page 38: ...ec l acide caustique présent dans la batterie En cas de contact du visage avec de l acide provenant de la batterie rincez vous abondamment sous l eau courante et consultez un médecin En cas de contact des yeux avec l acide provenant de la batterie rincez les pendant au moins 5 minutes sous l eau courante et consultez un médecin Veillez à toujours respecter la polarité lors du raccordement de l app...

Page 39: ... aux instructions du fabricant relatives à la charge et à la vitesse maximale de charge Brancher la batterie Risque de choc électrique Assurez vous toujours que le chargeur n est pas branché à une pise de courant alternatif 230 V lorsque vous le brancher à une batterie Assurez vous que la zone autour de la batterie est bien ventilée pendant le processus de charge 1 Connectez la pince positive roug...

Page 40: ...rapide 2 LED rouge POLARITY 3 LED verte POWER 4 LED jaune CHARGING 5 LED verte FULL 6 Câble de charge avec pince de charge noire 7 Câble de charge avec pince de charge rouge 8 Câble secteur avec fiche secteur 9 Commutateur sélection de la batterie Position gauche Batteries plomb acide Position droite Batteries GEL 9 1 5 2 3 4 6 7 8 ...

Page 41: ...é lorsque la LED verte Full 5 s allume La batterie est maintenant chargée à 100 et peut être débranchée du chargeur Démarrer le processus de charge batteries GEL Avant de brancher la batterie il faut veiller à ce que le commutateur de sélection de la batterie 9 se trouve en position GEL Sélectionnez ensuite la vitesse de charge avec le commutateur de vitesse de charge 1 Lorsque le chargeur est cor...

Page 42: ... AG 1208 1 5 2 0A 1 2 1 4A 1A 13 7 v 14 2 14 7 v 13 5 14 2 v 13 0 13 5 v 10 5 12 5 v Temps t Courant de charge A Tension V charge de maintien 14 2 14 7 13 5 12 10 5 6 7 7A 4 5 5 7A Chargeur automatique AG 1210 3 2 4 0A 1 4 1 7A 1A 13 7 v 14 2 14 7 v 13 5 14 2 v 13 0 13 5 v 10 5 12 5 v Temps t Courant de charge A ...

Page 43: ...ture dans des cas exceptionnels du pôle négatif de la batterie marqué avec N ou 3 Séparez la pince positive rouge du pôle positif de la batterie marqué avec P ou Tension V charge de maintien 14 2 14 7 13 5 12 10 5 7 4 8A 6 3 7A Chargeur automatique AG 1212 4 3 5 2A 1 8 2 7A 1A 13 7 v 14 2 14 7 v 13 5 14 2 v 13 0 13 5 v 10 5 12 5 v Temps t Courant de charge A ...

Page 44: ...ujours l appareil dans un endroit propre et sec Service Faites réparer l appareil uniquement par du personnel technique qualifié De cette manière vous assurerez et préserverez la sécurité de l appareil Attention Faites toujours remplacer le connecteur ou le câble de connexion par du personnel technique qualifié De cette manière vous assurerez et préserverez la sécurité de l appareil Ne plus utilis...

Page 45: ...x défauts de production et de matériau Rapportez un produit défectueux à votre magasin Nous nécessitons en plus les pièces suivantes pour un traitement rapide de votre réclamation Copie du ticket de caisse avec la date d achat Raison de la réclamation description de l erreur ...

Page 46: ...FR 45 ...

Page 47: ...46 ...

Page 48: ...A 50 Indicationi di sicurezza generali 50 Istruzioni di sicurezza per i caricabatterie 51 Funzionamento 54 Prima del processo di carica 54 Collegare la batteria 54 Descrizione dei prodotti AG 1208 AG 1210 AG 1212 55 Funzionamento 55 Fasi di carica 56 Fine del processo di carica 58 Pulizia cura e manutenzione 58 Assistenza 58 Smaltimento 58 Garanzia e servizio di assistenza 59 IT ...

Page 49: ...e quelle utilizzate per auto imbarcazioni camion e altri veicoli Rientrano in questa categoria molte batterie al piombo acido come Batterie bagnate batterie chiuse al piombo elettroliti fluidi Batterie senza manutenzione e batterie VRLA batterie al piombo acido con valvola limitatrice di pressione Batterie a gel elettroliti gelatinosi L apparecchio può essere collegato con i morsetti direttamente ...

Page 50: ...o aver aperto l imballaggio Accertarsi che l apparecchio e le sue componenti non siano danneggiate Non utilizzare l apparecchio se è difettoso o se alcune componenti sono difettose 1 caricabatterie automatico AG 1212 o AG 1210 o AG 1212 1 istruzioni Dati tecnici Modello AG 1208 AG 1210 AG 1212 Numero articolo 97003 97004 97005 Corrente max di carica 8 A effettivi 10 A effettivi 12 A effettivi Tens...

Page 51: ...rogettato per essere utilizzato da persone compresi i bambini con capacità fisiche psichiche sensoriali e intel lettuali ridotte oppure senza esperienza e o senza conoscenze adeguate a meno che essi non siano sotto il controllo di una persona competente oppure ricevano da essa indicazioni su come utilizzare il dispositivo I bambini dovrebbero essere sorvegliati per evitare che giochino con il disp...

Page 52: ... il dispositivo dalla corrente alternata se non lo si utilizza Scollegare sempre il dispositivo dall alimentazione di rete staccando la spina e mai staccando i morsetti di un cavo di collegamento Se il cavo dovesse essere fatto passare attraverso pareti con angoli vivi per es pareti di metallo utilizzare tubi cavi o le apposite canaline per evitare il dann eggiamento del cavo stesso Posizionare i ...

Page 53: ...uando lo si collega a una batteria o quando lo si scollega da essa Collegare sempre prima il morsetto positivo rosso al polo positivo della batte ria non collegato con la carrozzeria dell auto marcato P o Collegare poi il morsetto negative nero alla carrozzeria dell auto lontano dall alloggiamento della batteria dalla batteria e dal tubo del carburante Solo a questo punto il caricabatteria può ess...

Page 54: ...pre attenzione alla corretta polarità quando si collega il dispositivo a una batteria Questo caricabatteria non è stato costruito per la distribuzione di energia elettrica a caravan Questo caricabatteria non è stato progettato come un accessorio da installare nel veicolo Pericolo di ESPLOSIONE Durante la carica potrebbe verificarsi la formazione di bolle a causa della fuoriuscita di gas Tale gas è...

Page 55: ...e attenersi alle indicazioni del produttore per quanto riguarda il processo di carica e la velocità massima di carica Collegare la batteria Pericolo di folgorazione Accertarsi sempre che l apparecchio non sia collegato ad una presa di corrente alternata 230V quando lo collegate a una batteria Assicurarsi che l area attorno alla batteria sia ben ventilata 1 Collegare il morsetto positivo rosso al p...

Page 56: ...scelta batterie Posizione sinistra batterie al piombo acido Posizione destra batterie a gel Funzionamento Inizio processo di carica batterie al piombo acido Prima di collegare il caricabatterie prestare attenzione a che l interruttore scelta batterie 9 si trovi nella posizione normale In seguito selezionare la velocità di carica con l interruttore velocità di carica 1 Quando l apparecchio è colleg...

Page 57: ...uttore velocità di carica 1 Quando l apparecchio è collegato correttamen te il processo di carica comincia automaticamente Questo processo viene indicato dal Power LED 3 verde e dal Charging LED 4 giallo Il processo di carica procede in modo completamente automatico e termina quando il LED verde Full 5 s illumina La batteria sarà quindi carica al 100 e l apparecchio potrà essere scollegato Fasi di...

Page 58: ...0 3 2 4 0A 1 4 1 7A 1A 13 7 v 14 2 14 7 v 13 5 14 2 v 13 0 13 5 v 10 5 12 5 v Tempo t Corrente di carica Tensione V carica di mantenimento 14 2 14 7 13 5 12 10 5 7 4 8A 6 3 7A Caricabatterie automatico AG 1212 4 3 5 2A 1 8 2 7A 1A 13 7 v 14 2 14 7 v 13 5 14 2 v 13 0 13 5 v 10 5 12 5 v Tempo t Corrente di carica ...

Page 59: ...ibuirà a evitare danni accidentali ai cavi e al caricabatteria La saltuaria pulizia del caricabatteria con un panno mantiene lucida la superfi cie e aiuta a evitare la corrosione Conservare il caricabatteria in un luogo pulito e asciutto Assistenza Far riparare il dispositivo solo da personale qualificato in modo da mantenere integra la sicurezza del dispositivo Attenzione Far sostituire la spina ...

Page 60: ...di garanzia si riferiscono a difetti di produzione e del materiale Riportate al punto vendita il prodotto difettato Per una veloce elaborazione del vostro reclamo necessitate di copia della ricevuta con la data di acquisto motivo del reclamo descrizione del difetto ...

Page 61: ...60 ...

Page 62: ...ická data 63 bezpečnost 64 Všeobecné bezpečnostní pokyny 64 bezpečnostní pokyny týkající se nabíječek 65 Provoz 68 Před nabíjením baterie 68 Připojení na baterii 68 Popis nabíječky AG 1208 AG 1210 AG 1212 69 Provoz nabíječky 70 Fáze nabíjení 70 ukončení nabíjení 72 čištění péče a údržba 72 Servis 72 Likvidace 73 Garance a servis 73 CZ ...

Page 63: ...h pro automobily lodě nákladní auta a jiná vozidla nebo do nich vestavěných toto zahrnuje různé druhy kyselino olovnatých baterií jako jsou mokré baterie uzavřené olovnaté baterie s tekutým elektrolytem bezúdržbové baterie a VRLA baterie kyselino olovnaté s přetlakovým ventilem gelové baterie se želatinovým elektrolytem nabíječku je možné připojit svorkami přímo na baterii nabíječka není určena k ...

Page 64: ... kontrolujte ihned po rozbalení obsah dodávky Zkontrolujte jestli nejsou nabíječka nebo její díly poškozené Vadnou nabíječku nebo poškozené díly neuvádějte do provozu 1 automatická nabíječka AG 1208 nebo AG 1210 nebo AG 1212 1 návod k obsluze Technická data model AG 1208 AG 1210 AG 1212 číslo artiklu 97003 97004 97005 maximální nabíjecí proud 8 A efektivní 10 A efektivní 12 A efektivní napětí bate...

Page 65: ...ně dětí s ome zenými fyzickými senzorickými nebo duševními schopnostmi nebo bez zkušeností a nebo znalostí s výjimkou případu kdy jsou pod dozorem osoby zodpovědné za jejich bezpečnost nebo když byly touto osobou poučeny o způsobu použití zařízení Děti musí být pod dohledem aby se zaručilo že si nebudou hrát se zařízením Výrobce neponese žádnou odpovědnost za škody způsobené nesprávným připojením ...

Page 66: ...du odmontujte všechny kabely zařízení z akumulátoru dříve než budete zkoušet řídit vaše vozidlo když zařízení nepoužíváte pokaždé jej odpojte od střídavého prou du Pokaždé odpojujte zařízení odpojením napájecího kabelu a nikdy ne odpojením svorek spojovacího kabelu když je třeba vést kabely přes stěny s ostrými hranami například kovové stěny použijte prázdné trubky nebo kabelové potrubí aby se pře...

Page 67: ...zením Zkontrolujte vstupní napětí 230 V a zajistěte že odpovídá napětí elektrické sítě V opačném případě by mohlo dojít k zabránění využití funkce zařízení Pokaždé se ujistěte že zařízení není připojeno ke střídavému proudu když jej připojujete a odpojujete Pokaždé připojte kladnou napájecí svorku červenou ke klad nému pólu akumulátoru který není připojený ke kostře vozidla a je označený P nebo Po...

Page 68: ...ulátoru když přijdete do styku s kyselinou akumulátoru důkladně ji opláchněte pod tekoucí vodou a vyhledejte lékařskou pomoc V případě styku očí s kyselinou akumulátoru si vypláchněte oči pod tekoucí vodou nejméně po dobu pěti minut a vyhledejte lékařskou pomoc Při každém připojování zařízení k akumulátoru věnujte pozornost dodržení správné polarity tato nabíječka nebyla navržena pro distribuci el...

Page 69: ...ální doby nabíjení Připojení na baterii Nebezpečí zásahu elektrickým proudem Při připojování nabíječky na baterii se nejdříve ujistěte že není nabíječka připojená na přívod elektrického proudu s napětím 230 V Zajistěte aby byl prostor kolem baterie během nabíjení dostatečně větraný 1 Připojte kladnou svorku červenou na kladný pól baterie značený písmenem P nebo 2 Připojte zápornou svorku černou na...

Page 70: ...poloha rychlé nabíjení 2 LeD červená PoLARitY 3 LeD zelená PoWeR 4 LeD žlutá cHARGinG 5 LeD zelená FuLL 6 nabíjecí kabel se svorkou černá 7 nabíjecí kabel se svorkou červená 8 Přívodní kabel se zástrčkou 9 Volič druhu baterie Levá poloha kyselino olovnaté baterie Pravá poloha gelové baterie 9 1 5 2 3 4 6 7 8 ...

Page 71: ...abíječky Start nabíjení gelové baterie Před připojením baterie je třeba dbát na to aby byl volič druhu baterie 9 v poloze GeL Zvolte rychlost nabíjení příslušným voličem 1 Při správně zapojené nabíječce začíná nabíjení automaticky tento proces se znázorňuje kontrolkou Power LeD zelená 3 a charging LeD žlutá 4 nabíjení probíhá plně automaticky a po ukončení se rozsvítí zelená kontrolka LeD Full 5 b...

Page 72: ... 1210 3 2 4 0A 1 4 1 7A 1A 13 7 v 14 2 14 7 v 13 5 14 2 v 13 0 13 5 v 10 5 12 5 v Čas t Nabíjecí proud A Napětí V udržovacího nabíjení 14 2 14 7 13 5 12 10 5 7 4 8A 6 3 7A Automatická nabíječka AG 1212 4 3 5 2A 1 8 2 7A 1A 13 7 v 14 2 14 7 v 13 5 14 2 v 13 0 13 5 v 10 5 12 5 v Čas t Nabíjecí proud A ...

Page 73: ...kutinu akumulátoru která by mohla přijít do styku se svorkami Při uskladnění nabíječky správně sviňte kabely Pomůžete tím předejít poškození kabelu i nabíječky Příležitostné čištění pláště nabíječky jemným hadrem udržuje povrch v čistém stavu a zabraňuje korozi nabíječku uskladněte na čistém a suchém místě Servis opravu zařízení svěřte kvalifikovanému technickému personálu bude tím zaručena a zach...

Page 74: ...ujte více nepoužitelný výrobek způsobem odpovídajícím životnímu prostředí a místním ustanovením Garance a servis Všeobecné garanční podmínky se vztahují na defekty výrobku a materiá lu Přineste zpět vadný výrobek prodejci Pro rychlé zpracování Vaší reklamace potřebujete kromě toho kopii účtenky s datumem Důvod reklamace popis závady ...

Page 75: ...74 ...

Page 76: ... 77 beZPečnoSŤ 78 Všeobecné bezpečnostné pokyny 78 bezpečnostné pokyny týkajúce sa nabíjačiek 79 Prevádzka 82 Pred nabíjaním batérie 82 Pripojenie batérie 82 Prehľad o produkte AG 1208 AG 1210 AG 1212 83 Prevádzka nabíjačky 84 Fázy nabíjania 84 ukončenie nabíjania 86 čištění péče a údržba 86 Servis 86 Likvidace 87 Garance a servis 87 SK ...

Page 77: ...h nákladných automobiloch a iných vozidlách tu patria rôzne druhy olovo kyselinových batérií ako batérie naplnené kvapalinou zatvorené batérie tekutý elektrolyt bezúdržbové batérie a VRLA batérie olovo kyselinové batérie s pretlakovým ventilom Gélové batérie gélovitý elektrolyt nabíjačka sa môže pomocou svoriek napojiť priamo na batériu nabíjačka nie je určená na nabíjanie iných druhov batérií nab...

Page 78: ...h obsah balenia skontrolujte ihneď po jeho vybalení Zariadenie a všetky jeho časti skontrolujte či nie je nič poškodené Ak zistíte že zariadenie alebo jeho časti sú poškodené nepoužite ho 1 automatická nabíjačka AG 1208 alebo AG 1210 alebo AG 1212 1 návod na obsluhu Technické údaje model AG 1208 AG 1210 AG 1212 číslo artikla 97003 97004 97005 max nabíjací prúd 8 A efektívny 10 A efektívny 12 A efe...

Page 79: ...nemali používať osoby vrátane detí s obmedzenými fyzickými zmyslovými alebo duševnými schopnosťami alebo osoby bez skúseností a alebo znalostí ak nie sú pod dozorom osoby zodpovednej za ich bezpečnosť alebo ak neboli touto osobou poučené o spôsobe použitia zariadenia Deti musia byť pod dohľadom aby sa zaručilo že sa nebudú so zariadením hrať Výrobca neponesie žiadnu zodpovednosť za škody spôsobené...

Page 80: ...jte všetky káble zariadenia z akumulátora skôr ako budete skúšať riadiť vaše vozidlo keď zariadenie nepoužívate vždy ho odpojte od striedavého prúdu Vždy odpájajte zariadenie odpojením napájacieho kábla a nikdy nie odpojením svoriek spojovacieho kábla keď je potrebné viesť káble ponad steny s ostrými hranami napríklad kovové steny použite prázdne rúrky alebo káblové potrubia aby ste nepoškodili ká...

Page 81: ...ie 230 V a zabezpečte aby odpovedalo napätiu elektrickej siete V opačnom prípade by mohlo dôjsť k zabrá neniu využitia funkcie zariadenia keď zariadenie pripájate a odpájate vždy sa uistite že zariadenie nie je pripojené k striedavému prúdu Vždy pripájajte kladnú napájaciu svorku červenú ku kladnému pólu akumulátora ktorý nie je pripojený ku kostre vozidla a je označený P alebo následne pripojte z...

Page 82: ...tyku so žieravou kyselinou akumulátora keď prídete do styku s kyselinou akumulátora dôkladne ju opláchnite pod tečúcou vodou a vyhľadajte lekársku pomoc V prípade styku očí s kyselinou akumulátora si opláchnite oči pod tečúcou vodou najme nej po dobu piatich minút a vyhľadajte lekársku pomoc Pri každom pripájaní zariadenia k akumulátoru dodržte správnu polaritu táto nabíjačka nebola navrhnutá pre ...

Page 83: ...losť nabíjania Pripojenie batérie Nebezpečenstvo zasiahnutia elektrickým prúdom keď pripájate svorky nabíjačky na batériu dajte pozor aby nabíjačka nebola zapojená do siete so striedavým prúdom pod napätím 230 V Zabezpečte aby bolo okolie počas nabíjania batérie dobre vetrané 1 kladnú svorku červená pripojte na kladný pól batérie označený písmenom P alebo znamienkom 2 Zápornú svorku čierna pripojt...

Page 84: ...ontrolka PoLA RitA 3 Zelená LeD kontrolka PoWeR 4 Žltá LeD kontrolka cHARGinG batéria sa nabíja 5 Zelená LeD kontrolka FuLL batéria je úplne nabitá 6 nabíjací kábel so svorkou čierna 7 nabíjací kábel so svorkou červená 8 Sieťový kábel so zástrčkou 9 Vypínač pre voľbu batérie Poloha vľavo olovo kyselinové batérie Poloha vpravo GéLoVé batérie 9 1 5 2 3 4 6 7 8 ...

Page 85: ...nabíjačky Spustenie procesu nabíjania GÉLOVÉ batérie Skôr ako pripojíte batériu dajte pozor na to aby bol vypínač pre voľbu batérie 9 v polohe GeL Vypínačom pre rýchlosť nabíjania 1 potom zvoľte rýchlosť nabíjania Ak je nabíjačka pripojená správne nabíjanie prebehne automaticky tento proces je indikovaný LeD kontrolkou Power zelená 3 a LeD kontrolkou charging žltá 4 Proces nabíjania prebieha celko...

Page 86: ...G 1210 3 2 4 0A 1 4 1 7A 1A 13 7 v 14 2 14 7 v 13 5 14 2 v 13 0 13 5 v 10 5 12 5 v Čas t Nabíjací prúd A Napätie V udržiavacie nabíjanie 14 2 14 7 13 5 12 10 5 7 4 8A 6 3 7A Automatická nabíjačka AG 1212 4 3 5 2A 1 8 2 7A 1A 13 7 v 14 2 14 7 v 13 5 14 2 v 13 0 13 5 v 10 5 12 5 v Čas t Nabíjací prúd A ...

Page 87: ...ekutinu akumulátoru která by mohla přijít do styku se svorkami Při uskladnění nabíječky správně sviňte kabely Pomůžete tím předejít poškození kabelu i nabíječky Příležitostné čištění pláště nabíječky jemným hadrem udržuje povrch v čistém stavu a zabraňuje korozi nabíječku uskladněte na čistém a suchém místě Servis opravu zařízení svěřte kvalifikovanému technickému personálu bude tím zaručena a zac...

Page 88: ...ujte více nepoužitelný výrobek způsobem odpovídajícím životnímu prostředí a místním ustanovením Garance a servis Všeobecné garanční podmínky se vztahují na defekty výrobku a materiá lu Přineste zpět vadný výrobek prodejci Pro rychlé zpracování Vaší reklamace potřebujete kromě toho kopii účtenky s datumem Důvod reklamace popis závady ...

Page 89: ...GmbH co industriestr 31 cH 8112 otelfingen SPA Systems s r o Pod Višňovkou 1661 37 140 00 Praha 4 krč česká republika www aeg automotive com AeG is a registered trademark used under license from Ab electrolux publ Stand der informationen 5 2012 eAn 4038373970039 4038373970046 4038373970053 ...

Page 90: ...présentes instructions avant toute utilisation de l appareil et suivre les conseils mentionnés ici IT Pagina 47 Leggere attentamente le istruzione i seguire tutti i consigli e gli avvisi prima di utilizzare il prodotto CZ Strana 61 Před použitim nabiječky si přečtěte tento navod Dodržujte všechny pokyny a doporučeni SK Strana 75 Pred použitim nabijačky si prečitajte tento navod Dodržujte všetky po...

Page 91: ...ische Daten 5 Sicherheit 6 Allgemeine Sicherheitshinweise 6 Sicherheitshinweise für Ladegeräte 7 Betrieb 10 Vor dem Aufladen einer Batterie 10 Batterie anschließen 10 Produktübersicht AG 1208 AG 1210 AG 1212 11 Betrieb 11 Ladephasen 12 Ladevorgang beenden 14 Reinigung Pflege und Wartung 14 Service 14 Entsorgung 15 Garantie und Service 15 DE ...

Page 92: ...n einge baut sind vorgesehen Das beinhaltet verschiedene Arten von Blei Säure Batterien wie Nassbatterien geschlossene Bleibatterien Flüssigelektrolyt Wartungsfreie Batterien und VRLA Batterien Blei Säure Batterien mit Überdruck ventil Gel Batterien geleeartiges Elektrolyt Das Ladegerät kann mit den Klemmen direkt an die Batterie angeschlossen werden Das Ladegerät ist nicht dafür vorgesehen andere...

Page 93: ...itte ebenfalls aus Lieferumfang Kontrollieren Sie unmittelbar nach dem Auspacken den Lieferumfang Prüfen Sie das Gerät sowie alle Teile auf Beschädigungen Nehmen Sie ein defektes Gerät oder Teile nicht in Betrieb 1 Automatik Ladegerät AG 1208 oder AG 1210 oder AG 1212 1 Bedienungsanleitung Technische Daten Modell AG 1208 AG 1210 AG 1212 Artikelnummer 97003 97004 97005 Max Ladestrom 8 A effektiv 10...

Page 94: ...ischen sensorischen oder geistigen Fähigkeiten oder mangels Erfahrung und oder mangels Wissen benutzt zu werden es sei denn sie werden durch eine für ihre Sicherheit zuständige Person beaufsichtigt oder erhielten von ihr Anweisungen wie das Gerät zu benutzen ist Kinder sollten beaufsichtigt werden um sicherzustellen dass sie nicht mit dem Gerät spielen Der Hersteller ist nicht verantwortlich für S...

Page 95: ...zu fahren Trennen Sie das Gerät immer vom Wechselstrom wenn Sie es nicht benutzen Trennen Sie das Gerät immer indem Sie den Netzstecker heraus ziehen aber niemals durch Abklemmen eines Anschlusskabels Wenn die Kabel durch scharfkantige Wände z B Metallwände geleitet wer den müssen verwenden Sie leere Schläuche oder Kabelkanäle um eine Beschä digung der Kabel zu vermeiden Legen Sie elektrische Kabe...

Page 96: ...ann die Funktion des Gerätes beeinträchtigt werden Vergewissern Sie sich immer dass das Gerät nicht an Wechselstrom ange schlossen ist wenn Sie es an eine Batterie anschließen und wenn Sie es von einer Batterie trennen Schließen Sie immer zuerst die positive Ladeklemme rot an den positiven Pol der Batterie an nicht mit der Karosserie des Autos verbunden markiert mit P oder Schließen Sie dann die n...

Page 97: ...it ätzender Batteriesäure Wenn Ihr Gesicht mit Batteriesäure in Kontakt kommt waschen Sie es gründlich unter fließendem Wasser und setzen Sie sich mit Ihrem Arzt in Verbindung Sollten Ihre Augen in Kontakt mit Batteriesäure kommen spülen Sie sie mindestens 5 Minuten lang mit fließendem Wasser und setzen Sie sich mit Ihrem Arzt in Verbindung Achten Sie immer auf die richtige Polarität wenn Sie das ...

Page 98: ...en des Herstellers in Bezug auf das Aufladen und die Ladegeschwindigkeit Batterie anschließen Stromschlaggefahr Vergewissern Sie sich immer dass das Ladegerät nicht an die 230 V Wechselstromsteckdose angeschlossen ist wenn Sie es an eine Batterie anschließen Stellen Sie sicher dass der Bereich um die Batterie herum während des Ladevor gangs gut belüftet ist 1 Schließen Sie die positive Ladeklemme ...

Page 99: ...hl Linke Position Blei Säure Batterien Rechte Position GEL Batterien Betrieb Ladevorgang starten Blei Säure Batterien Bevor die Batterie angeschlossen wird muss darauf geachtet werden dass sich der Schalter Batterieauswahl 9 in der Stellung Normal befindet Wählen Sie danach die Geschwindigkeit der Ladung mit dem Schalter Ladegeschwindigkeit 1 aus Wenn das Ladegerät richtig angeschlossen ist starte...

Page 100: ...dung mit dem Schalter Ladegeschwindigkeit 1 aus Wenn das Ladegerät richtig angeschlossen ist startet der Ladevorgang automatisch Dieser Vorgang wird durch die grüne Power LED 3 und die gelbe Charging LED 4 angezeigt Der Ladevorgang verläuft vollständig automatisch und ist abgeschlossen wenn die grüne LED Full 5 aufleuchtet Die Batterie ist nun zu 100 aufgeladen und kann vom Ladegerät getrennt werd...

Page 101: ...t AG 1210 3 2 4 0A 1 4 1 7A 1A 13 7 v 14 2 14 7 v 13 5 14 2 v 13 0 13 5 v 10 5 12 5 v Zeit t Ladestrom A Spannung V Laderhaltungsphase 14 2 14 7 13 5 12 10 5 7 4 8A 6 3 7A Automatik Ladegerät AG 1212 4 3 5 2A 1 8 2 7A 1A 13 7 v 14 2 14 7 v 13 5 14 2 v 13 0 13 5 v 10 5 12 5 v Zeit t Ladestrom A ...

Page 102: ...t Rollen Sie die Kabel ordentlich auf wenn Sie das Ladegerät lagern Das hilft versehentliche Beschädigungen der Kabel und des Ladegerätes zu vermeiden Gelegentliche Reinigung des Ladegerätes mit einem weichen Tuch erhält die Oberfläche glänzend und hilft dabei Korrosion zu verhindern Lagern Sie das Ladegerät an einem sauberen und trockenen Ort Service Lassen Sie das Gerät nur von qualifiziertem Fa...

Page 103: ...r verwendbares Produkt umweltgerecht entsprechend den örtlich geltenden Regelungen Garantie und Service Die allgemeinen Garantiebedingungen beziehen sich auf Produktions und Materi alfehler Bringen Sie ein fehlerhaftes Produkt zur Verkaufsstelle zurück Für eine zügige Bearbeitung Ihrer Reklamation benötigen Sie außerdem Kopie des Kassenzettels mit dem Kaufdatum Grund für die Reklamation Fehlerbesc...

Page 104: ...16 ...

Page 105: ...ntents 19 Technical data 19 Safety 20 General safety guidelines 20 Safety notices for chargers 21 Operation 23 Before charging batteries 23 Connecting the battery 24 Product overview AG 1208 AG 1210 AG 1212 24 Operating 25 Charging phases 26 End charging process 27 Cleaning care and service 28 Service 28 Warranty and Service 28 GB ...

Page 106: ...ies as installed in cars boats lorries and other vehicles This includes different types of lead acid batteries such as Wet batteries closed lead batteries liquid electrolyte Maintenance free batteries and VRLA batteries valve regulated lead acid batteries Gel batteries gelatinous electrolyte The charging device can be directly connected to the batteries using the clamps The charging devices is not...

Page 107: ...e all documentation Contents Please check the contents immediately after opening the package Check the device and all parts for damage Do not operate a defective device or parts 1 Automatic charging device AG 1208 or AG 1210 or AG 1212 1 Operating instructions Technical data Model AG 1208 AG 1210 AG 1212 Item number 97003 97004 97005 Max charging current 8 A effective 10 A effective 12 A effective...

Page 108: ...physical sensory or mental abilities or who lack experience and or knowledge unless they are supervised by a person who is responsible for their safety or unless they receive instructions from this person on how the equipment is to be used Child ren must be supervised in order to ensure that they do not play with the device The manufacturer is not responsible for damages caused by Improper connect...

Page 109: ... plug never by unclam ping a connecting cable If the cables need to be run through walls with sharp edges for example metal sheets use tubes or cable ducts to prevent damage to the cables Lay electrical cables in such a way that it is not possible to stumble over them thereby preven ting damage Never place the device over or close to the battery to be charged Gases from the battery make the charge...

Page 110: ...assis and then the battery connection Do not look at the battery when connecting the charger to the power supply Warning Never try to charge damaged non rechargeable or frozen batteries This charger is only suitable for the listed batteries maintenance free sealed lead acid batteries SLA or gel batteries and may not be used to charge non rechargeable NiCd or other types of batteries Do not use it ...

Page 111: ...hen the charger is disconnected from the mains OPERATION Before charging batteries If the battery must be removed from the vehicle before charging always discon nect the earthed connector from the battery first Also ensure all other loads in the vehicle are off Ensure adequate ventilation to allow any toxic vapours or gasses to disperse Ensure the battery poles are clean If the battery has a remov...

Page 112: ...ing clamp red to the positive battery terminal marked P or 2 Connect the negative charging clamp black to the body of the vehicle or in exceptions to the negative battery terminal marked N or 3 Verify both terminal clamps make good contact with the respective terminals 4 Plug the power plug into a suitable AC mains outlet In the event of reverse polarity the Polarity LED will light up red Charging...

Page 113: ...will automatically start charging this process is indicated by the Power LED green 3 and the charging LED yellow 4 The charging process is completely automatic and completed when the green FULL LED 5 lights up The battery is now charged to 100 and can be disconnected from the charging device Start charging GEL batteries Before connecting the battery be sure the battery selector switch 9 is set to ...

Page 114: ... AG 1208 1 5 2 0A 1 2 1 4A 1A 13 7 v 14 2 14 7 v 13 5 14 2 v 13 0 13 5 v 10 5 12 5 v Time t Charging current A Voltage V maintenance charge 14 2 14 7 13 5 12 10 5 6 7 7A 4 5 5 7A Automatic Charging Device AG 1210 3 2 4 0A 1 4 1 7A 1A 13 7 v 14 2 14 7 v 13 5 14 2 v 13 0 13 5 v 10 5 12 5 v Time t Charging current A ...

Page 115: ...m the negative battery terminal marked N or 3 Disconnect the positive charging clamp red from the positive battery terminal marked P or Voltage V maintenancecharge 14 2 14 7 13 5 12 10 5 7 4 8A 6 3 7A Automatic Charging Device AG 1212 4 3 5 2A 1 8 2 7A 1A 13 7 v 14 2 14 7 v 13 5 14 2 v 13 0 13 5 v 10 5 12 5 v Time t Charging current A ...

Page 116: ...lified technical personnel should change the plug or the connecting cables This will guarantee the safety of the device is maintained If the product is no longer suitable for use dispose of it in an environmentally friendly manner in accordance with your local ordinances Disposal Do not dispose of packaging or the product through your household waste The product and packaging are made from recycla...

Page 117: ...GB 29 ...

Page 118: ...30 ...

Page 119: ...ÉCURITÉ 34 Consignes generales de sécurité 34 Consignes de sécurité spécifiques aux chargeurs 35 Fonctionnement 38 Avant la charge d une batterie 38 Brancher la batterie 38 Aperçu du produit AG 1208 AG 1210 AG 1212 39 Fonctionnement 40 Phases de charge 41 Terminer le processus de charge 42 Nettoyage entretien et maintenance 43 Service 43 Traitement des déchets 43 Garantie et service 44 FR ...

Page 120: ...ue celles des voitures des bateaux des poids lourds et autres véhicules Cela comprend différents types de batteries plomb acide tels que Batteries humides batteries plomb fermées électrolyte liquide Batteries sans maintenance et batteries VRLA batteries plomb acide avec clapet de décharge Batterie Gel électrolyte sous forme de gel L appareil peut être branché avec des pinces directement à la batte...

Page 121: ...rôlez immédiatement le contenu de l emballage après avoir déballé l appareil Contrôlez l appareil ainsi que toutes les pièces du point de vue d éventuels dom mages Ne mettez pas en marche un appareil ou des pièces défectueux 1 chargeur automatique AG 1208 ou AG 1210 ou AG 1212 1 notice d utilisation Caractéristiques techniques Modèle AG 1208 AG 1210 AG 1212 Référence 97003 97004 97005 Max Courant ...

Page 122: ... à être utilisé par des personnes notamment des enfants dont les capacités physiques sensorielles ou mentales sont limitées ou qui ne possèdent pas d expérience et ou de connaissances dans le domaine à moins qu elles soient surveillées par une personne responsable de leur sécurité ou qu elles reçoivent des instructions quant à la manière d utiliser cet appareil Il faut surveiller les enfants afin ...

Page 123: ...e le véhicule en marche Débranchez toujours l appareil du courant alternatif en cas de non utilisation Déconnectez toujours l appareil en le débranchant de la prise de courant mais jamais en déconnectant un câble de connexion Si les câbles doivent passer sur des murs présentant des arrêtes vives par exemple des cloisons en métal il est impératif d utiliser des tuyaux flexibles vides ou des conduit...

Page 124: ...z qu elle concorde avec la tension du réseau Dans le cas contraire le fonctionnement de l appareil pour rait être compromis Veillez toujours à ce que l appareil ne soit pas connecté au réseau électrique au moment où vous connectez la batterie et lorsque vous la déconnectez Branchez toujours la pince positive du chargeur rouge en premier au pôle positif de la batterie non relié à la carrosserie du ...

Page 125: ...ec l acide caustique présent dans la batterie En cas de contact du visage avec de l acide provenant de la batterie rincez vous abondamment sous l eau courante et consultez un médecin En cas de contact des yeux avec l acide provenant de la batterie rincez les pendant au moins 5 minutes sous l eau courante et consultez un médecin Veillez à toujours respecter la polarité lors du raccordement de l app...

Page 126: ... aux instructions du fabricant relatives à la charge et à la vitesse maximale de charge Brancher la batterie Risque de choc électrique Assurez vous toujours que le chargeur n est pas branché à une pise de courant alternatif 230 V lorsque vous le brancher à une batterie Assurez vous que la zone autour de la batterie est bien ventilée pendant le processus de charge 1 Connectez la pince positive roug...

Page 127: ...rapide 2 LED rouge POLARITY 3 LED verte POWER 4 LED jaune CHARGING 5 LED verte FULL 6 Câble de charge avec pince de charge noire 7 Câble de charge avec pince de charge rouge 8 Câble secteur avec fiche secteur 9 Commutateur sélection de la batterie Position gauche Batteries plomb acide Position droite Batteries GEL 9 1 5 2 3 4 6 7 8 ...

Page 128: ...é lorsque la LED verte Full 5 s allume La batterie est maintenant chargée à 100 et peut être débranchée du chargeur Démarrer le processus de charge batteries GEL Avant de brancher la batterie il faut veiller à ce que le commutateur de sélection de la batterie 9 se trouve en position GEL Sélectionnez ensuite la vitesse de charge avec le commutateur de vitesse de charge 1 Lorsque le chargeur est cor...

Page 129: ... AG 1208 1 5 2 0A 1 2 1 4A 1A 13 7 v 14 2 14 7 v 13 5 14 2 v 13 0 13 5 v 10 5 12 5 v Temps t Courant de charge A Tension V charge de maintien 14 2 14 7 13 5 12 10 5 6 7 7A 4 5 5 7A Chargeur automatique AG 1210 3 2 4 0A 1 4 1 7A 1A 13 7 v 14 2 14 7 v 13 5 14 2 v 13 0 13 5 v 10 5 12 5 v Temps t Courant de charge A ...

Page 130: ...ture dans des cas exceptionnels du pôle négatif de la batterie marqué avec N ou 3 Séparez la pince positive rouge du pôle positif de la batterie marqué avec P ou Tension V charge de maintien 14 2 14 7 13 5 12 10 5 7 4 8A 6 3 7A Chargeur automatique AG 1212 4 3 5 2A 1 8 2 7A 1A 13 7 v 14 2 14 7 v 13 5 14 2 v 13 0 13 5 v 10 5 12 5 v Temps t Courant de charge A ...

Page 131: ...ujours l appareil dans un endroit propre et sec Service Faites réparer l appareil uniquement par du personnel technique qualifié De cette manière vous assurerez et préserverez la sécurité de l appareil Attention Faites toujours remplacer le connecteur ou le câble de connexion par du personnel technique qualifié De cette manière vous assurerez et préserverez la sécurité de l appareil Ne plus utilis...

Page 132: ...x défauts de production et de matériau Rapportez un produit défectueux à votre magasin Nous nécessitons en plus les pièces suivantes pour un traitement rapide de votre réclamation Copie du ticket de caisse avec la date d achat Raison de la réclamation description de l erreur ...

Page 133: ...FR 45 ...

Page 134: ...46 ...

Page 135: ...A 50 Indicationi di sicurezza generali 50 Istruzioni di sicurezza per i caricabatterie 51 Funzionamento 54 Prima del processo di carica 54 Collegare la batteria 54 Descrizione dei prodotti AG 1208 AG 1210 AG 1212 55 Funzionamento 55 Fasi di carica 56 Fine del processo di carica 58 Pulizia cura e manutenzione 58 Assistenza 58 Smaltimento 58 Garanzia e servizio di assistenza 59 IT ...

Page 136: ...e quelle utilizzate per auto imbarcazioni camion e altri veicoli Rientrano in questa categoria molte batterie al piombo acido come Batterie bagnate batterie chiuse al piombo elettroliti fluidi Batterie senza manutenzione e batterie VRLA batterie al piombo acido con valvola limitatrice di pressione Batterie a gel elettroliti gelatinosi L apparecchio può essere collegato con i morsetti direttamente ...

Page 137: ...o aver aperto l imballaggio Accertarsi che l apparecchio e le sue componenti non siano danneggiate Non utilizzare l apparecchio se è difettoso o se alcune componenti sono difettose 1 caricabatterie automatico AG 1212 o AG 1210 o AG 1212 1 istruzioni Dati tecnici Modello AG 1208 AG 1210 AG 1212 Numero articolo 97003 97004 97005 Corrente max di carica 8 A effettivi 10 A effettivi 12 A effettivi Tens...

Page 138: ...rogettato per essere utilizzato da persone compresi i bambini con capacità fisiche psichiche sensoriali e intel lettuali ridotte oppure senza esperienza e o senza conoscenze adeguate a meno che essi non siano sotto il controllo di una persona competente oppure ricevano da essa indicazioni su come utilizzare il dispositivo I bambini dovrebbero essere sorvegliati per evitare che giochino con il disp...

Page 139: ... il dispositivo dalla corrente alternata se non lo si utilizza Scollegare sempre il dispositivo dall alimentazione di rete staccando la spina e mai staccando i morsetti di un cavo di collegamento Se il cavo dovesse essere fatto passare attraverso pareti con angoli vivi per es pareti di metallo utilizzare tubi cavi o le apposite canaline per evitare il dann eggiamento del cavo stesso Posizionare i ...

Page 140: ...uando lo si collega a una batteria o quando lo si scollega da essa Collegare sempre prima il morsetto positivo rosso al polo positivo della batte ria non collegato con la carrozzeria dell auto marcato P o Collegare poi il morsetto negative nero alla carrozzeria dell auto lontano dall alloggiamento della batteria dalla batteria e dal tubo del carburante Solo a questo punto il caricabatteria può ess...

Page 141: ...pre attenzione alla corretta polarità quando si collega il dispositivo a una batteria Questo caricabatteria non è stato costruito per la distribuzione di energia elettrica a caravan Questo caricabatteria non è stato progettato come un accessorio da installare nel veicolo Pericolo di ESPLOSIONE Durante la carica potrebbe verificarsi la formazione di bolle a causa della fuoriuscita di gas Tale gas è...

Page 142: ...e attenersi alle indicazioni del produttore per quanto riguarda il processo di carica e la velocità massima di carica Collegare la batteria Pericolo di folgorazione Accertarsi sempre che l apparecchio non sia collegato ad una presa di corrente alternata 230V quando lo collegate a una batteria Assicurarsi che l area attorno alla batteria sia ben ventilata 1 Collegare il morsetto positivo rosso al p...

Page 143: ...scelta batterie Posizione sinistra batterie al piombo acido Posizione destra batterie a gel Funzionamento Inizio processo di carica batterie al piombo acido Prima di collegare il caricabatterie prestare attenzione a che l interruttore scelta batterie 9 si trovi nella posizione normale In seguito selezionare la velocità di carica con l interruttore velocità di carica 1 Quando l apparecchio è colleg...

Page 144: ...uttore velocità di carica 1 Quando l apparecchio è collegato correttamen te il processo di carica comincia automaticamente Questo processo viene indicato dal Power LED 3 verde e dal Charging LED 4 giallo Il processo di carica procede in modo completamente automatico e termina quando il LED verde Full 5 s illumina La batteria sarà quindi carica al 100 e l apparecchio potrà essere scollegato Fasi di...

Page 145: ...0 3 2 4 0A 1 4 1 7A 1A 13 7 v 14 2 14 7 v 13 5 14 2 v 13 0 13 5 v 10 5 12 5 v Tempo t Corrente di carica Tensione V carica di mantenimento 14 2 14 7 13 5 12 10 5 7 4 8A 6 3 7A Caricabatterie automatico AG 1212 4 3 5 2A 1 8 2 7A 1A 13 7 v 14 2 14 7 v 13 5 14 2 v 13 0 13 5 v 10 5 12 5 v Tempo t Corrente di carica ...

Page 146: ...ibuirà a evitare danni accidentali ai cavi e al caricabatteria La saltuaria pulizia del caricabatteria con un panno mantiene lucida la superfi cie e aiuta a evitare la corrosione Conservare il caricabatteria in un luogo pulito e asciutto Assistenza Far riparare il dispositivo solo da personale qualificato in modo da mantenere integra la sicurezza del dispositivo Attenzione Far sostituire la spina ...

Page 147: ...di garanzia si riferiscono a difetti di produzione e del materiale Riportate al punto vendita il prodotto difettato Per una veloce elaborazione del vostro reclamo necessitate di copia della ricevuta con la data di acquisto motivo del reclamo descrizione del difetto ...

Page 148: ...60 ...

Page 149: ...ická data 63 bezpečnost 64 Všeobecné bezpečnostní pokyny 64 bezpečnostní pokyny týkající se nabíječek 65 Provoz 68 Před nabíjením baterie 68 Připojení na baterii 68 Popis nabíječky AG 1208 AG 1210 AG 1212 69 Provoz nabíječky 70 Fáze nabíjení 70 ukončení nabíjení 72 čištění péče a údržba 72 Servis 72 Likvidace 73 Garance a servis 73 CZ ...

Page 150: ...h pro automobily lodě nákladní auta a jiná vozidla nebo do nich vestavěných toto zahrnuje různé druhy kyselino olovnatých baterií jako jsou mokré baterie uzavřené olovnaté baterie s tekutým elektrolytem bezúdržbové baterie a VRLA baterie kyselino olovnaté s přetlakovým ventilem gelové baterie se želatinovým elektrolytem nabíječku je možné připojit svorkami přímo na baterii nabíječka není určena k ...

Page 151: ... kontrolujte ihned po rozbalení obsah dodávky Zkontrolujte jestli nejsou nabíječka nebo její díly poškozené Vadnou nabíječku nebo poškozené díly neuvádějte do provozu 1 automatická nabíječka AG 1208 nebo AG 1210 nebo AG 1212 1 návod k obsluze Technická data model AG 1208 AG 1210 AG 1212 číslo artiklu 97003 97004 97005 maximální nabíjecí proud 8 A efektivní 10 A efektivní 12 A efektivní napětí bate...

Page 152: ...ně dětí s ome zenými fyzickými senzorickými nebo duševními schopnostmi nebo bez zkušeností a nebo znalostí s výjimkou případu kdy jsou pod dozorem osoby zodpovědné za jejich bezpečnost nebo když byly touto osobou poučeny o způsobu použití zařízení Děti musí být pod dohledem aby se zaručilo že si nebudou hrát se zařízením Výrobce neponese žádnou odpovědnost za škody způsobené nesprávným připojením ...

Page 153: ...du odmontujte všechny kabely zařízení z akumulátoru dříve než budete zkoušet řídit vaše vozidlo když zařízení nepoužíváte pokaždé jej odpojte od střídavého prou du Pokaždé odpojujte zařízení odpojením napájecího kabelu a nikdy ne odpojením svorek spojovacího kabelu když je třeba vést kabely přes stěny s ostrými hranami například kovové stěny použijte prázdné trubky nebo kabelové potrubí aby se pře...

Page 154: ...zením Zkontrolujte vstupní napětí 230 V a zajistěte že odpovídá napětí elektrické sítě V opačném případě by mohlo dojít k zabránění využití funkce zařízení Pokaždé se ujistěte že zařízení není připojeno ke střídavému proudu když jej připojujete a odpojujete Pokaždé připojte kladnou napájecí svorku červenou ke klad nému pólu akumulátoru který není připojený ke kostře vozidla a je označený P nebo Po...

Page 155: ...ulátoru když přijdete do styku s kyselinou akumulátoru důkladně ji opláchněte pod tekoucí vodou a vyhledejte lékařskou pomoc V případě styku očí s kyselinou akumulátoru si vypláchněte oči pod tekoucí vodou nejméně po dobu pěti minut a vyhledejte lékařskou pomoc Při každém připojování zařízení k akumulátoru věnujte pozornost dodržení správné polarity tato nabíječka nebyla navržena pro distribuci el...

Page 156: ...ální doby nabíjení Připojení na baterii Nebezpečí zásahu elektrickým proudem Při připojování nabíječky na baterii se nejdříve ujistěte že není nabíječka připojená na přívod elektrického proudu s napětím 230 V Zajistěte aby byl prostor kolem baterie během nabíjení dostatečně větraný 1 Připojte kladnou svorku červenou na kladný pól baterie značený písmenem P nebo 2 Připojte zápornou svorku černou na...

Page 157: ...poloha rychlé nabíjení 2 LeD červená PoLARitY 3 LeD zelená PoWeR 4 LeD žlutá cHARGinG 5 LeD zelená FuLL 6 nabíjecí kabel se svorkou černá 7 nabíjecí kabel se svorkou červená 8 Přívodní kabel se zástrčkou 9 Volič druhu baterie Levá poloha kyselino olovnaté baterie Pravá poloha gelové baterie 9 1 5 2 3 4 6 7 8 ...

Page 158: ...abíječky Start nabíjení gelové baterie Před připojením baterie je třeba dbát na to aby byl volič druhu baterie 9 v poloze GeL Zvolte rychlost nabíjení příslušným voličem 1 Při správně zapojené nabíječce začíná nabíjení automaticky tento proces se znázorňuje kontrolkou Power LeD zelená 3 a charging LeD žlutá 4 nabíjení probíhá plně automaticky a po ukončení se rozsvítí zelená kontrolka LeD Full 5 b...

Page 159: ... 1210 3 2 4 0A 1 4 1 7A 1A 13 7 v 14 2 14 7 v 13 5 14 2 v 13 0 13 5 v 10 5 12 5 v Čas t Nabíjecí proud A Napětí V udržovacího nabíjení 14 2 14 7 13 5 12 10 5 7 4 8A 6 3 7A Automatická nabíječka AG 1212 4 3 5 2A 1 8 2 7A 1A 13 7 v 14 2 14 7 v 13 5 14 2 v 13 0 13 5 v 10 5 12 5 v Čas t Nabíjecí proud A ...

Page 160: ...kutinu akumulátoru která by mohla přijít do styku se svorkami Při uskladnění nabíječky správně sviňte kabely Pomůžete tím předejít poškození kabelu i nabíječky Příležitostné čištění pláště nabíječky jemným hadrem udržuje povrch v čistém stavu a zabraňuje korozi nabíječku uskladněte na čistém a suchém místě Servis opravu zařízení svěřte kvalifikovanému technickému personálu bude tím zaručena a zach...

Page 161: ...ujte více nepoužitelný výrobek způsobem odpovídajícím životnímu prostředí a místním ustanovením Garance a servis Všeobecné garanční podmínky se vztahují na defekty výrobku a materiá lu Přineste zpět vadný výrobek prodejci Pro rychlé zpracování Vaší reklamace potřebujete kromě toho kopii účtenky s datumem Důvod reklamace popis závady ...

Page 162: ...74 ...

Page 163: ... 77 beZPečnoSŤ 78 Všeobecné bezpečnostné pokyny 78 bezpečnostné pokyny týkajúce sa nabíjačiek 79 Prevádzka 82 Pred nabíjaním batérie 82 Pripojenie batérie 82 Prehľad o produkte AG 1208 AG 1210 AG 1212 83 Prevádzka nabíjačky 84 Fázy nabíjania 84 ukončenie nabíjania 86 čištění péče a údržba 86 Servis 86 Likvidace 87 Garance a servis 87 SK ...

Page 164: ...h nákladných automobiloch a iných vozidlách tu patria rôzne druhy olovo kyselinových batérií ako batérie naplnené kvapalinou zatvorené batérie tekutý elektrolyt bezúdržbové batérie a VRLA batérie olovo kyselinové batérie s pretlakovým ventilom Gélové batérie gélovitý elektrolyt nabíjačka sa môže pomocou svoriek napojiť priamo na batériu nabíjačka nie je určená na nabíjanie iných druhov batérií nab...

Page 165: ...h obsah balenia skontrolujte ihneď po jeho vybalení Zariadenie a všetky jeho časti skontrolujte či nie je nič poškodené Ak zistíte že zariadenie alebo jeho časti sú poškodené nepoužite ho 1 automatická nabíjačka AG 1208 alebo AG 1210 alebo AG 1212 1 návod na obsluhu Technické údaje model AG 1208 AG 1210 AG 1212 číslo artikla 97003 97004 97005 max nabíjací prúd 8 A efektívny 10 A efektívny 12 A efe...

Page 166: ...nemali používať osoby vrátane detí s obmedzenými fyzickými zmyslovými alebo duševnými schopnosťami alebo osoby bez skúseností a alebo znalostí ak nie sú pod dozorom osoby zodpovednej za ich bezpečnosť alebo ak neboli touto osobou poučené o spôsobe použitia zariadenia Deti musia byť pod dohľadom aby sa zaručilo že sa nebudú so zariadením hrať Výrobca neponesie žiadnu zodpovednosť za škody spôsobené...

Page 167: ...jte všetky káble zariadenia z akumulátora skôr ako budete skúšať riadiť vaše vozidlo keď zariadenie nepoužívate vždy ho odpojte od striedavého prúdu Vždy odpájajte zariadenie odpojením napájacieho kábla a nikdy nie odpojením svoriek spojovacieho kábla keď je potrebné viesť káble ponad steny s ostrými hranami napríklad kovové steny použite prázdne rúrky alebo káblové potrubia aby ste nepoškodili ká...

Page 168: ...ie 230 V a zabezpečte aby odpovedalo napätiu elektrickej siete V opačnom prípade by mohlo dôjsť k zabrá neniu využitia funkcie zariadenia keď zariadenie pripájate a odpájate vždy sa uistite že zariadenie nie je pripojené k striedavému prúdu Vždy pripájajte kladnú napájaciu svorku červenú ku kladnému pólu akumulátora ktorý nie je pripojený ku kostre vozidla a je označený P alebo následne pripojte z...

Page 169: ...tyku so žieravou kyselinou akumulátora keď prídete do styku s kyselinou akumulátora dôkladne ju opláchnite pod tečúcou vodou a vyhľadajte lekársku pomoc V prípade styku očí s kyselinou akumulátora si opláchnite oči pod tečúcou vodou najme nej po dobu piatich minút a vyhľadajte lekársku pomoc Pri každom pripájaní zariadenia k akumulátoru dodržte správnu polaritu táto nabíjačka nebola navrhnutá pre ...

Page 170: ...losť nabíjania Pripojenie batérie Nebezpečenstvo zasiahnutia elektrickým prúdom keď pripájate svorky nabíjačky na batériu dajte pozor aby nabíjačka nebola zapojená do siete so striedavým prúdom pod napätím 230 V Zabezpečte aby bolo okolie počas nabíjania batérie dobre vetrané 1 kladnú svorku červená pripojte na kladný pól batérie označený písmenom P alebo znamienkom 2 Zápornú svorku čierna pripojt...

Page 171: ...ontrolka PoLA RitA 3 Zelená LeD kontrolka PoWeR 4 Žltá LeD kontrolka cHARGinG batéria sa nabíja 5 Zelená LeD kontrolka FuLL batéria je úplne nabitá 6 nabíjací kábel so svorkou čierna 7 nabíjací kábel so svorkou červená 8 Sieťový kábel so zástrčkou 9 Vypínač pre voľbu batérie Poloha vľavo olovo kyselinové batérie Poloha vpravo GéLoVé batérie 9 1 5 2 3 4 6 7 8 ...

Page 172: ...nabíjačky Spustenie procesu nabíjania GÉLOVÉ batérie Skôr ako pripojíte batériu dajte pozor na to aby bol vypínač pre voľbu batérie 9 v polohe GeL Vypínačom pre rýchlosť nabíjania 1 potom zvoľte rýchlosť nabíjania Ak je nabíjačka pripojená správne nabíjanie prebehne automaticky tento proces je indikovaný LeD kontrolkou Power zelená 3 a LeD kontrolkou charging žltá 4 Proces nabíjania prebieha celko...

Page 173: ...G 1210 3 2 4 0A 1 4 1 7A 1A 13 7 v 14 2 14 7 v 13 5 14 2 v 13 0 13 5 v 10 5 12 5 v Čas t Nabíjací prúd A Napätie V udržiavacie nabíjanie 14 2 14 7 13 5 12 10 5 7 4 8A 6 3 7A Automatická nabíjačka AG 1212 4 3 5 2A 1 8 2 7A 1A 13 7 v 14 2 14 7 v 13 5 14 2 v 13 0 13 5 v 10 5 12 5 v Čas t Nabíjací prúd A ...

Page 174: ...ekutinu akumulátoru která by mohla přijít do styku se svorkami Při uskladnění nabíječky správně sviňte kabely Pomůžete tím předejít poškození kabelu i nabíječky Příležitostné čištění pláště nabíječky jemným hadrem udržuje povrch v čistém stavu a zabraňuje korozi nabíječku uskladněte na čistém a suchém místě Servis opravu zařízení svěřte kvalifikovanému technickému personálu bude tím zaručena a zac...

Page 175: ...ujte více nepoužitelný výrobek způsobem odpovídajícím životnímu prostředí a místním ustanovením Garance a servis Všeobecné garanční podmínky se vztahují na defekty výrobku a materiá lu Přineste zpět vadný výrobek prodejci Pro rychlé zpracování Vaší reklamace potřebujete kromě toho kopii účtenky s datumem Důvod reklamace popis závady ...

Page 176: ...GmbH co industriestr 31 cH 8112 otelfingen SPA Systems s r o Pod Višňovkou 1661 37 140 00 Praha 4 krč česká republika www aeg automotive com AeG is a registered trademark used under license from Ab electrolux publ Stand der informationen 5 2012 eAn 4038373970039 4038373970046 4038373970053 ...

Reviews: