background image

17

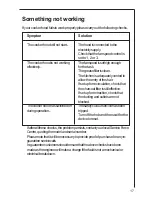
Something not working

If your cooker hood fails to work properly please carry out the following checks.

Sympton

Solution

The cooker hood will not start...

The hood is connected to the

electricity supply.
Check that the fan speed control is
set to 1, 2 or 3.

The cooker hood is not working

The fan speed is set high enough

effectively...

for the task.
The grease filter is clean.
The kitchen is adequately vented to
allow the entry of fresh air.
If set up for recirculation, check that
the charcoal filter is still effective.
If set up for extraction, check that
the ducting and outlets are not
blocked.

The cooker hood has switched off

The safety cut-out service has been

during operation...

tripped.
Turn off the hob and then wait for the
device to reset.

If after all these checks, the problem persists, contact your local Service Force
Centre, quoting the model and serial number.
Please note that it will be necessary to provide proof of purchase for any in-
guarantee service calls.
In-guarantee customers should ensure that the above checks have been
made as the engineer will make a charge if the fault is not a mechanical or
electrical breakdown.

Summary of Contents for 825 D

Page 1: ...825 D 8259 D Extractor Hood Installation and Operating Instructions ...

Page 2: ...connection for the UK 5 TechnicalDetails 6 Installation 7 Safetywarnings 7 Installation 8 Hood Operation 11 Safetywarningsforuser 12 Maintenance and care 13 Metalgrease filter 13 Opening the metal grease filter 13 Carbon filter 14 Changingthelightbulb 15 Cleaning 16 Accessories 16 Something not working 17 Service Spare Parts 18 ...

Page 3: ...The air is forced out through a hose fitted to the top of the hood A Fig 1 The outlet hose must have a diameter of 120 mm accessory for the extraction mode Fit the connection ring above the hood with two screws then fir an exhaustingpipelongenoughtoreachtheoutside Fig 1 If the cooking vapour is passed through an outside wall you will need an MKZ telescopic wall pipe with intake and ventilation E N...

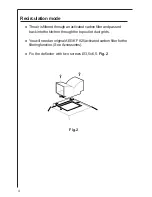
Page 4: ...n activated carbon filter and passed back into the kitchen through the top outlet duct grids You will need an original AEG KF 825 activated carbon filter for the filteringfunction See Accessories Fix the deflector with two screws Ø3 5x6 5 Fig 2 Fig 2 ...

Page 5: ...PLY are for the connection for the internal house wiring and the terminations labelled LOAD are for theappliance IMPORTANT The wires of the mains lead supplied with this appliance are coloured in accordance with the following code Blue Neutral Brown Live As the colours of the flexible cord of this appliance may not correspond with the coloured markings identifying the ter minals in the plug procee...

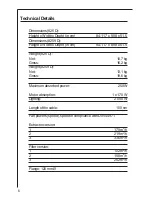
Page 6: ... x 89 9 x 51 5 Weight 825 D Net 10 7kg Gross 16 2kg Weight 8259 D Net 13 1kg Gross 19 6kg Maximumabsorbedpower 250W Motor absorption 1 x 170 W Lighting 2 x 40 W Lengthofthecable 100cm Fanpowers speed speed incompliancewith DIN44971 Extractor version 1 179m3 h 2 219m3 h 3 336m3 h Filter version 1 102m3 h 2 150m3 h 3 252m3 h Flange 120mmØ ...

Page 7: ...l The air outlet must not be connected to chimney flues or combus tion gas ducts The air outlet must under no circumstances be connected to ventilation ducts for rooms in which fuel burning appliancesareinstalled It is advisable to apply for authorization from the relevant controlling authority when connecting the outlet to an unused chimneyflueorcombustiongasduct The air outlet installation must ...

Page 8: ...uce the performance of the extractor hood If the hood is used in its filtering function it will operate simply and safely in the above conditions without the need for any of the aforementionedmeasures When the hood is used in its extractor function the following rules must be followed to obtain optimal operation short and straight outlet hose keep bends in outlet hose to a minimum never install th...

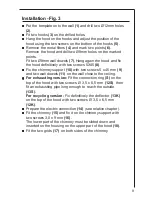
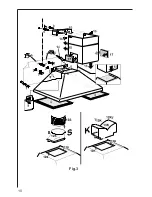
Page 9: ... with two screws 5 x 45 mm 9 and two wall dowels 11 on the wall close to the ceiling For exhausting version Fit the connection ring S on the top of the hood with two screws Ø 3 5 x 6 5 mm 12S then fit an exhausting pipe long enough to reach the outside 13S For recycling version Fix definitively the deflector 13K on the top of the hood with two screws Ø 3 5 x 6 5 mm 12K Prepare the electric connect...

Page 10: ...10 Fig 3 ...

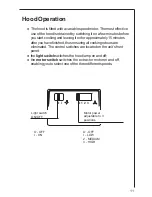
Page 11: ...pproximately 15 minutes afteryouhavefinished thusensuringallcookingodoursare eliminated The control switches are located on the unit s front panel the light switch switches the hood lamp on and off the motor switch switches the extractor motor on and off enabling you to select one of the three different speeds Motor power adjustable to 3 positions Light switch ON OFF O OFF I ON O OFF I LOW 2 MEDIU...

Page 12: ...f a fat fire increases when using dirty oil It is extremely important to note that overheating can cause a fire Never carry out any flambé cooking under the hood Always disconnect the unit from the power supply before carrying out any work on the hood including replacing the light bulb take the cartridge fuse out of the fuse holder or switch off the automatic circuit breaker It is very important t...

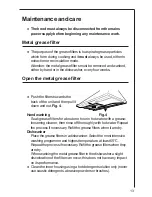
Page 13: ...unit and then pull it down and out Fig 4 Handwashing Soak grease filters for about one hour in hot water with a grease loosening cleaner then rinse off thoroughly with hot water Repeat the process if necessary Refit the grease filters when it are dry Dishwasher Placethegreasefiltersinadishwasher Selectthemostintensive washingprogrammeandhighesttemperature atleast65 C Repeattheprocessifnecessary Re...

Page 14: ...be replaced once every four months Mounting Fig 5 Fit one carbon filter on the left and one on the right so to cover the plastic grids that protect the fan wheel then turn clockwise the central handle of the carbon filter To remove proceed in reverse order Alwaysspecifythehoodmodelcodenumberandserialnumber when ordering replacement filters This information is shown on the rating plate located on t...

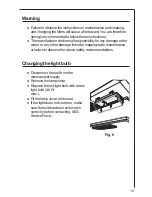
Page 15: ...bilityforanydamagetothe motor or any other damage linked to inappropriate maintenance or failure to observe the above safety recommendations Changing the light bulb Disconnect the unit from the mainspowersupply Removethelampcover Replace the old light bulb with a new light bulb 40 W max Fit the lamp cover on its seat If the light does not come on make surethebulbhasbeenscrewedin correctly before c...

Page 16: ...ergentsorabrasivebrushesorpowders Only ever clean the switch panel and filter grille using a damp cloth anddelicatedetergents It is extremely important to clean the unit and change the filters at therecommendedintervals Failuretodosowillcausegrease deposits to build up that could constitute a fire hazard Accessories MKZ telescopic wall pipe E Nr 610899004 outlet hose ABS120 120 mm Ø 942118611 Carb...

Page 17: ...recirculation checkthat thecharcoalfilterisstilleffective Ifsetupforextraction checkthat theductingandoutletsarenot blocked Thecookerhoodhasswitchedoff Thesafetycut outservicehasbeen duringoperation tripped Turnoffthehobandthenwaitforthe devicetoreset Ifafterallthesechecks theproblempersists contactyourlocalServiceForce Centre quotingthemodelandserialnumber Pleasenotethatitwillbenecessarytoprovide...

Page 18: ...Yourname addressandpostcode 2 Your telephone number 3 Clearandconcisedetailsofthefault 4 The model serial number E Nr and the manufacturing number F Nr This information can be found on the ratingplate 5 Dateofpurchase CustomerCare ForgeneralenquiriesregardingyourAEGappliance orfurtherinformation onAEGproductspleasecontactourcustomercaredepartment CustomerCareDepartment AEGDomesticAppliancesLimited...

Page 19: ...19 ...

Page 20: ...AEGHausgeräteAG Postfach 1036 D 90327 Nürnberg Copyright by AEG LI03XA ...

Reviews: