background image

CARE AND CLEANING

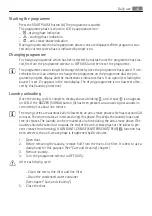
Cleaning fluff filter

The filters collect all the fluff which collect during drying. To ensure that the tumble dryer

works perfectly, the fluff filters (micro-fine filter and fine strainer) must be cleaned after

each drying cycle.

The warning icon   is on to remind you of this operation.

CAUTION!

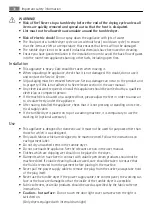
Do not operate the tumble dryer without fluff filters or with damaged or blocked fluff fil

-

ters.

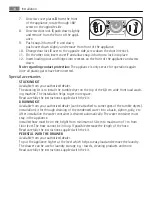
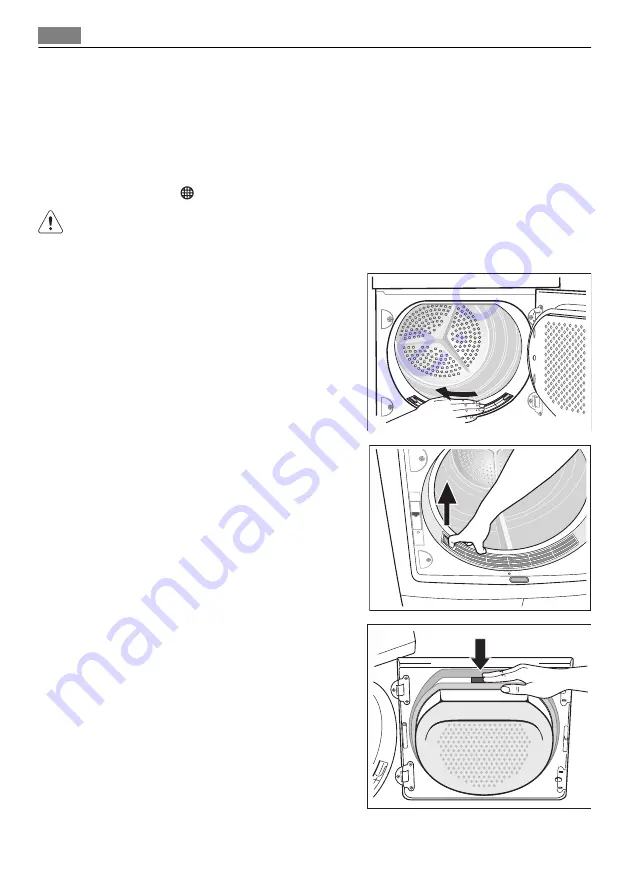
1.

Open loading door

2.

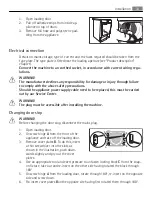
Use a moist hand to clean the micro-

fine filter, which is built into the lower

part of the loading aperture.

3.

After a period of time, a gleam because

of detergent residue on laundry forms

on the filters. When this occurs, clean

the filters with warm water using a

brush. Remove the filter from the door

pulling it out. It can be positioned with

the tooth facing to the left or to the

right).
After cleaning do not forget to put it

back.

4.

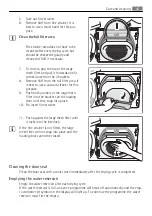
Push down the unlock button on the

large coarse filter.
Large mesh filter jumps up.

44

Care and cleaning

Summary of Contents for 7040 TWF

Page 1: ...7040 TWF Istruzioni per l uso Asciugabiancheria User manual Tumble dryer ...

Page 2: ...eciali 8 DESCRIZIONE DEL PRODOTTO 9 PANNELLO DEI COMANDI 10 Pannello dei comandi 10 Display 10 PREPARAZIONE AL PRIMO UTILIZZO 11 TABELLA DEI PROGRAMMI 11 UTILIZZO QUOTIDIANO 13 Suddivisione della biancheria 13 Pesi medi della biancheria 14 Accensione della macchina accensione della luce 14 Come caricare la biancheria 14 Selezione del programma 15 Funzione EXTRA DELICATO EXTRA SANFT 15 Funzione INT...

Page 3: ...odi viti pietre o altri materiali duri e ta glienti possono danneggiare gravemente l apparecchiatura prestare attenzione a non in trodurli insieme alla biancheria Per evitare il pericolo di incendio dovuto all eccessiva asciugatura non utilizzare l appa recchiatura per asciugare i seguenti capi cuscini trapunte e altri imbottiti poiché posso no accumulare calore Oggetti di gommapiuma schiuma di la...

Page 4: ...bbia subito danni durante il trasporto In caso di dubbi non utilizzarlo e rivolgersi al Centro di assistenza Disimballare completamente l apparecchiatura prima dell installazione L eliminazione in completa dei materiali di imballaggio può causare gravi danni all apparecchiatura Vedere la relativa sezione del libretto di istruzioni Se si rendesse necessaria una modifica all impianto elettrico per l...

Page 5: ...ere molto pericolosi per i bambini perché possono causare soffocamento Tenerli fuori dalla portata dei bambini Tenere in un luogo sicuro e al di fuori della portata dei bambini anche tutti i detersivi Evitare che i bambini o gli animali domestici entrino nel cestello TUTELA DELL AMBIENTE Il simbolo sul prodotto o sulla confezione indica che il prodotto non deve essere considerato come un normale r...

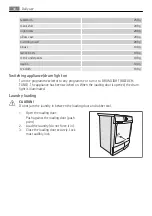
Page 6: ...che l olio possa scorrere nuovamente nel motore In caso contrario il motore rischia di venire danneggiato Posizionamento dell apparecchio Per ragioni di comodità si consiglia di collocare l apparecchiatura vicino alla lavabian cheria L asciugatrice deve essere installata in luogo pulito L aria deve circolare liberamente attorno all apparecchiatura Non ostruire la griglia di ventilazione frontale o...

Page 7: ...rta 2 Togliere le strisce adesive applicate al l interno sulla parte superiore del cestel lo 3 Togliere le pellicole e le protezioni in po listirolo Collegamento elettrico I particolari sulla tensione di rete sul tipo di corrente e sui fusibili richiesti sono riportati sulla targhetta nominale Tale targhetta è montata vicino all apertura vedere il capitolo Descrizione del prodotto Collegare l appa...

Page 8: ...ontare la porta e le cerniere e riavvitare Nota relativa alla protezione da contatto La macchina è sicura soltanto quando sono state installate tutte le parti in plastica Accessori speciali KIT DI INSTALLAZIONE IN COLONNA Disponibile presso il vostro distributore autorizzato Il kit di installazione in colonna consente di installare l asciugabiancheria sopra una lavatri ce a carica frontale Questa ...

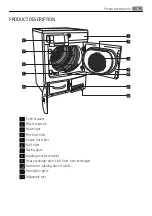
Page 9: ...L PRODOTTO 4 8 5 10 11 12 1 3 6 7 9 2 1 Pannello dei comandi 2 Serbatoio per l acqua di condensa 3 Luce del cestello 4 Microfiltro 5 Filtro a maglie larghe 6 Filtro lanugine 7 Targhetta di identificazione 8 Porta reversibile 9 Sportello scambiatore di calore filtro scambiatore di calore 10 Pulsante di apertura sportello nello zoccolo 11 Griglia di ventilazione 12 Piedini regolabili Descrizione del...

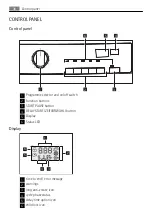
Page 10: ...zione 3 Tasto AVVIO PAUSA START PAUSE 4 Tasto RITARDATA PARTENZA ZEITVORWAHL 5 Display 6 Spie luminose Display 1 2 3 4 5 6 1 Tempo residuo messaggio di errore 2 avvertenze 3 simbolo funzione anti piega prolungato 4 stato fase del ciclo 5 simbolo opzione partenza ritardata 6 simbolo sicurezza bambini 10 Pannello dei comandi ...

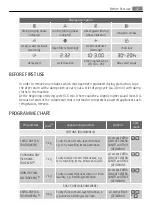
Page 11: ...ovuto all avvio del compressore ed è un fenomeno normale per gli elettrodomestici alimentati da compressore come frigoriferi congelatori ecc TABELLA DEI PROGRAMMI Programmi Cari co1 Impiego Caratteristiche Opzioni Simbo lo sull eti chetta COTONI BAUMWOLLE EXTRA EXTRA TROCKEN 7 kg Asciugatura completa di tessuti spessi o multistrato ad esempio asciugamani in spugna accappatoi tutti tranne EX TRA DE...

Page 12: ...HE 3 kg Per asciugare biancheria da letto len zuola singole o doppie federe coprilet ti copripiumini tutti tranne EX TRA DELICATO EXTRA SANFT e ASCIUG A TEM PO ZEITWAHL JEANS 7 kg Per asciugare capi sportivi come jeans felpe e simili in tessuti di spessore di verso ad esempio su colletto polsini e cuciture tutti tranne EX TRA DELICATO EXTRA SANFT e ASCIUG A TEM PO ZEITWAHL MICROFIBRA MIKROFASER 1 ...

Page 13: ...ANFT UTILIZZO QUOTIDIANO Suddivisione della biancheria Suddivisione per tessuto Cotone lino per i programmi del gruppo COTONI BAUMWOLLE Tessuti misti e sintetici per i programmi del gruppo TESSUTI MISTI MISCHGEWEBE Suddivisione in base all etichetta Le etichette indicano Possibilità di asciugatura a macchina Asciugatura a temperatura normale Asciugatura a temperatura ridotta Asciugatura a macchina...

Page 14: ...me di carico massimo di 7 kg Pesi medi della biancheria Accappatoio 1 200 g Copripiumino 700 g Camice da lavoro da uomo 600 g Pigiama da uomo 500 g Lenzuola 500 g Tovaglia 250 g Camicia da uomo 200 g Camicia da notte 200 g Federa 200 g Asciugamano in spugna 200 g Camicetta 100 g Intimo da donna 100 g Mutande da uomo 100 g Tovagliolo 100 g Strofinaccio 100 g Accensione della macchina accensione del...

Page 15: ...bolo sull etichet ta e per i tessuti sensibili alle alte temperature per es acrilico viscosa Il programma viene ese guito a temperatura ridotta La funzione Delicato è indicata solo per carichi in feriori a 3 kg Per attivare la funzione 1 Scegliere il programma di asciugatura 2 Premere il tasto EXTRA DELICATO EXTRA SANFT 1 La spia corrispondente si accende Per deselezionare la funzione premere nuov...

Page 16: ...one ciclo con un avviso allarme Per attivare la funzione 1 Scegliere il programma di asciugatura 2 Premere il tasto SEGNALE ACUSTICO SIGNAL 4 La spia corrispondente si accende Per deselezionare la funzione premere nuovamente il tasto SEGNALE ACUSTICO SIGNAL 4 La spia corrispondente si spegne Funzione ASCIUG A TEMPO ZEITWAHL Questa opzione permette di selezionare la durata del programma dopo l impo...

Page 17: ...uel programma Quando si avvia un programma viene visualizzato solo il simbolo della fase in corso Modifica del programma Per modificare un programma selezionato per errore dopo l avvio del programma ruotare dapprima il selettore dei programmi su OFF AUS quindi reimpostare il programma Una volta avviato il programma non può più essere modificato Se si tenta di modificare il programma girando la man...

Page 18: ...funzioni perfettamente i filtri ultrafine e fine devono essere puliti dopo ogni ciclo di asciugatura Il simbolo di avvertimento si accende per ricordare all utente di eseguire questa opera zione ATTENZIONE Non mettere in funzione l asciugatrice senza i filtri o con filtri danneggiati o intasati 1 Aprire la porta 2 Con la mano umida pulire il filtro ultra fine incorporato nella parte inferiore dell...

Page 19: ...o fine non deve es sere pulita dopo ogni ciclo ma deve es sere controllata regolarmente e pulita all occorrenza 7 Per fare questo prendere la parte supe riore del filtro a maglia larga e tirarlo verso di sé fino a che non esce dai 2 supporti 8 Rimuovere la lanugine dall intera area del filtro Si consiglia di usare un aspira tore 9 Premere entrambi i perni del filtro a maglia larga nelle staffe sul...

Page 20: ...a Per continuare il programma è necessa rio svuotare la tanica dell acqua AVVERTENZA Rischio di avvelenamento L acqua dal serbatoio non può essere bevuta o utilizzata per pre parare pasti 1 Estrarre il serbatoio dell acqua 1 e tirare verso l alto il tubo di scarico secondo i limiti del possibile 2 2 Versare l acqua di condensa in una baci nella o in un recipiente simile 3 Inserire i collegamenti d...

Page 21: ...ine dello scambiatore di calore si bagnino Non utilizzare l asciugabiancheria senza i filtri per la lanugine I filtri intasati comportano un maggiore consumo di energia prolungamento del ciclo di asciugatura e causano danni all asciugabiancheria Se la pompa di calore non viene pulita deve essere sottoposta a costose operazioni di pulizia 1 Aprire lo sportello 2 Aprire lo sportellino nello zoccolo ...

Page 22: ...rio estrarre e pulire il filtro con acqua tiepida utilizzando uno spaz zolino Pulire l interno dello sportello il vano di raccolta della lanugine e le guarnizioni in gomma 6 Rimontare il filtro nell alloggiamento a Inserire il secondo filtro nell alloggia mento si sentirà un rumore di blocco e farlo scorrere all interno della camera del filtro b Chiudere lo sportellino nello zoccolo Nota Se il fil...

Page 23: ... mobili o detergenti abrasivi per pulire la macchina Usare un panno umido per pulire il pannello e la struttura dell apparecchio COSA FARE SE Risoluzione dei problemi Problema1 Possibile causa Rimedio L asciugatrice non funziona L asciugatrice non è collegata all ali mentazione di rete Inserire la spina nella presa di rete Con trollare il fusibile nella scatola elettrica installazione domestica La...

Page 24: ...i asciugatura più elevato per es EXTRA Ciclo di asciu gatura troppo lungo 6 Filtri otturati Pulire i filtri Volume di carico eccessivo Rispettare il volume di carico massimo La biancheria non è stata sufficiente mente centrifugata Centrifugare adeguatamente la bian cheria La temperatura ambiente è troppo ele vata nessun malfunzionamento del l apparecchiatura Se possibile abbassare la temperatura a...

Page 25: ...ualsiasi programma 2 Premere contemporaneamente i tasti EXTRA DELICATO EXTRA SANFT IN TENSIVO TROCKNEN PLUS 1 e 2 per circa 5 secondi la spia sopra il tasto SEGNALE ACUSTICO SIGNAL 4 inizia ad accen dersi il segnale acustico è attivato in modo permanente la spia si spegne il segnale acustico è disattivato in modo permanen te 3 Alla consegna dell apparecchio il segnale acustico è disattivato Per at...

Page 26: ...finita il messaggio di avvertenza LED viene sempre visualizzato alla fine del ciclo di asciugatura oppure durante il ciclo di asciugatura se la tanica dell acqua di condensa è piena Se si utilizza uno scarico esterno per l acqua di condensa è possibile che il messaggio non venga visualizzato CARATTERISTICHE TECNICHE Altezza x larghezza x profondità 85 x 60 x 58 cm Volume del cestello 108 l Profond...

Page 27: ... controllato in conformità alla norma EN 61121 ASSISTENZA TECNICA In caso di problemi tecnici provare a risolverli consultando le istruzioni per l uso sezione Cosa fare se In caso di dubbi non utilizzare l apparecchio e contattare il Centro di assistenza locale Per velocizzare gli interventi di assistenza si prega di fornire le seguenti informazioni Modello Numero prodotto PNC Numero di serie ripo...

Page 28: ...accessories 34 PRODUCT DESCRIPTION 35 CONTROL PANEL 36 Control panel 36 Display 36 BEFORE FIRST USE 37 PROGRAMME CHART 37 DAILY USE 39 Sorting laundry 39 Average laundry weights 39 Switching appliance drum light on 40 Laundry loading 40 Selecting the programme 41 EXTRA DELICATE EXTRA SANFT function 41 INTENSIVE TROCKNEN PLUS function 41 LONG ANTI CREASE KNITTERSCHUTZ PLUS function 41 BUZZER SIGNAL...

Page 29: ...s caused by excessive drying do not use appliance to dry the following items Cushions quilts etc these items accumulate heat Items such as foam rubber latex foam shower caps waterproof textiles rubber backed articles and clothes or pillows fitted with foam rubber pads should not be dried in the tumble dryer Always unplug the appliance after use cleaning and maintenance Under no circumstances shoul...

Page 30: ...o allow air to circulate freely under the appliance After having installed the appliance check that it is not pressing or standing on its elec trical supply cable If the tumble dryer is placed on top of a washing machine it is compulsory to use the stacking kit optional accessory Use This appliance is designed for domestic use It must not be used for purposes other than those for which it was desi...

Page 31: ...otential negative consequences for the environment and human health which could otherwise be caused by inappropriate waste handling of this product For more detailed information about recycling of this product please contact your local council your household waste disposal service or the shop where you purchased the product Environmental information The packaging materials are environmentally frie...

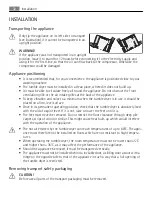
Page 32: ...face Once in its permanent operating position check that the tumble dryer is absolutely level with the aid of a spirit level If it is not raise or lower the feet until it is The feet must never be removed Do not restrict the floor clearance through deep pile carpets strips of wood or similar This might cause heat built up which would interfere with the operation of the appliance The hot air emitte...

Page 33: ... must be carried out by our Service Center WARNING The plug must be accessible after installing the machine Changing door stop WARNING Before changing the door stop disconnect the mains plug 1 Open loading door 2 Unscrew hinge A from the front of the appliance and take off the loading door 3 Remove cover plates B To do this insert a thin screwdriver into the slots as shown in the illustration push...

Page 34: ...n the top of the 60 cm wide front load wash ing machine The installation helps to get more space Read carefully the instructions supplied with the kit DRAINING KIT Available from your authorized dealer can be attached to some types of the tumble dryers Installation kit for through draining of the condensed water into a basin siphon gully etc After installation the water container is drained automa...

Page 35: ... reservoir 3 Drum light 4 Fine fluff filter 5 Coarse fluff filter 6 Fluff filter 7 Rating plate 8 Loading door reversible 9 Heat exchanger door fluff filter heat exchanger 10 Button for opening door in plinth 11 Ventilation grille 12 Adjustable feet Product description 35 ...

Page 36: ...off switch 2 Function buttons 3 START PAUSE button 4 DELAY START ZEITVORWAHL button 5 Display 6 Status LED Display 1 2 3 4 5 6 1 time to end error message 2 warnings 3 long anti crease icon 4 cycle phase status 5 delay time option icon 6 child lock icon 36 Control panel ...

Page 37: ...sor that is normal for compressor powered appliances such refrigerators freezers PROGRAMME CHART Programmes Load1 Application properties Options Care mark COTTONS BAUMWOLLE EXTRA DRY EX TRATROCKEN 7 kg To dry thick or multi layered fabrics e g terry towelling items bathrobes all except EXTRA DELICATE EXTRA SANFT and TIME ZEITWAHL CUPBOARD DRY SCHRANK TROCKEN 2 7 kg To dry fabrics of even thickness...

Page 38: ...seams all except EXTRA DELICATE EXTRA SANFT and TIME ZEITWAHL MICRO FIBRE MIKROFASER 1 kg To dry thin fabrics polyester and polya mide which are not ironed all except EXTRA DELICATE EXTRA SANFT and TIME ZEITWAHL EASY IRON PLUS LEICHTBÜGELN PLUS 1 kg or 5 shirts To dry easy care cloths such as shirts and blouses After this programme the cloths iron easiest To have good result we recommend to shake ...

Page 39: ...as being suitable for tumble drying This appliance can be used for all wet laundry items which are labelled as suitable for tum ble drying Do not dry new coloured textiles together with light coloured laundry items Textile col ours may bleed Do not dry cotton jersey and knitwear with the EXTRA programme Items may shrink Wool and wool like textiles can be dried using the WOOL CARE WOLLPFLEGE pro gr...

Page 40: ...mme selector to any programme or turn it to DRUM LIGHT BELEUCH TUNG The appliance has been switched on When the loading door is opened the drum light is illuminated Laundry loading CAUTION Do not jam the laundry in between the loading door and rubber seal 1 Open the loading door Push against the loading door push point 2 Load the laundry do not force it in 3 Close the loading door securely Lock mu...

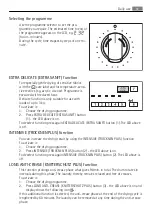
Page 41: ...is off INTENSIVE TROCKNEN PLUS function You can increase the drying result by using the INTENSIVE TROCKNEN PLUS function To activate it 1 Choose the drying programme 2 Press INTENSIVE TROCKNEN PLUS button 2 the LED above is on To deselect function press again INTENSIVE TROCKNEN PLUS button 2 The LED above is off LONG ANTI CREASE KNITTERSCHUTZ PLUS function This function prolongs anti crease phase ...

Page 42: ...ed the duration is automatically set to 10 mins DELAY START ZEITVORWAHL Allows to delay the start of a drying programme from minimum of 30 min to maximum of 20 hours 1 Select the drying programme and additional options 2 Push the DELAY START ZEITVORWAHL button again and again until the necessary de lay start is shown in the display e g if the programme has to start after 12 hours 3 To activate the...

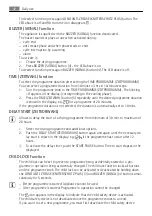
Page 43: ...rotection Laundry unloading Once the drying cycle is complete display shows a blinking anti crease icon appears on LCD If the BUZZER SIGNAL button 4 has been pressed an acoustic signal sounds in termittently for about one minute The drying cycles are automatically followed by an anti crease phase which lasts around 30 minutes The drum rotates at intervals during this phase This keeps the laundry l...

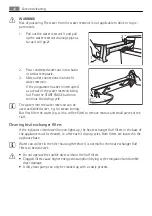
Page 44: ...r blocked fluff fil ters 1 Open loading door 2 Use a moist hand to clean the micro fine filter which is built into the lower part of the loading aperture 3 After a period of time a gleam because of detergent residue on laundry forms on the filters When this occurs clean the filters with warm water using a brush Remove the filter from the door pulling it out It can be positioned with the tooth faci...

Page 45: ... mesh filter into the brackets on the loading door until they snap into place 10 Re insert fine strainer 11 Push against the large mesh filter until it locks into the interlock If the fine strainer is not fitted the large mesh filter will not snap into place and the loading door cannot be closed Cleaning the door seal Clean the door seal with a moist cloth immediately after the drying cycle is com...

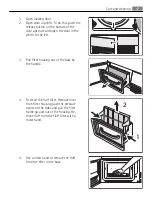
Page 46: ...tilled water e g for steam ironing But first filter the water e g with a coffee filter to remove residue and small pieces of the fluff Cleaning heat exchanger filters If the indicator clean base filters lights up the heat exchanger fluff filters in the base of the appliance must be cleaned i e after each 3 drying cycles Both filters are located in the appliance base Water can collect in the filter...

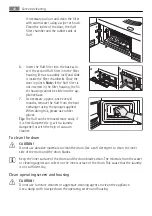
Page 47: ...eft 3 Pull filter housing out of the base by the handle 4 To clean the fluff filter Remove filter from filter housing push the pressure points on the sides and pull the filter frame up and out of the housing Re move fluff from the fluff filter with a moist hand 5 Use a moist hand to remove the fluff from the filter in the base 2 1 Care and cleaning 47 ...

Page 48: ...using the sponge supplied When doing this please use rubber gloves Tip The fluff can be removed more easily if it is first dampened e g with a laundry dampener or with the help of vacuum cleaner To clean the drum CAUTION Do not use abrasive materials to clean the drum Use a soft detergent to clean the inner side of the drum and the drum blades Keep the inner surface of the drum and the drum blades...

Page 49: ...ogramme selector in OFF position Turn it to DRUM LIGHT if available or to any programme Defective light bulb Replace light bulb see next section Abnormally elapsing time on the LCD5 Time to end is calculated on the basis of type volume and dampness of laun dry Automatic process this is not a ma chine fault Programme inactive Full water reservoir Empty water reservoir3 press START PAUSE button Dryi...

Page 50: ...op refer to Description of machine section 2 Replace defective bulb 3 Screw cover back down Check the correct positioning of o ring gasket before screwing back the door light cover Do not operate the dryer when missing o ring gasket on door light cover WARNING For safety reasons the cover must be screwed down tightly If this is not done the dryer must not be operated MACHINE SETTINGS Setting Imple...

Page 51: ... on 1 Water contains a variable quantity of limestone and mineral salts of which quantities vary according to geographical locations thus varying its conductivity values Relevant variations of the conductivity of the water compared to those prefixed by the factory could slightly influence the residual humidity of the laundry at the end of the cycle Your dryer allows you to regulate the sensitivity...

Page 52: ...t of different measuring methods 2 in accordance to EN 61121 3 hints for test institutes cycle has to be checked in accordance to EN 61121 SERVICE If there are technical faults first check if you can remedy the problem yourself with the help of the operating instructions see chapter What to do if If you cannot remedy the problem on your own get in touch with the Customer Care De partment or one of...

Page 53: ...53 ...

Page 54: ...54 ...

Page 55: ...55 ...

Page 56: ...www aeg com shop 136918840 A 312011 ...

Reviews: