background image

59

Control Panel

• Best results are obtained by using a low speed for normal conditions

and a high speed when odours are more concentrated.

Turn the hood on a few minutes before you start cooking.

The hood should be left on after cooking for about 15 minutes or

until all the odours have disappeared.

The control switches are located on the hood’s front panel:

1. ON/OFF Lights Key– lower lamps:

press once to switch the lights on (soft lighting).

press twice to increase the intensity of the light.

press once again to switch the lights off.

ON/OFF LIGHTS Key – upper lamps:

press and keep pressed – the upper lights switch on.

repeat the same operation to switch them off.

2. ON/OFF motor 

key

 reset

 indicators

.

3.

Cyclical 

1-2-3 speed

 selection 

key

:

4. Intensive

 speed selection

 key

:

lasts 5 minutes after which the hood returns to the previously set

speed.

5. Led

 speed suction 

1

 indicator (power) and 

grease filter

 saturation

indicator (n this case the led flashes).

6. Led

 speed suction 

2

 indicator (power) and 

carbon filter

 saturation

indicator (in this case the led flashes).

7. Led

 speed suction   

3

 indicator (power) and remote control batteries

discharged indicator (the led flashes – the remote control is a

special accessory to order apart).

8. Led intensive

 speed (power) indicator.

Fig.  2

1

2

4

3

5

6

7

8

Summary of Contents for DD 8697

Page 1: ...DD 8697 Dunstabzugshaube Afzuigkap Hotte Cooker Hood Montage und Gebrauchsanweisung Installatie en gebruiksaanwijzing Notice d utilisation et d installation Operating and Installation Instructions...

Page 2: ...ce and Care 61 Cleaning the hood 61 Removing the panels 61 Metal grease filter 62 Removing the metal grease filter 62 Charcoal filter 63 Changing the light upper and lower bulbs 64 What to do if 65 Sp...

Page 3: ...intended for use by young children or infirm persons without supervision Older children must be supervised if using the appliance Young children should be supervised to ensure that they do not play wi...

Page 4: ...nsions that are approxi mately the same as the outlet hole National and regional building regulations impose a number of restrictions on using hoods and fuel burning appliances connected to a chimney...

Page 5: ...me diameter as the outlet hole the length should be no more than 3 metres with one 90 bend 2 metres with two 90 bends Bends of more than 90 will reduce the efficiency of the hood and reduce the airflo...

Page 6: ...can be used immediately in the recirculation mode We advise removing the charcoal filter to use the hood in the extraction mode Extraction mode In this mode fumes are extracted to the outside via a ho...

Page 7: ...OFF LIGHTS Key upper lamps press and keep pressed the upper lights switch on repeat the same operation to switch them off 2 ON OFF motor key reset indicators 3 Cyclical 1 2 3 speed selection key 4 Int...

Page 8: ...light up but when the charcoal filter LED 6 lights up the saturation indicator will be enabled To disable it Press buttons 3 and 4 again simultaneously and hold them for 3 seconds until the charcoal...

Page 9: ...ed objects in the motor s protective grid Only ever clean the switch panel and filter grill using a damp cloth and mild washing up liquid It is extremely important to clean the unit and change the fil...

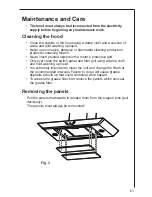
Page 10: ...hing Soak grease filters for about one hour in hot water with a grease loosening cleaner then rinse off thoroughly with hot water Repeat the process if necessary Refit the grease filters when they are...

Page 11: ...separately so that no food parts gets stuck on the filter and later causes bad odours To reactivate the charcoal the filter should be dried in an oven for 10 minutes with a maximum temperature of 100...

Page 12: ...re damage linked to inappropriate maintenance or failure to observe the above safety recommendations Changing the light upper and lower bulbs Disconnect the cooker hood from the mains supply Remove th...

Page 13: ...cked The cooker hood has The safety cut out device has been switched off tripped during operation Turn off the hob and then wait for the device to reset If the hood has been installed below the height...

Page 14: ...covering your post code area For the address of your local Service Force Centre and further information about Service Force please visit the website at www serviceforce co uk Please ensure that you ha...

Page 15: ...re LU4 9QQ 08705 350 350 calls to this number may be recorded for training purposes Technical Details Dimensions in cm Height 63 7 72 107 8 Width 89 5 Depth 45 Maximum absorbed power 330 W Motor 250 W...

Page 16: ...ixed connection of the appliance must only be carried out by an authorised electrician Electrical connection for UK only Safety warnings for the electrician Connect the hood to the mains supply via a...

Page 17: ...ll 1 hole 8mm 9 fit two wall plugs 10 Drill two holes 8mm on the upper side close to the ceilling fit two wall plugs 11 In case the hood is to be used in filter version mount the deflector F on the ch...

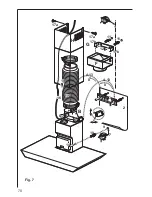
Page 18: ...70 17b 17b 4 13 4 13 1 2 3 11 11 12 15 17a 17a 65 16 B G H 8 8 18 F 5 6 14 9 10 7 Fig 7...

Page 19: ...illion Electrolux Group products such as refrigerators cookers washing machines vacuum cleaners chain saws and lawn mowers are sold each year to a value of approx USD 14 billion in more than 150 count...

Reviews: