aee.com
-20-
7. Deleting, Protecting, and Automatically Playing a File
In playback mode, you can press the ”
M
“ key to delete, protect, and automatically play a file.
1) Deleting a File
On the video, photo, or mixed file interface, you can delete a video file, a photo file, or all the files.
To delete a file, perform the following operations: Select a file to be deleted. Press the ”
M
“ key to display the operation
interface. The following options are displayed on the operation interface.
●
Delete single: deletes a picture. Press OK to display the options for deletion. Select “
√
”or “
×
”based on the displayed
message. An option marked with “
√
” will be deleted.
●
Delete all: deletes all the unprotected pictures.
2) Protecting a File
On the video, photo, or mixed file interface, you can protect a video file, a photo file, or all the files.
To protect a file, perform the following operations: Select a file to be protected. Press the ”
M
“ key to display the
operation interface. The following options are displayed on the operation interface.
●
Protect single: protects a file.
Press “
OK
” to display the options for protection. After you select a file to be protected and press “
OK
”, the system
automatically returns to the playback interface.
●
Protect all: protects all the files.
Press “
OK
” to display the options for protection. After you select all the options to be protected, the system
automatically returns to the playback interface.
●
Unlock single: unlocks a protected file.
Press “
OK
” to display the options for protection. After you select a file to be unlocked and press “
OK
”, the system
automatically returns to the playback interface.
●
Unlock all: unlocks all the protected files.
Press “
OK
” to display the options for protection. After you select all the files to be unlocked and press “
OK
”, the system
automatically returns to the playback interface.
Note: For a protected file, the” “icon in gray is displayed in the bottom-left corner of the preview interface. After being
unlocked, a file is unprotected, and the” “icon in blue is displayed in the bottom-left corner of the preview interface. A
protected file cannot be deleted, but can be deleted by a formatting operation.
3) Automatically Playing a File
In the photo file interface, the SD21 video camera can automatically play photos in sequence every five seconds.
To automatically play a file, perform the following operations: Enable the playback function, and press “
OK
”.
8. Using a Remote Controller
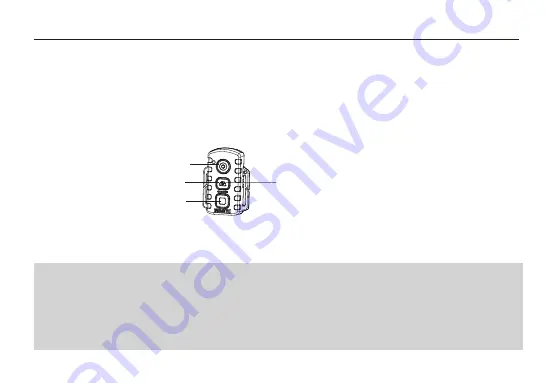
The SD21 video camera is equipped with a remote controller, which is used for control of video recording, shooting as
well as turning on/off a laser. After you pressing the corresponding key, the red indicator on the remote controller blinks
once. The following figure shows the functional keys of the remote controller.
To match the functions of the remote controller with those of the SD21 video camera one to one, perform the following
operations for code pairing before using the remote controller.
— Press the Video key on the SD21 video camera in power off.
— Turn the power switch to the ON position.
— Release the Video key. Then hold the Video and Stop keys on the remote controller once within three seconds.
After successful code pairing, the SD21 video camera generates the tick tone twice.
Note:
a. To check whether code pairing is successful, use a wireless remote controller to control the SD21 video camera. The
control functions involve starting/stopping video recording, shooting, waking-up in standby mode, and turning on/off
the laser indicator. For each operation, the SD21 video camera generates a tick tone, indicating that the operation takes
effect. When you use the remote controller to stop video recording or turn off the laser indicator, the SD21 video
camera generates a tick tone twice.
b. The remote controller must be used within a distance of up to 10 meters in an obstacle-free and horizontal angle.
c. In standby mode, you can press the Video, Photo, or Stop key on the remote controller to start the SD21 video camera.
Video key
Photo key
Press and hold the Photo key
for five seconds to enable or
disble the laser function
Stop key
Summary of Contents for SD21
Page 1: ...G SENSOR SD21...
Page 33: ......
Page 34: ......
Page 35: ......
Page 36: ...S PPSD21xxA01V3...


