background image

SIMB-A01 User Manual

26

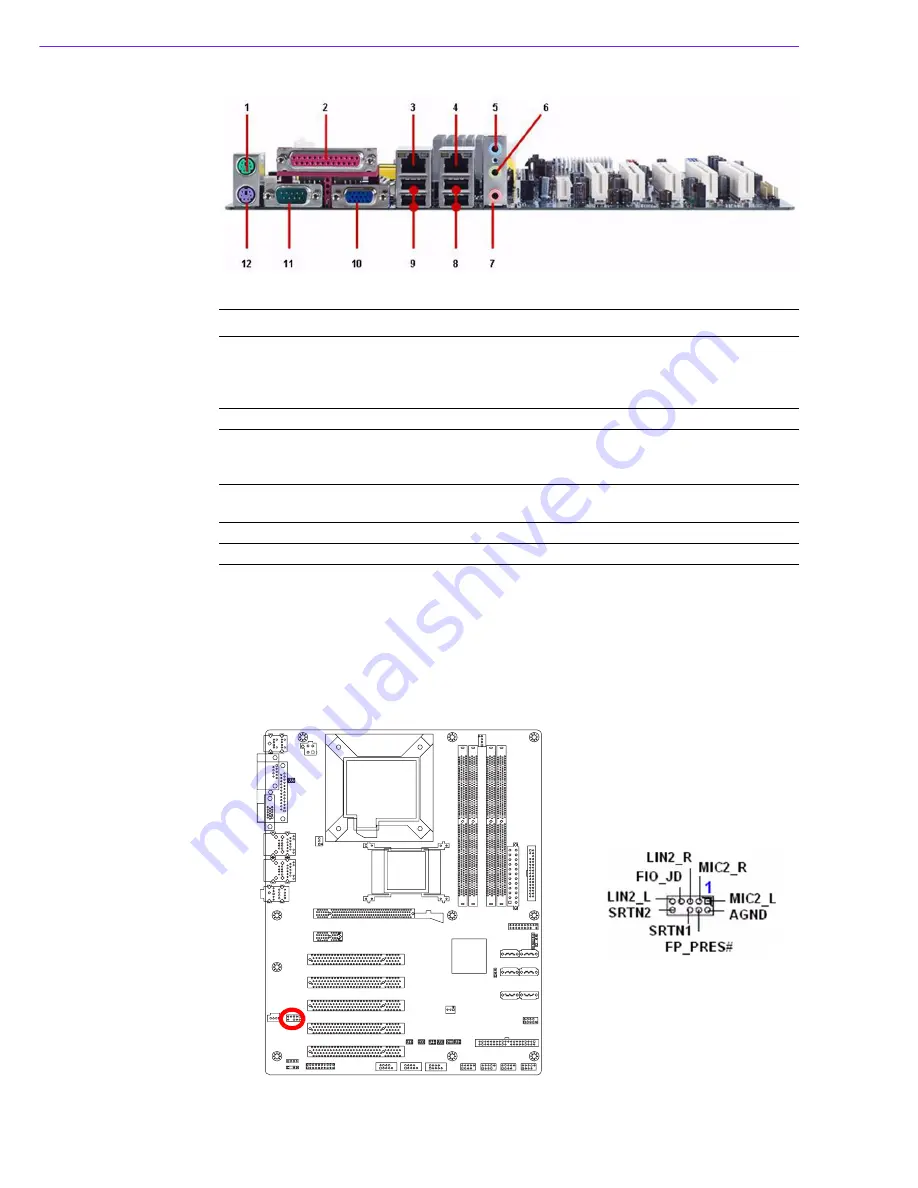
2.8.2

Front Panel Audio Connector (AAFP)

This connector is for a chassis-mounted front panel audio I/O module that supports
either HD Audio or legacy AC’97 (optional) audio standard. Connect one end of the
front panel audio I/O module cable to this connector.

No

Label

Function

Description

6

AUDIO

Line-Out port (Lime)

This port connects a headphone or a 
speaker. In 4-channel, 6-channel, and 8-
channel configuration, the function of this 
port becomes Front Speaker Out.

7

AUDIO

Microphone port (Pink)

This port connects a microphone.

8, 9

LAN_USB1,
LAN_USB2

USB 2.0 connector

These two 4-pin Universal Serial Bus (USB) 
ports are available for connecting USB 2.0 
devices.

10

VGA

VGA port

This 15-pin port is for a VGA monitor or other 
VGA-compatible devices.

11

COM1

Serial port connector

D-Sub 9-pin, male

12

KBMS

PS/2 KB connector

This port is for a PS/2 keyboard


Summary of Contents for SIMB-A01

Page 1: ...User Manual SIMB A01 Intel Q35 LGA775 socket for Intel Core 2 Quad Core 2 Duo ATX Motherboard...

Page 2: ...the power supply is broken do not try to fix it by yourself Contact a qualified service technician or your retailer Operation safety Before installing the motherboard and adding devices on it carefull...

Page 3: ...cking List Before you begin installing your single board please make sure that the following materials have been shipped 1 x Intel Q35 ATX Main board 1 x CD ROM per carton which contains the following...

Page 4: ...SIMB A01 User Manual iv...

Page 5: ...the CPU Heatsink and Fan 13 2 4 3 Uninstalling the CPU Heatsink and Fan 15 2 5 System Memory 17 2 5 1 DIMM Sockets Location 17 2 5 2 Memory Configurations 18 2 5 3 Installing a DDR2 DIMM 18 2 5 4 Rem...

Page 6: ...E_EIDE 33 2 8 13 Power Fan Connector PWR_FAN 33 2 8 14 Serial ATA Connector SATA1 6 34 2 8 15 Digital Audio Connector SPDIF_OUT 35 2 8 16 SPI Pin Header SPI 36 2 8 17 USB 2 0 Connector USB56 USB78 USB...

Page 7: ...Chapter 1 1 Product Overview...

Page 8: ...el 05B 05A 06 processors Support Intel next generation 45nm Multi Core CPU FSB 1333 1066 800 MHz BIOS AMI 32 Mb SPI BIOS System Chipset Intel Q35 GMCH ICH9R I O Chipset Winbond W83627DHG A Memory Four...

Page 9: ...r Internal I O 4 x USB connectors support additional 8 USB ports with 5V dual 1 x Floppy disk drive connector 1 x IDE connector 6 x SATA connectors 1 x CPU Fan header 1 x Chassis Fan header 1 x Power...

Page 10: ...SIMB A01 User Manual 4 1 2 Block Diagram Figure 1 1 Block Diagram...

Page 11: ...Chapter 2 2 Product Introduction...

Page 12: ...onboard LED Caution Unplug the power cord from the wall socket before touching any component Use a grounded wrist strap or touch a safely grounded object or a metal object such as the power supply cas...

Page 13: ...into the chassis in the correct orientation The edge with external ports goes to the rear part of the chassis as indicated in the image below 2 2 2 Screw Holes Place eight 8 screws into the holes ind...

Page 14: ...7 6 USB78 USB56 USB910 USB1112 COM4 COM3 COM2 JDIO SPDIF_OUT JAMP1 PCI5 PCI4 CD IN AAFP PCI3 PCI2 PCI1 PCIEX1_1 AUDIO LAN_USB2 LAN_USB1 PWR_FAN VGA LPT COM1 JCOMPWR1 KB MS PCIEX16 Table 2 1 Slots Lab...

Page 15: ...pitch 2 54mm 36 ATX12V ATX Power Connector 2 x 2 header 37 CD IN Optical Drive Audio Connector 4 x 1 header pitch 2 54mm 38 CHA_FAN1 Chassis Fan Connector 3 x 1 wafer pitch 2 54mm 38 COM2 3 4 Serial P...

Page 16: ...in this section do not match the CPU documentation follow the lat ter Upon purchase of the motherboard make sure that the PnP cap is on the socket and the socket contacts are not bent Contact your re...

Page 17: ...direction of the arrow to a 135o angle 4 Lift the load plate with your thumb and forefinger to a 100o angle A then push the PnP cap from the load plate window to remove B Important Before installing t...

Page 18: ...U connect the chassis fan cable to the CHA_FAN1 connector to ensure system stability Caution The CPU fits in only one correct orientation DO NOT force the CPU into the socket to prevent bending the co...

Page 19: ...ll the CPU fan and heatsink assembly When you buy a boxed Intel processor the package includes the CPU fan and heatsink assembly If you buy a CPU separately make sure that you use only Intel certified...

Page 20: ...cable to the connector on the motherboard labelled CPU_FAN Caution Do not forget to connect the fan cables to the fan connectors Insuf ficient air flow inside the system may damage the motherboard co...

Page 21: ...stalling the CPU Heatsink and Fan 1 Disconnect the CPU fan cable from the connector on the motherboard 2 Rotate each fastener counter clockwise 3 Pull up two fasteners at a time in a diagonal sequence...

Page 22: ...atsink and fan assembly from the motherboard 5 Rotate each fastener clockwise to ensure correct orientation when reinstalling Important The narrow end of the groove should point outward after resettin...

Page 23: ...kets A DDR2 module has the same physical dimensions as a DDR DIMM but has a 240 pin footprint compared to the 184 pin DDR DIMM DDR2 DIMMs are notched differ ently to prevent installation on a DDR DIMM...

Page 24: ...the total size of memory module s installed per channel must be the same DIMM1 DIMM2 Always install DIMMs with the same CAS latency For optimum compatibility it is recommended that you obtain memory m...

Page 25: ...Caution A DDR2 DIMM is keyed with a notch so that it fits in only one direc tion DO NOT force a DIMM into a socket to avoid damaging the DIMM The DDR2 DIMM sockets do not support DDR DIMMs DO NOT ins...

Page 26: ...pansion card configure it by adjusting the software settings 1 Turn on the system and change the necessary BIOS settings if any 2 Assign an IRQ to the card if needed Refer to the tables on the next pa...

Page 27: ...N card SCSI card USB card and other cards that comply with PCI specifications The figure shows a LAN card installed on a PCI slot 2 6 5 PCI Express X16 Slot This motherboard supports one PCI Express x...

Page 28: ...rase the RTC RAM 1 Turn OFF the computer and unplug the power cord 2 Remove the onboard battery 3 Move the jumper cap from pins 1 2 default to pins 2 3 Keep the cap on pins 2 3 for about 5 10 seconds...

Page 29: ...23 SIMB A01 User Manual Chapter 2 Product Introduction 2 7 2 Chassis Intrusion Connector CHSSIS1 2 7 3 COM1 2 3 4 RI 5V 12V Select JCOMPWR1 2 3 4 RI 12V 5V JCOMPWR1 JCOMPWR2 4 3 5 7 6...

Page 30: ...SIMB A01 User Manual 24 2 7 4 COM1 2 3 4 RI 5V 12V Select JCOMPWR1 2 3 4 RI 12V 5V JCOMPWR1 JCOMPWR2 4 3 5 7 6 RS 232 RS 422 RS 485...

Page 31: ...t that supports Enhanced Parallel Port EPP and Extended Capabilities Parallel Port ECP mode 3 4 LAN_USB1 LAN_USB2 LAN RJ 45 connector This port allows Gigabit connection to a Local Area Network LAN th...

Page 32: ...e This port connects a headphone or a speaker In 4 channel 6 channel and 8 channel configuration the function of this port becomes Front Speaker Out 7 AUDIO Microphone port Pink This port connects a m...

Page 33: ...tional HD Audio feature we recommend that you connect a high definition front panel audio module to this con nector to avail of the motherboard s high definition audio capability ATX12V EATXPWR Import...

Page 34: ...SIMB A01 User Manual 28 2 8 4 Optical Drive Audio Connector CD IN 2 8 5 Chassis Fan Connector CHA_FAN1 Important Enable the CD IN function in the audio utility when using this connector...

Page 35: ...29 SIMB A01 User Manual Chapter 2 Product Introduction 2 8 6 Serial Port Connector COM2 COM3 COM4 2 8 7 CPU Fan Connector CPU_FAN COM2 COM3 COM4 COM2 COM3 COM4...

Page 36: ...may damage the motherboard components and hardware monitoring errors can occur if you fail to plug this connector These are not jumpers DO NOT place jumper caps on the fan con nectors Important Pin 5...

Page 37: ...e system power button Pressing the power button turns the system on or puts the system in sleep or soft off mode depending on the BIOS settings Pressing the power switch for more than four seconds whi...

Page 38: ...SIMB A01 User Manual 32 2 8 10 Amplifier Connector JAMP1 2 8 11 Digital Audio Connector JDIO...

Page 39: ...SIMB A01 User Manual Chapter 2 Product Introduction 2 8 12 Primary EIDE RAID Connector PRE_EIDE 2 8 13 Power Fan Connector PWR_FAN Note Orient the red markings usually zigzag on the IDE cable to Pin...

Page 40: ...ial ATA signal cables for Serial ATA hard disk drives SATA2 SATA1 SATA4 SATA3 SATA6 SATA5 Note Connect the right angle side of SATA signal cable to SATA device Or you may connect the right angle side...

Page 41: ...Connector SPDIF_OUT This connector is for an additional Sony Philips Digital Interface S PDIF port s Connect the S PDIF module cable to this connector then install the module to a slot opening at the...

Page 42: ...hese connectors are for USB 2 0 ports Connect the USB GAME module cable to any of these connectors then install the module to a slot opening at the back of the system chassis These USB connectors comp...

Page 43: ...37 SIMB A01 User Manual Chapter 2 Product Introduction Caution Never connect a 1394 cable to the USB connectors Doing so will dam age the motherboard Note The USB module is purchased separately...

Page 44: ...SIMB A01 User Manual 38...

Page 45: ...Chapter 3 3 BIOS Setup This chapter tells how to change the system setting through the BIOS setup menus Detailed descriptions of the BIOS parame ters are also provided...

Page 46: ...he Power On Self Test POST to enter the Setup utility otherwise POST continues with its test routines If you wish to enter Setup after POST restart the system by pressing Ctrl Alt Delete or by pressin...

Page 47: ...the legend keys to enter val ues and move from field to field within a sub menu as you would within a menu Use the Esc key to return to the main menu Take some time to familiarize yourself with the l...

Page 48: ...ing screen appears The BIOS menu screen dis plays the items that allow you to make changes to the system configuration To access the menu items press the up down right left arrow key on the keyboard u...

Page 49: ...2MB 5 1 4 720KB 5 1 4 1 44MB 5 1 4 2 88MB 3 1 2 3 2 1 4 SATA 1 6 While entering Setup the BIOS automatically detects the presence of SATA devices There is a separate sub menu for each IDE device Selec...

Page 50: ...disables data multi sectors transfers When set to Auto the data transfer from and to the device occurs multiple sectors at a time if the device supports multi sector transfer feature When set to Disab...

Page 51: ...ver to enable advanced Serial ATA fea tures that increases storage performance on random workloads by allowing the drive to internally optimize the order of commands If you want to create a RAID 0 RAI...

Page 52: ...SIMB A01 User Manual 46 3 2 1 6 AHCI Setting AHCI CD DVD Boot Time out The options 0 5 10 15 20 25 30 35...

Page 53: ...menu gives you an overview of the general system specifications The BIOS automatically detects the items in this menu AMI BIOS Display the auto detected BIOS information Processor Display the auto det...

Page 54: ...er system devices 3 2 2 1 USB Configuration The items in this menu allow you to change the USB related features Select an item then press Enter to display the configuration options Caution Take cautio...

Page 55: ...ration options Enabled Disabled BIOS EHCI Hand Off Enabled Allow you to enable support for operating systems without an EHCI hand off feature Configuration options Disabled Enabled Port 64 60 Emulatio...

Page 56: ...SIMB A01 User Manual 50 TCG TPM SUPPORT YES Allows you to enable or disable TCG TPM setting Configuration options No Yes Note The following items show when you set TCG TPM SUPPORT option to YES...

Page 57: ...ation Disabled Allows you to enable or disable the Intel TXT Initialization Configuration options Disabled Enabled Note The items show when you set Intel TXT Initialization option to Enabled When you...

Page 58: ...SIMB A01 User Manual 52 3 2 2 4 Intel VT d Configuration Intel VT d Disabled Allows you to enable or disable the Intel VT d function Configuration options Disabled Enabled...

Page 59: ...operating systems to boot even without support for CPUs with extended CPUID functions Configuration options Disabled Enabled Execute Disable Bit Enabled Allows you to enable or disable the No Executio...

Page 60: ...SIMB A01 User Manual 54 3 2 2 6 Chipset The Chipset menu allows you to change the advanced chipset settings Select an item then press Enter to display the sub menu North Bridge Configuration...

Page 61: ...e Internal graph ics device Configuration options Disabled Enabled 1MB Enabled 8MB PEG Port Control Auto Allows you to disable or enable PEG port control Configuration options Auto Disabled Video Func...

Page 62: ...dress Configuration options Disabled 3F8 2F8 3E8 2E8 Serial Port IRQ Configuration options 3 4 10 11 Parallel Port Address 378 Allow you to select the Parallel Port base addresses Configuration option...

Page 63: ...nd setting the memory size block for legacy ISA devices Plug and Play O S No When set to No BIOS configures all the devices in the system When set to Yes and if you install a Plug and Play operating s...

Page 64: ...to select the Advanced Configuration and Power Interface ACPI state to be used for system suspend Configuration options S1 POS S3 STR Auto 3 2 3 2 Repost Video on S3 Resume No Determine whether to inv...

Page 65: ...list Configuration options Disabled Enabled 3 2 3 5 APM Configuration Restore on AC Power Loss Off When set to Off the system goes into off state after an AC power loss When set to On the system goes...

Page 66: ...M or Ignored N A The onboard hardware monitor automatically detects and displays the CPU fan speed in rotations per minute RPM If the fan is not connected to the mother board the field shows N A Chass...

Page 67: ...e Keep CPU at lower temperature than Optimized mode with faster fan speed 3 2 4 Boot The Boot menu items allow you to change the system boot options Select an item then press Enter to display the sub...

Page 68: ...on the screen depends on the number of devices installed in the system Configuration options xxx Drive Disabled 3 2 4 3 Removable Device 1st xxth Drive xxx Drive These items specify the removable dev...

Page 69: ...e or OEM logo The options Disabled Enabled Add On ROM Display Mode Force BIOS Set the display mode for option ROM Configuration options Force BIOS Keep Current Bootup Num Lock On Allows you to select...

Page 70: ...to set or change the Supervisor User Password 1 Select the Change Supervisor User Password item and press Enter 2 From the password box type a password composed of at least six letters and or number...

Page 71: ...afe default values for the BIOS items and save or discard your changes to the BIOS items Note If you forget your BIOS password you can clear it by erasing the CMOS Real Time Clock RTC RAM Note Press E...

Page 72: ...ry sustains the CMOS RAM so it stays on even when the PC is turned off When you select this option a confirmation window appears Select OK to save change and exit 3 2 5 2 Discard Changes and Exit Sele...

Page 73: ...Select OK to dis card any changes and load the previously saved values 3 2 5 4 Load Setup Defaults This option allows you to load the setup default values for each of the parameters on the Setup menus...

Page 74: ...tions are subject to change without notice No part of this publication may be reproduced in any form or by any means electronic photocopying recording or otherwise without prior written permis sion of...

Reviews: