background image


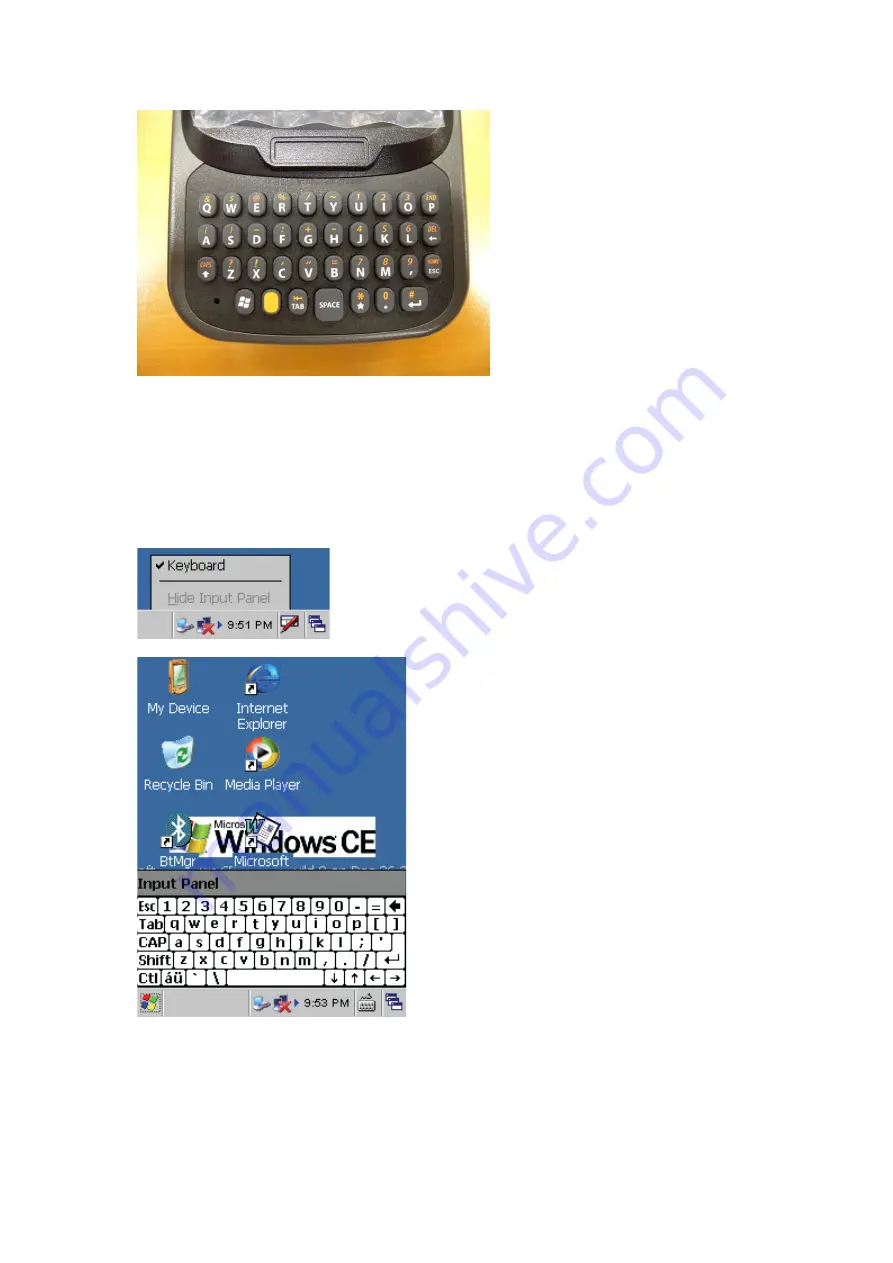
Entering Characters with the Keypad 

The operating system has an onscreen keyboard that enables you to enter alphanumeric 

characters with the stylus. 

Press the input panel icon in the system tray to view the input panel menu. 

Tap 

Keyboard 

to view the onscreen keyboard. 


Tap 

Hide Input Panel 

to close the keyboard. The keyboard emulates a standard computer 

keyboard. Tap the onscreen keyboard to enter, edit, and delete text. 


Summary of Contents for PWS-430

Page 1: ...Regulatory Compliance Statements Federal Communications Commission FCC Statement This device complies with Part 15 of the FCC Rules Operation is subject to the following two conditions 1 This device m...

Page 2: ...the equivalent international standards EN 60950 1 IEC60950 1 Product Safety EN 300 328 Technical requirement for radio equipment ETS 301 489 General EMC requirements for radio equipment Products that...

Page 3: ...on insert the PWS 430 into the cradle and connect the AC adapter to the cradle Recharge the unit for 3 hours in order to fully charge its battery The backup battery will recharge from external power w...

Page 4: ...ty notice Chapter 1 Introducing the PWS 430 Features Package Contents A Tour of the PWS 430 Front View Right View Left View Bottom View Back View Cradle Optional Chapter 2 Getting Started Connecting t...

Page 5: ...omputer Connecting with Bluetooth Connecting to a WLAN Wi Fi Add a New Network Connect to an Existing Network Changing the Advanced Settings View Wireless Networking Log Information Connecting GPS Usi...

Page 6: ...dergone multiple 5 feet drop tests to prevent downtime Features With powerful wireless communication and data capture functionality the PWS 430 is a smart configurable handheld terminal with applicati...

Page 7: ...Barcode scan button right side Volume control buttons LCD light switch button Package Contents After opening the box ensure the following accessories for the PWS 430 are present PWS 430 device Stylus...

Page 8: ...r device It is touch sensitive and responds to the stylus or finger QWERTY keys Keypad interface for controlling the PWS 430 See Keypads and Function Buttons on page for more information Power LED Ind...

Page 9: ...ion Barcode scan button Press to activate the barcode scanner LCD light switch button Press to turn on off the LCD light Left View Component Description Volume control button Press to turn up down the...

Page 10: ...me way you would a pen or pencil 5 Mega Pixel Camera Displays LED Speaker Enables you to hear audio from the PWS 430 Battery pack compartment Houses the removable and rechargeable battery pack See Ins...

Page 11: ...430 Installing the Battery This section explains how to install the battery WARNING There is a risk of fire and burns if the battery pack is handled improperly DO NOT disassemble crush puncture short...

Page 12: ...ove the stylus from the holder 2 Push the latch to remove the battery compartment cover from the chassis 3 Align the battery contacts with the contacts in the compartment and place the battery in the...

Page 13: ...you need to charge it for about 3 hours Charge the PWS 430 using the charger or the docking station NOTE When the battery power is below 10 the PWS 430 will enter suspend mode Charging the Battery wit...

Page 14: ...f the external battery charger 3 Plug the power cable connector into the AC adapter 4 Plug the AC adapter into an electrical outlet The charging LED right on the PWS 430 flashes LED Status LED Status...

Page 15: ...your device for about 3 hours the device is ready to be used You can now start up your device where you ll calibrate the display learn some basic stylus usage and set up the system time zone date and...

Page 16: ...librated 3 After calibration is finished press the Enter key to save the settings or press Esc to revert to the previous settings NOTE To recalibrate the screen at any time tap Start Settings Control...

Page 17: ...Setting the Time and Date Follow these instructions to set the time and date 1 Tap Start Settings Control Panel 2 Double tap Date Time 3 Tap the arrows next to the month to select the correct month...

Page 18: ...4 Select a field in the time box and tap the arrows next to the time to change the value of the field 5 Tap the drop down arrow next to Time Zone to select the correct time zone for your area...

Page 19: ...ve the settings Adjusting the Screen Brightness Follow these instructions to adjust the screen brightness 1 Tap Start Settings Control Panel 2 Double tap OEMs Utility 3 Click the Display Manager tab 4...

Page 20: ...rdware Keypads and Function Buttons The keypad enables you to both enter information and interact with the PWS 430 operating system and also operate secondary functions using the function keys and Fn...

Page 21: ...alphanumeric characters with the stylus Press the input panel icon in the system tray to view the input panel menu Tap Keyboard to view the onscreen keyboard Tap Hide Input Panel to close the keyboard...

Page 22: ...se your finger to interact with the screen as well 1 Remove the stylus from its holder 2 Hold the stylus as you would a pencil 3 To make a choice from a menu lightly tap the tip of the stylus on that...

Page 23: ...r transfer files and data The slot also supports SDIO cards for added connectivity options Follow these instructions to insert a SD card into the SD slot 1 Remove the battery compartment cover and bat...

Page 24: ...era The PWS 430 has camera demo software for basic picture taking function 1 Before using the camera please peel off the protective film on the camera lens 2 Find the DDCam icon on the desktop and dou...

Page 25: ...ure on the lower left of the screen the picture will be stored in directory My Documents My Pictures 4 Due to the limitation of PWS 430 screen resolution the picture shown on PWS 430 may not look very...

Page 26: ...necting to Your Computer 1 After ActiveSync has been installed connect the USB convertor cable to your PWS 430 Refer to Connecting the PWS 430 to a PC on page 2 Plug the other end of the USB cable int...

Page 27: ...ronization will be initialized and will take place if you ve chosen to synchronize periodically or upon connection 8 ActiveSync detects the PWS 430 and establishes a connection 9 Click No and then cli...

Page 28: ...pped with a Bluetooth adapter or access point Bluetooth wireless technology allows you to communicate with the computer whenever it is within range Follow these instructions to set up a Bluetooth conn...

Page 29: ...s list You are prompted to authenticate the device 6 Tap Yes to authenticate the device You are prompted for the device s pin code NOTE Authenticating the device ensures that you are only enabling tru...

Page 30: ...e or inactive Authenticate tap to authenticate the device and add the device to the trusted devices list Encrypt tap to enable or disable encryption of data transferred between the PWS 430 and a Bluet...

Page 31: ...ireless Information tab to display the available options Add a New Network 1 To add a new network double click Add New 2 When the following screen displays input the required parameters as explained i...

Page 32: ...om the drop down list Authentication Select from the drop down list Network key Input the network key if required Key index Input the key index if required EAP type Select the EAP type 3 Click OK to c...

Page 33: ...Settings 1 Tap the Advanced button to display the advanced wireless settings the preferred networks will be listed and preference is given to networks at the top of the list 2 To move a network up or...

Page 34: ...3 To delete a network from the list tap the Delete button 4 To automatically connect to non preferred networks click the box...

Page 35: ...5 To select which networks to access tap the dropdown menu and choose the required option View Wireless Networking Log Information Tap the Log button to display the log information...

Page 36: ...ed with GPS application You can download freeware GPS viewer or other GPS test programs from the Internet 1 Run the GPS Viewer program download available from the Internet 2 Select COM4 and Baudrate 9...

Page 37: ...3 When GPS is active click GPS status to display the satellite status 4 After approximately 60 seconds for GPS longitude and latitude display...

Page 38: ...located on the right side of the unit Mode Symbology Decoded Codabar Codablock A and F Code 11 Code 39 Code 93 93i Code 128 ISBT 128 UCC EAN 128 Industrial and Standard 2 of 5 Interleaved 2 of 5 Matr...

Page 39: ...tive Undecoded operation 200 scans s Scan Angle 40 Print Contrast Down to 25 Min x Dimension 0 1mm 4mils Reading Distance Up to 90cm 35 inches 1 Click the BarCode Reader icon on the desk top 2 On the...

Page 40: ...3 Activate the barcode scanner by pressing the trigger key located on the right side of the unit...

Page 41: ...Text Message on the window displays the barcode value Chapter 5 Advance Settings Checking the Battery Status This section describes how to view the power level for both the main and backup battery an...

Page 42: ...eries NOTE It is necessary to charge the battery when the battery charge reaches below 13 If the battery does not accept a charge contact Technical Support Extending Battery Life You can extend the PW...

Page 43: ...the selected timeout The backlight is turned off The backlight turns on when the LCD is touched Switch state to Suspend PWS 430 enters suspend mode when there is no user input or system activity after...

Page 44: ...ory allocation All records and entries are retained after a reset Performing a Cold Boot 1 There is no reset button on PWS 430 2 To perform a reset cold boot just remove the battery for at least 3 sec...

Page 45: ...Update Software Visit Advantech s website www advantech com to download the latest version PWS 430 software Boot loader OS Currently PWS 430 software can only be updated via Micro SD card Update the...

Page 46: ...ter update completed Update the OS Operating System 1 Copy the latest version OS NK file into a Micro SD card 2 Press the Volume UP control button while power on the PWS 430 The whole OS update proces...

Page 47: ...3 Restart the computer after update completed...

Reviews: