background image

EKI-122xR-CE Series User Manual

37

3.5

Administrator Settings

3.5.1

Locate the Modbus Router

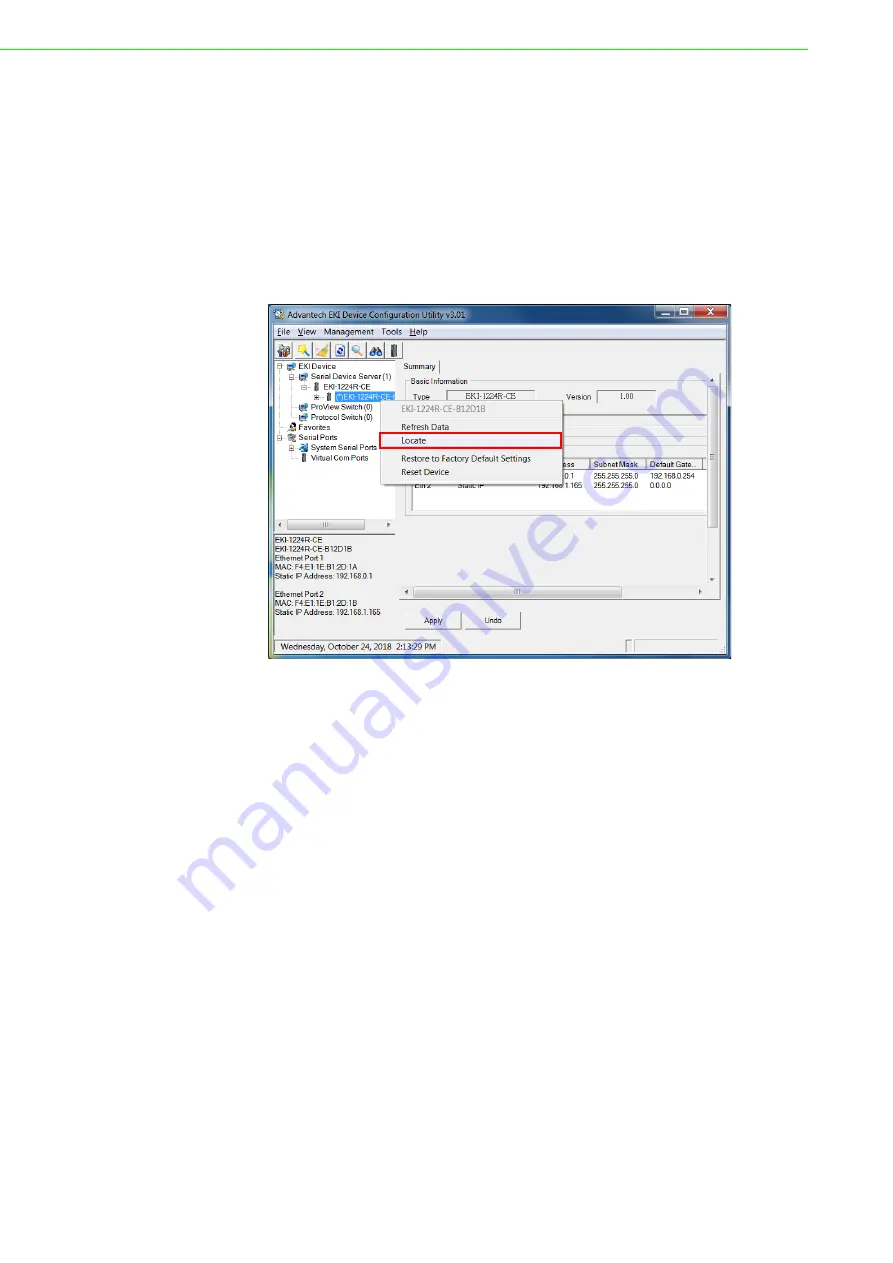
When several modbus routers are connected to the network, identification of a spe-
cific device is possible through the Locate function.

To locate the modbus router:

1.

From the device list frame, locate the desired device and right-click on it to dis-
play the settings menu.

2.

Select 

Locate

 from the menu.

Figure 3.16 Locate the Modbus Router

The unit’s Status LED solid amber and the buzzer beep until you click 

Stop Locate

.

Summary of Contents for EKI-122 R-CE Series

Page 1: ...User Manual EKI 122xR CE Series 1 2 4 port Modbus Router ...

Page 2: ...lation Advantech assumes no liability under the terms of this warranty as a consequence of such events Because of Advantech s high quality control standards and rigorous testing most of our customers never need to use our repair service If an Advantech product is defective it will be repaired or replaced at no charge during the warranty period For out of warranty repairs you will be billed accordi...

Page 3: ...s and can radiate radio frequency energy and if not installed and used in accordance with the instruction manual may cause harmful interference to radio communications Operation of this equipment in a residential area is likely to cause harmful interference in which case the user will be required to correct the interference at his own expense Technical Support and Assistance 1 Visit the Advantech ...

Page 4: ...dealer immediately 1 x Modbus router 1 x DIN Rail mounting bracket and screws 1 x Wall mounting bracket Warning Warnings indicate conditions which if not observed can cause personal injury Caution Cautions are included to help you avoid damaging hardware or losing data e g There is a danger of a new battery exploding if it is incorrectly installed Do not attempt to recharge force open or heat the ...

Page 5: ...r open the equipment For safety reasons the equipment should be opened only by qualified service personnel If one of the following situations arises get the equipment checked by service personnel The power cord or plug is damaged Liquid has penetrated into the equipment The equipment has been exposed to moisture The equipment does not work well or you cannot get it to work according to the user s ...

Page 6: ...AINS IMPORTANT SAFETY INSTRUCTIONS CONSERVER CES INSTRUCTIONS CETTE NOTICE CONTIENT DES INSTRUCTIONS IMPORTANTES CONCERNANT LA SÉCURITÉ WARNING SHOCK HAZARD ONLY FOR MOUNTING IN A RACK OR ENCLOSURE FULLY ENCLOSING ALL LIVE PARTS AVERTISSEMENT RISQUE D ÉLECTROCUTION NE DOIT ÊTRE INSTALLÉ QUE DANS UN BÂTI OU UN BOÎTIER RECOUVRANT ENTIÈREMENT TOUTES LES PIÈCES SOUS TENSION WARNING HOT SURFACE AVERTIS...

Page 7: ...on period The following guidelines are also recommended Wear a grounded wrist or ankle strap and use gloves to prevent direct contact with the device before servicing the device Avoid nylon gloves or work clothes which tend to build up a charge Always disconnect the power from the device before servicing it Before plugging a cable into any port discharge the voltage stored on the cable by touching...

Page 8: ...on 18 2 6 1 Overview 18 2 6 2 Considerations 19 2 6 3 Grounding the Device 19 2 6 4 Wiring a Relay Contact 20 2 6 5 Wiring the Power Inputs 20 2 7 Default Button 22 Chapter 3 Configuration 24 3 1 Configuration Utility Overview 25 3 2 Installing the Configuration Utility 25 3 3 Menu Bar 28 3 4 Quick Tool Bar 29 3 4 1 Utility Settings 30 3 4 2 Discovering Your Modbus Router 32 3 4 3 Network Settings...

Page 9: ...ter Rules 51 4 10 Port Forward 51 4 10 1 Port Forwarding 51 4 10 2 DMZ 51 4 11 QoS 52 4 11 1 QoS Settings 52 4 11 2 QoS IP Base Rules 53 4 11 3 QoS Protocol Base Rules 53 4 12 Static Routes 54 4 12 1 Static IPv4 Routes 54 4 13 Diagnostics 55 4 14 Status 56 4 14 1 Routes 56 4 14 2 Syslog 56 4 15 System Management 57 4 15 1 Administration 57 4 15 2 Backup Flash Firmware 57 4 15 3 System 58 4 15 4 Re...

Page 10: ... InstallShield Wizard 2 of 4 26 Figure 3 3 InstallShield Wizard 3 of 4 26 Figure 3 4 InstallShield Wizard 4 of 4 27 Figure 3 5 Configuration Utility Overview 28 Figure 3 6 Quick Tool Bar Overview 29 Figure 3 7 View Settings Main Form Setting 30 Figure 3 8 View Settings Device Manager 31 Figure 3 9 Open View of Serial Device Configuration Utility 32 Figure 3 10 Selecting a Group 33 Figure 3 11 Sele...

Page 11: ...QoS Protocol Base Rules 53 Figure 4 18 Static Routes Static IPv4 Routes 54 Figure 4 19 Diagnostics 55 Figure 4 20 Status Routes 56 Figure 4 21 Status Syslog 56 Figure 4 22 Management Administration 57 Figure 4 23 Management Backup Flash Firmware 57 Figure 4 24 Management System 58 Figure 4 25 Management Reboot Device 59 ...

Page 12: ...Chapter 1 1Product Overview ...

Page 13: ...nt Dimensions W x H x D EKI 1221R CE 30 x 140 x 95 mm 1 19 x 5 52 x 3 75 EKI 1222R CE 30 x 140 x 95 mm 1 19 x 5 52 x 3 75 EKI 1224R CE 42 x 140 x 95 mm 1 66 x 5 52 x 3 75 LED Display System LED P1 P2 Status Port LED LAN Speed Link Active Serial Tx Rx Environment Operating Temperature 10 C 60 C 14 F 140 F Storage Temperature 40 C 85 C 40 F 185 F Ambient Relative Humidity 5 95 non condensing Power P...

Page 14: ...n 1 System LED panel See LED Indicators on page 9 for further details 2 Default Press to restart the device Press and hold 10 seconds to reset to factory default 3 ETH ports RJ45 ports for Ethernet 4 Serial port DB9 pinout supports RS232 422 485 1 Default Ethernet ports ETH1 WAN ETH2 Tx Rx P1 P2 Status Serial port EKI 1221R 3 4 1 2 ...

Page 15: ...e LED Indicators on page 9 for further details 2 Default Press to restart the device Press and hold 10 seconds to reset to factory default 3 ETH ports RJ45 ports for Ethernet 4 Serial ports DB9 pinout supports RS232 422 485 1 2 Default Ethernet ports ETH1 WAN ETH2 Tx Rx Tx Rx P1 P2 Status Serial ports EKI 1222R 1 2 3 4 ...

Page 16: ...dicators on page 9 for further details 2 Default Press to restart the device Press and hold 10 seconds to reset to factory default 3 ETH ports RJ45 ports for Ethernet 4 Serial ports DB9 pinout supports RS232 422 485 1 2 3 4 Default Tx Rx Tx Rx Tx Rx Tx Rx P1 P2 Status Serial ports EKI 1224R Ethernet ports ETH1 WAN ETH2 1 2 3 4 ...

Page 17: ...22xR CE Series User Manual 1 2 2 Rear View 1 2 2 1 EKI 1221R CE EKI 1222R CE Figure 1 4 Rear View No Item Description 1 DIN Rail mounting plate Mounting plate used for the installation to a standard DIN rail 1 ...

Page 18: ...on 1 DIN Rail mounting plate Mounting plate used for the installation to a standard DIN rail 1 No Item Description 1 Wall mounting screws Screws x4 used in the installation of a wall mounting plate 2 Terminal block Connect cabling for power and alarm wiring 3 Ground terminal Screw terminal used on ground chassis PWR2 P Fail DC12 48V PWR1 V2 V2 V1 V1 1A 24V 2 1 3 ...

Page 19: ... Screws x4 used in the installation of a wall mounting plate 2 Terminal block Connect cabling for power and alarm wiring 3 Ground terminal Screw terminal used on ground chassis PWR2 P Fail DC12 48V PWR1 V2 V2 V1 V1 1A 24V 2 1 3 No Item Description 1 Wall mounting screws Screws x4 used in the installation of a wall mounting plate 1 No Item Description 1 Wall mounting screws Screws x4 used in the in...

Page 20: ...on function in utility Blinking System is ready Off System is powered off WAN Ethernet2 Amber On 100Mbps Ethernet connection Off 10Mbps Ethernet connection Green Blinking Ethernet port is transmitting or receiving data Steady on Ethernet has a good link for 10Mbps or 100Mbps operations Serial Amber Serial port is receiving data Green Serial port is transmitting data Off Data is not transmitted or ...

Page 21: ... 1 535 149 80 5 898 140 5 512 47 05 1 852 47 95 1 888 68 2 677 95 3 740 104 4 094 30 1 181 Unit mm inch 140 5 512 149 80 5 898 140 5 512 47 05 1 852 47 95 1 888 95 3 740 33 1 299 15 0 591 35 1 378 9 80 0 386 20 53 0 808 11 60 0 457 42 1 654 30 50 1 201 40 1 575 104 4 094 30 1 181 39 1 535 68 2 677 Unit mm inch ...

Page 22: ...Chapter 2 2Modbus Router Installation ...

Page 23: ...er can overheat To prevent performance degradation and damage to the modbus router make sure there is clearance at the top and bottom and around the exhaust vents 2 1 1 Connecting Hardware In this instruction it will explain how to find a proper location for your Modbus Routers and how to connect to the network hock up the power cable and connect to the EKI 122xR CE Series 2 2 Verifying Modbus Rou...

Page 24: ...op of the DIN rail clip hooks over the top of the DIN rail as shown in the following illustration Make sure the DIN rail is inserted behind the spring mechanism 2 Once the DIN rail is seated correctly in the DIN rail clip press the front of the modbus router to rotate the modbus router down and into the release tab on the DIN rail clip If seated correctly the bottom of the DIN rail should be fully...

Page 25: ...uter is correctly installed Otherwise re attempt the installation process from the beginning 2 3 1 2 Removing the DIN Rail Mounting Kit 1 Ensure that power is removed from the modbus router and disconnect all cables and connectors from the front panel of the modbus router 2 Push down on the top of the DIN rail clip release tab with your finger As the clip releases lift the bottom of the modbus rou...

Page 26: ...plate to the rear panel of the modbus router 3 Remove the DIN mounting plate Store the DIN mounting plate and provided screws for later use 4 Remove the screws securing on the top and bottom of the device 5 Align the wall mounting plates on the rear side The screw holes on the device and the mounting plates must be aligned see the following illustration 6 Secure the wall mount plates with the prov...

Page 27: ...must accommodate wall sinks in addition to the screws To mount the wall plate use screws of the size shown in the following illustration Figure 2 5 Wall Mounting Screw Dimensions 10 Align the wall mount plate over the screws on the wall 11 Install the wall mount plate on the screws and slide it forward to lock in place see the following figure Figure 2 6 Wall Mount Installation 12 Once the device ...

Page 28: ...g may be used to provide further protection Figure 2 7 Ethernet Plug Connector Pin Position Maximum cable length 100 meters 328 ft for 10 100BaseT 2 5 Serial Connection EKI 122xR CE Series provides eight ports DB9 male connectors RS 232 422 485 pin assignments as below Figure 2 8 DB 9 Pin Position Straight thru Cable Wiring Cross over Cable Wiring Pin 1 Pin 1 Pin 1 Pin 3 Pin 2 Pin 2 Pin 2 Pin 6 Pi...

Page 29: ...wer loss EKI 122xR CE Series support 12 to 48 VDC Dual power inputs are supported and allow you to connect a backup power source Figure 2 9 Power Wiring for EKI 122xR CE Series Warning Power down and disconnect the power cord before servicing or wiring the modbus router Caution Do not disconnect modules or cabling unless the power is first switched off The device only supports the voltage outlined...

Page 30: ...s for more effective management and servicing 2 6 3 Grounding the Device Note Routing communications and power wiring through the same conduit may cause signal interference To avoid interference and signal degradation route power and communications wires through separate conduits Caution Do not disconnect modules or cabling unless the power is first switched off The device only supports the voltag...

Page 31: ...tact The terminal receptor includes a total of six pins two for PWR1 two for PWR2 and two for a fault circuit 2 6 5 Wiring the Power Inputs Note Before applying power to the grounded modbus router it is advisable to use a volt meter to ensure there is no voltage difference between the power supply s negative output terminal and the grounding point on the modbus router PWR2 P Fail DC12 48V PWR1 V2 ...

Page 32: ...the screws securing terminal block to the terminal block receptor 2 Remove the terminal block from the modbus router Figure 2 13 Removing a Terminal Block 3 Insert a small flat bladed screwdriver in the V1 V1 wire clamp screws and loosen the screws 4 Insert the negative positive DC wires into the V V terminals of PW1 If setting up power redundancy connect PW2 in the same manner 5 Tighten the wire ...

Page 33: ...e terminal block to secure it to the terminal block receptor If there is no gap between the terminal block and the terminal receptor the terminal block is seated correctly Figure 2 15 Securing a Terminal Block to a Receptor 2 7 Default Button Reset configuration to factory default Press and hold the Default button for 10 seconds System reboot Press the Default button Note Do NOT power off the modb...

Page 34: ...EKI 122xR CE Series User Manual 23 ...

Page 35: ...Chapter 3 3Configuration ...

Page 36: ...ct and configure the local and remote Advantech modbus routers easily The utility provides access to the following functions Configure the network settings you can set the IP address Gateway address and Subnet mask 3 2 Installing the Configuration Utility 1 Insert the Advantech EKI Device Configuration Utility CD ROM into the CD ROM drive whereas E is the drive name of your CD ROM on the host PC 2...

Page 37: ... press I Agree to continue or Cancel to stop the installation Figure 3 2 InstallShield Wizard 2 of 4 The InstallShield continues and a status screen displays The default installation path is C Program Files EKI Device Configuration Utility Figure 3 3 InstallShield Wizard 3 of 4 ...

Page 38: ...User Manual 27 6 Once the installation of the package is finished a Configuration Utility Setup screen displays Click Finish to conclude the process and exit the InstallShield Wizard Figure 3 4 InstallShield Wizard 4 of 4 ...

Page 39: ...ew No Item Description 1 Menu Bar Displays File View Management Tools and Help 2 Quick Tool Bar Useful management functions shortcuts 3 Device List Area Available devices are listed in this area Devices and COM ports can be organized or grouped in this area 4 Information Panel Click on the devices or move cursor to the devices the related information is shown in this area 5 Status Bar Displays the...

Page 40: ...s for modbus router product Clear Device List and Search Again Click to clear listed modbus routers in the Device List Area and initiate a new search A continuous click of the icon results in the following message Please do not refresh so frequently Search Again Click to search for modbus routers on the local LAN Add IP Address to Favorite Click to include the selected IP Address into the Favor it...

Page 41: ...eck box to activate the AdvLogMessage form The Form Log message displays Save Log to File Check the check box to save log to file Browse If the Save Log to File option is enabled click Browse to select a file to save log data Language Settings Interface Language Click the drop down menu to select an interface language Tradi tional Chinese Simplified Chinese or English NOTE A restart is required fo...

Page 42: ...y the time to auto detection time 1 means disable auto detection Auto detect devices every X second Enter a value to specify the time to auto detect devices Check device alive every X second Enter a value to specify the time to check device alive Mark device as lost con tact after retry for X times Enter a value to specify the time to mark device as lost contact Unsigned Hardware Installation Auto...

Page 43: ...name to show the features of the spe cific device Click on the before the model name and the utility will expand the tree structure to show the individual device name Click on the before the model name and the utility will collapse the tree structure Figure 3 9 Open View of Device Configuration Utility In the previous figure the EKI modbus router is listed as EKI 1224R CE B12D1B Select the device ...

Page 44: ... and connected host IP Figure 3 10 Selecting a Group Click on the before the device name and the utility will expand the interfaces on this modbus router Figure 3 11 Selecting a Device Click on each item to enter the configuration page to change the setting The configu ration will be introduced on following sections Figure 3 12 Viewing Basic Settings ...

Page 45: ...figuration utility to allow it to a device over a network connection Click on the before the model name e g EKI 1222 to expand the device s sub menu listing Click on the before the device name and the utility expands the interfaces on the modbus router Select the Ethernet interface Eth2 to view the settings and modify them Figure 3 13 Utility Overview ...

Page 46: ... Overview Item Description Static IP User defined IP address Subnet Mask and Default Gateway DHCP DHCP Server assigned IP address Subnet Mask and Default Gateway Note When you have finished the configuration of these settings for each cat egory please press the Apply button in order to make these settings effective on the modbus router ...

Page 47: ...t Device to reboot the modbus router Any configuration changes you have made since the last time you saved will be lost To reset the device 1 Right click a desired device to display the settings menu 2 Select Reset Device Figure 3 15 Reset Device ...

Page 48: ...tification of a spe cific device is possible through the Locate function To locate the modbus router 1 From the device list frame locate the desired device and right click on it to dis play the settings menu 2 Select Locate from the menu Figure 3 16 Locate the Modbus Router The unit s Status LED solid amber and the buzzer beep until you click Stop Locate ...

Page 49: ...ttings The confirm message will display after clicking Restore to Factory Default Set tings If you really want to restore the modbus router to factory default settings click Yes button to continue Power off the modbus router within ten seconds After reconnecting the power all settings will be reset to the factory default If the power supply remains connected for more than ten seconds the modbus ro...

Page 50: ... new configuration settings to flash memory Once a new setting is changed you can use the Save function to accept the changes You must then reset the device to save the settings to flash memory To reset the device 1 Right click a desired device to display the settings menu 2 Select Reset Device Figure 3 18 Reset Device The device resets Once the process is complete the modbus router displays under...

Page 51: ...Chapter 4 4Managing Modbus Router ...

Page 52: ...s device Once the IP is entered you will be pre sented with the following windows 4 2 Accessing the Web Page 4 2 1 Accessing the Web Page via Configuration Utility To access the web page via configuration utility 1 Select ETH2 under the desired device 2 Click Launch Browser Figure 4 1 Accessing the Web Page via Configuration Utility Note Before using the web based configuration make sure your host...

Page 53: ...in interface displays 4 2 3 Changing Default Password In keeping with good management and security practices it is recommended that you change the default password as soon as the device is functioning and setup correctly The following details indicate the necessary steps to change the default password To change the password 1 Navigate to System Management Administration 2 In the Password field typ...

Page 54: ...s page click Overview Figure 4 3 Overview The following table describes the items in the previous figure Item Description System Hostname Displays the host name of the device Model Displays the model name of the device Firmware Version Displays the current firmware version of the device Local Time Displays the current time Uptime Displays the accumulated time for continuous operation Network WAN S...

Page 55: ...nter a value to specify the start number of subscribers The default is 100 Limit Enter a value to specify the limited number of subscribers This functionality allows an Internet service provider ISP to limit the number of leases available to clients per household or connection The default is 150 Leasetime Set the valid time lease of IP address obtained by DHCP The default is 12 hours DNS Strict or...

Page 56: ...Address Setting mode static IP or DHCP client IPv4 Address Enter a value to specify the IP address of the interface The default is 192 168 0 1 IPv4 Netmask Enter a value to specify the IP subnet mask for the interface The default is 255 255 255 0 IPv4 Gateway Enter a value to specify the default gateway for the interface The default is 192 168 0 254 Custom DNS Server 1 Enter a value to specify the...

Page 57: ...describes the items in the previous figure Item Description PPTP Passthrough Click the radio button to enable the PPTP passthrough function L2TP Passthrough Click the radio button to enable the L2TP passthrough function IPSec Passthrough Click the radio button to enable the IPSec passthrough function Apply Click Apply to save the values and update the screen Item Description Listen Port for Slave ...

Page 58: ...rop down menu to select a value to specify the baud rate The value should conform to the current transmission speeds of connected devices when setting the baud rate Parity Click the drop down menu to select the parity None Odd Even Mark or Space Data Bits Click the drop down menu to select the data bits 5 6 7 or 8 Stop Bits Click the drop down menu to select the stop bits 1 1 5 or 2 Flow Control C...

Page 59: ...lave Timeout ms Specify the time duration in milliseconds for the EKI 122xR CE Series to wait for a response after it has issued a command while using Modbus RTU or Modbus ASCII After the timeout is expired and no response is received the EKI 122xR CE Series will regard the command as failed Note that the timeout for the host PC must be greater than the timeout setting here specified otherwise an ...

Page 60: ...ort Enter a value to import or export certificate CRL Remote IP Address Enter a value to specify a remote IP address Remote Subnet Enter a value to specify a remote subnet Remote Subnet Mask Enter a value to specify a remote subnet mask Server Network Enter a value to specify a server netmask Server Netmask Enter a value to specify a server network Redirect Gateway Check the box to initiate the re...

Page 61: ...key file which you can use for every authentication mode CA Certificate Click Browse to select the CA certificate file which you can use for the username password and X 509 Certificate authentication modes DH Parameters Click Browse to select the DH parameter file e which you can use for X 509 Certificate authentication in the server mode Local Certificate Click Browse to select the local certific...

Page 62: ... The following table describes the items in the previous figure 4 10 2 DMZ To access this page click Port Forward DMZ Figure 4 14 Port Forward DMZ The following table describes the items in the previous figure Item Description Add Click Add to add a new filter rule Apply Click Apply to save the values and update the screen Item Description Add Click Add to add a new port forwarding setting Apply C...

Page 63: ...Settings The following table describes the items in the previous figure IP Enter a value to specify the IP address of the DMZ Apply Click Apply to save the values and update the screen Item Description Item Description QoS Click the radio button to enable the QoS function Download Speed kbit s Enter a value to specify the download speed The default speed is 8291 kbit s Upload Speed kbit s Enter a ...

Page 64: ...he items in the previous figure 4 11 3 QoS Protocol Base Rules The QoS Protocol Base Rule menu allows you to forward the device which works in tandem with signaling protocols to ensure end to end QoS To access this page click QoS QoS Protocol Base Rules Figure 4 17 QoS QoS Protocol Base Rules The following table describes the items in the previous figure Item Description Add Click Add to add a new...

Page 65: ...ed recently Static routes are private routers unless they are redistributed by a routing protocol 4 12 1 Static IPv4 Routes To access this page click Static Routes Static IPv4 Routes Figure 4 18 Static Routes Static IPv4 Routes The following table describes the items in the previous figure Item Description Add Click Add to add a new static IPv4 route Apply Click Apply to save the values and update...

Page 66: ...wer cycle Host names are composed of series of labels concatenated with periods Each label must be between 1 and 63 characters long maximum of 64 characters Ping Click Ping to display the ping reply format IP Address or Hostname Enter the IP address or host name of the station to traceroute The initial value is blank The IP Address or host name you enter is not retained across a power cycle Host n...

Page 67: ...tus Status contains Routes and Syslog 4 14 1 Routes To access this page click Status Routes Figure 4 20 Status Routes 4 14 2 Syslog Users can check the history in the Syslog page To access this page click Status Syslog Figure 4 21 Status Syslog ...

Page 68: ...t Reboot to save the updates 4 15 2 Backup Flash Firmware To access this page click Management Backup Flash Firmware Figure 4 23 Management Backup Flash Firmware The following table describes the items in the previous figure Item Description Password Enter the character set to define a password Confirmation Retype the password entry to confirm the profile password Submit Click Submit to save the v...

Page 69: ...onize the time on the device with the local PC Hostname Enter the device name up to 31 alphanumeric characters Timezone Click the drop down menu to select a system time zone NTP Setting NTP Click the radio button to enable or disable the NTP Provide NTP Server Click the radio button to enable or disable the provide the NTP server NTP Server Candidates Enter the address of the NTP server This is a ...

Page 70: ...15 4 Reboot Device To access this page click Management Reboot Device Click Reboot to reboot the modbus router Any configuration changes you have made since the last time you issued a save will be lost Figure 4 25 Management Reboot Device ...

Page 71: ...ations are subject to change without notice No part of this publication may be reproduced in any form or by any means electronic photocopying recording or otherwise without prior written permission of the publisher All brand and product names are trademarks or registered trademarks of their respective companies Advantech Co Ltd 2018 ...

Reviews: