ACP-1320BP User Manual
16
3.3
Replacing the power supply
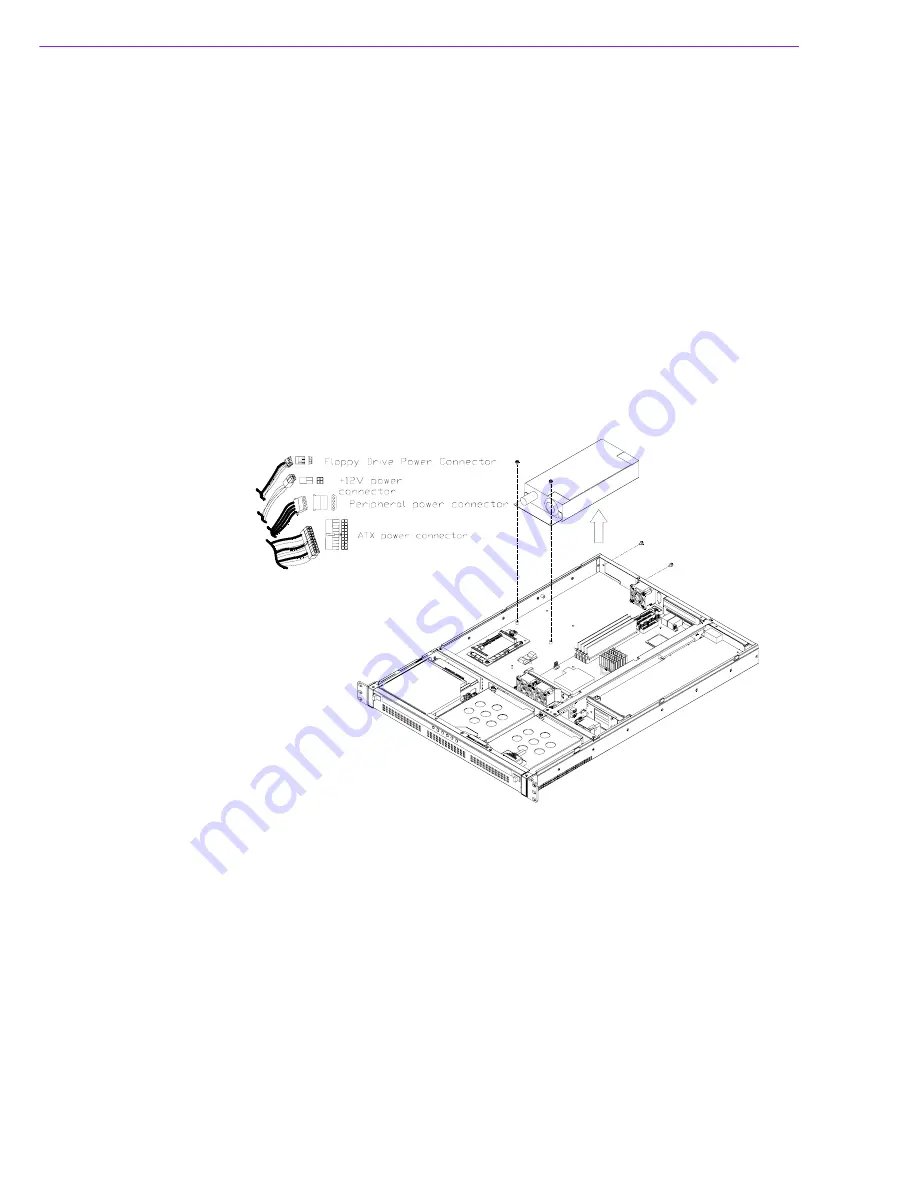
ACP-1320BP supports a single 1U-high power supply. To change the power supply,
refer to Figure 3.4 and proceed as follows:
1.
Un-plug the AC inlet from the power supply of ACP-1320BP.
2.
Remove the top cover of ACP-1320BP.
3.
Unplug the ATX power connector and +12V power connector from the CPU
card, and the peripheral power connector(s) from the drive disk(s).
4.
Remove the two screws, which mount the power supply bracket to the chassis,
and the other two screws, which mount the fan bracket on the chassis, then lift
the power supply.
5.
Place a new power supply into the chassis and fasten it with the four screws.
6.
Plug the ATX power connector and +12V power connector to the CPU card, and
the peripheral power connector(s) to the proper drive disks.
7.
Return the cover of ACP-1320BP and plug in the AC inlet.
Figure 3.4 Changing the power supply
Summary of Contents for ACP-1320BP
Page 1: ...User Manual ACP 1320BP 1U high Rackmount IPC Chassis with Dual SATA Storage Trays...
Page 10: ...ACP 1320BP User Manual x...
Page 13: ...Chapter 1 1 General Information...
Page 16: ...ACP 1320BP User Manual 4 1 5 Dimensions of ACP 1320BP Figure 1 1 Dimensions of ACP 1320BP...
Page 17: ...Chapter 2 2 System Setup...
Page 23: ...Chapter 3 3 Operation...
Page 29: ...Chapter 4 4 Alarm Board...
Page 34: ...ACP 1320BP User Manual 22...
Page 35: ...Appendix A A Exploded Diagram...
Page 37: ...Appendix B B Backplane Options...
Page 39: ...27 ACP 1320BP User Manual Appendix B Backplane Options...


