background image

Customer Service 1-888-707-1880                 9              Maurice Pincoffs Canada Inc.

©

2010 


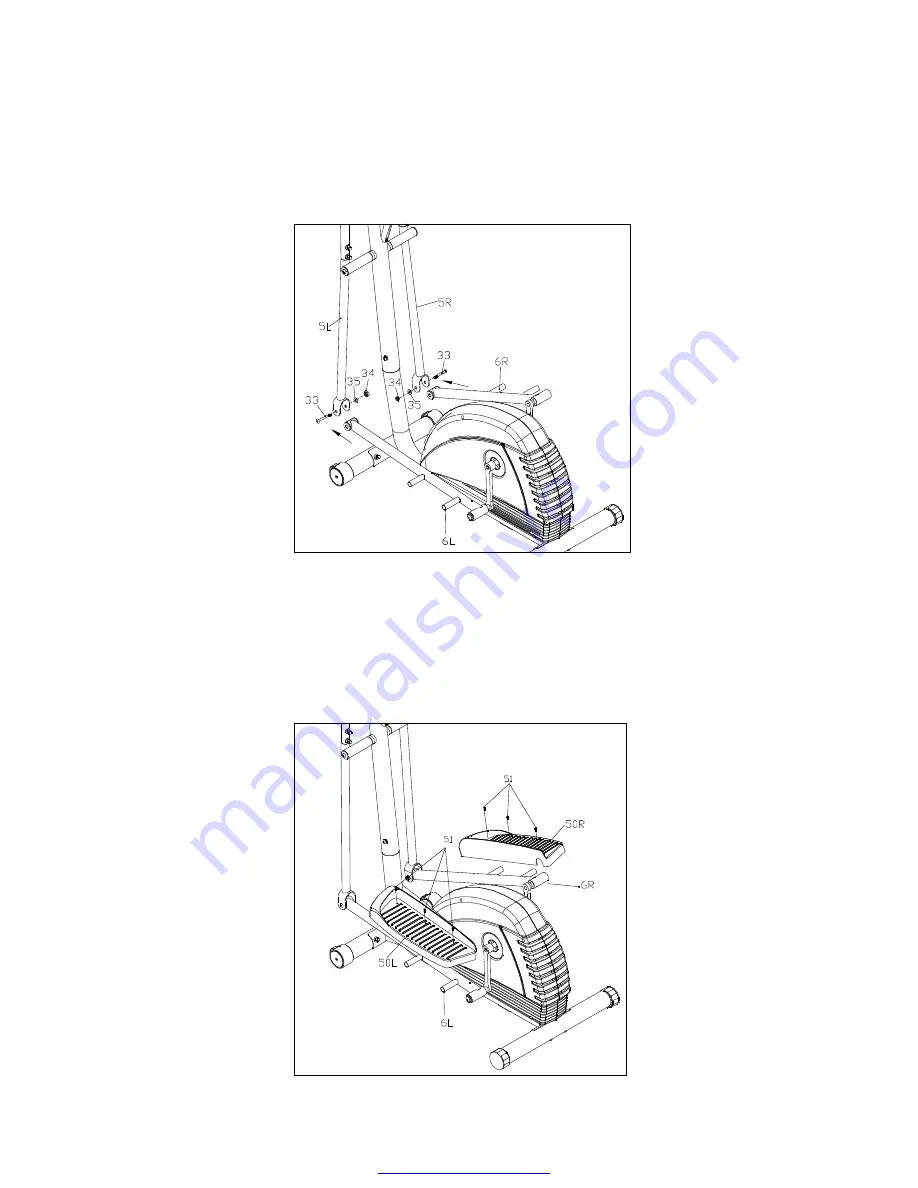
STEP 7 

1. Attach the left foot pedal tube 

(6L) 

to the U bracket of left lower handlebar 

(5L).  

Secure with one 

allen head bolt 

(33)

, one flat washer 

(35) 

and one nylon nut 

(34)

.  

2. Repeat for the right foot pedal tube 

(6R). 


STEP8 


1. Attach the left foot pedal 

(50L) 

to the welded reinforced tube of left pedal tube 

(6L).  

Secure with 

three machine screws 

(51)

2. Repeat for the right foot pedal 

(50R). 


PDF created with pdfFactory trial version 

www.softwarelabs.com

Summary of Contents for 16117100

Page 1: ...cise Parts Warranty CAUTION You must read and understand this owner s manual before operating unit RETAIN FOR FUTURE REFERENCE MAURICE PINCOFFS CANADA INC 6050 DON MURIE STREET NIAGARA FALLS ONTARIO L2E 6X8 PDF created with pdfFactory trial version www softwarelabs com ...

Page 2: ...bility for consequential damages are hereby excluded REPAIR PARTS AND SERVICE All of the parts for the elliptical shown in figure can be ordered from Maurice Pincoffs Canada Inc 6050 DON MURIE STREET NIAGARA FALLS ONTARIO L2E 6X8 When ordering parts the parts will be sent and billed at the current prices Prices may be subject to change without notice Check or money order must accompany all orders ...

Page 3: ...ipment mat to prevent the unit from moving while it is being used which could possibly scratch or damage the surface of your floor 6 No changes must be made which might compromise the safety of the equipment 7 It is recommended to have a minimum of 2 safe clearance around the exercise equipment while in use 8 Keep children and pets away from this equipment at all times while exercising 9 Warm up 5...

Page 4: ...frame 1 2 Upright 1 3 Stationary handlebar 1 4 L R Upper handlebar left right 1PR 5L R Lower handlebar left right 1PR 6L R Foot pedal tube left right 1PR 9 Front stabilizer 1 10 Rear stabilizer 1 11 Computer 1 30 Tension control set 1 50L R Foot pedal left right 1PR PDF created with pdfFactory trial version www softwarelabs com ...

Page 5: ...en head bolt 2 M10 34 Nylon nut 2 M10 35 Flat washer 2 Φ19 xΦ10x1 0mm 54 Tooth washer 2 M10 37 Right flange nut Black 1 38 Left flange nut Brass 1 52 Crank arm cover 2 25 Curve sleeve 2 51 Machine screw M5x15mm 6 M5x15mm 31 Round bolt M5X15mm 1 M5X15mm 29 Hex head bolt 4 M6X35mm 76 Allen wrench 1 6mm 77 Universal wrench 1 78 Socket wrench 1 Above described parts are all the parts you need to assem...

Page 6: ... Attach the front stabilizer 9 with two transportation wheels 39 to the front welded curved bracket of the main frame 1 Secure with two carriage bolts 45 two curved washers 20 two spring washers 19 and two cap nuts 46 2 Attach the rear stabilizer 10 with two leveling caps 69 to the rear welded curved bracket of the main frame 1 Secure with two carriage bolts 45 two curved washers 20 two spring was...

Page 7: ... upright 2 NOTE Please do not tighten the allen head bolts until you have all of the bolts attached to the upright When all bolts have been attached to the upright you can firmly tightened the bolts NOTE it is necessary to insert the wires into the main frame once you have attached the wires Be careful not to pinch the wires when you tighten all bolts STEP 4 1 Attach the left upper handlebar 4L to...

Page 8: ...the left crank arm 8L of the left foot pedal tube 6L to the left axle of the pulley 7 Secure with one anti slippery washer 54 one left flange nut 38 and one crank cover 52 NOTE Ensure that the nut is securely tightened 2 Repeat for the right crank arm 8R NOTE The thread on the right side of the pivot shaft 7 is right thread Please use enclosed tools 76 78 to tighten it with clockwise The thread on...

Page 9: ...ar 5L Secure with one allen head bolt 33 one flat washer 35 and one nylon nut 34 2 Repeat for the right foot pedal tube 6R STEP8 1 Attach the left foot pedal 50L to the welded reinforced tube of left pedal tube 6L Secure with three machine screws 51 2 Repeat for the right foot pedal 50R PDF created with pdfFactory trial version www softwarelabs com ...

Page 10: ...stationary handlebar 3 to the upright 2 Secure with three curve washers 20 three spring washers 19 and three allen head bolts 18 STEP 10 1 Connect the extension sensor wire 36 to the wire from the back of the computer 11 2 Connect the hand pulse wire 21 to the wire from the back of the computer 11 3 Attach the computer 11 to the computer bracket of the upright 2 Secure with four screws 12 which ar...

Page 11: ...o 999 cal Note This is a rough guide used for comparison of different exercise sessions which cannot be used for medical purposes Gripped pulse The monitor will display the user s current heart rate in beats per minute during the workout Both hands must hold the gripped pulse for a heart rate reading during your workout Remarks 1 Monitor requires two AA batteries 2 The monitor will turn on automat...

Page 12: ... 1710016 End cap 2 17 1710017 Machine screw M4x15mm 2 18 1710018 Allen head bolt M8x20mm 11 19 1710019 Spring washer M8 15 20 1710020 Curve washer M8 11 21 1710021 Hand pulse wire 1 22 1710022 Washer Φ32xΦ8 4x2 0t 4 23 1710023 Pivot shaft bushing Φ19 4 24 1710024 Washer Φ32xΦ19x0 5t 2 25 1710025 Curve sleeve Φ32φ19x13 5H 2 26 1710026 Cap nut M6 4 27 1710027 Spring washer M6 4 28 1710028 Curve wash...

Page 13: ...19 2 56 1710056 Adjustable washer Φ26xφ19 5x0 5mm 4 57 1710057 Bearing R12ZZ 2 58 1710058 Clip Φ42 2 59 1710059 Nut3 8 x26Wx9mm 3 60 1710060 Mag flywheel system w pivot shaft 1 61 1710061 Machine screw M4x12mm 2 62 1710062 Nut3 8 x26Wx7mm 1 63 1710063 Spring Φ19xφ2 5x85mm 1 64 1710064 Magnet Φ15 1 65 1710065 Drive belt J6 420 1 66 1710066 Sensor w wire 1 67 1710067 Machine screw M4x25mm 6 68L 1710...

Page 14: ...Customer Service 1 888 707 1880 14 Maurice Pincoffs Canada Inc 2010 EXPLODED DRAWING PDF created with pdfFactory trial version www softwarelabs com ...

Page 15: ... Securely plug tension control cable into the extension tension control cable No tension Magnetic wheel not working properly Replace magnetic wheel Pulse wire not connected not connected Securely plug wires into the back of the monitor Hand pulse defective Replace hand pulse grip or ear clip Heart rate not displaying Monitor not working properly Replace monitor Crank bearing defective Replace cran...

Page 16: ... oxygen uptake MVo2 This is often referred to as your aerobic capacity The effort that you can exert over a prolonged period of time is limited by your ability to deliver oxygen to the working muscles Regular vigorous exercise produces a training effect that can increase your aerobic capacity by as much as 20 to 30 An increased MVO2 indicates an increased ability of the heart to pump blood of the ...

Page 17: ...nd this is too easy you may want to increase it but it is better to lean on the conservative side As a rule of thumb the maximum heart rate is 220 minus your age As you increase in age so your heart like other muscles loses some of its efficiency Some of its natural loss is won back as fitness improves The following table is a guide to those who are starting fitness Age 25 30 35 40 45 50 55 60 65 ...

Page 18: ...that you are on the correct program is a very slight soreness in most major muscle groups This is quite normal and will disappear in a matter of days If you experience major discomfort you may be on a program that is too advanced or you have increased your program too rapidly If you experience PAIN during or after exercise your body is telling your something Stop exercising and consult your doctor...

Page 19: ...etch up the left side of your neck Next rotate for one count Then lift your left shoulder your head back for one count stretching your chin to up for one count as you lower your right the ceiling and letting your mouth open Rotate your shoulder head to the left for one count and finally drop your head to your chest for one count SIDE STRETCHES QUADRICEPS STRETCH Open your arms to the side and cont...

Page 20: ... counts can and hold for 15 counts HAMSTRING STRETCHES CALF ACHILLES STRETCH Sit with your right leg extended Rest the sole of Lean against a wall with your left leg in front your left foot against your right inner thigh Stretch of the right and your arms forward Keep toward your toe as far as possible Hold for 15 counts your right leg straight and the left foot on the Relax and then repeat with l...

Reviews: